Chargebee allows you to tailor the PDFs of invoices, credit notes and quotes sent to your customers.
Navigate to Settings > Configure Chargebee > Invoices, credit notes and quotes to access this feature.
At any time while making changes, you may preview them by clicking on Preview invoice or Preview credit note on the left pane.
Once you have finished customizing and have previewed the changes, please click the Apply changes button at the top to save the changes.
The General Settings tab has options that apply to PDFs of invoices, credit notes and quotes.
If the address of your organization has been added to your profile, this section gives you a way to choose how it appears on the PDFs.
You may choose between the following:

For example, if you want just the name of your company and the email address to appear, you may type-in the Mail Merge fields as follows:
{{org.name}}
{{org.email}}
On clicking Apply, the result would look like this:

Restrictions on country selections
In accordance with Chargebee's Terms of Service, users certify that they will not use Chargebee's products or services in any manner that would result in Chargebee's non-compliance with applicable sanctions and export control laws.
Restrictions on certain parties
Absent an applicable government authorization, Chargebee is prohibited from conducting business with certain individuals and companies appearing on restricted party lists — including, but not limited to, the List of Specially Designated Nationals and Blocked Persons ("SDN List") published by the U.S. Office of Foreign Asset Control (OFAC)., the Foreign Sanctions Evaders List, the Sectoral Sanctions Identification List ("SSI List"), and the BIS Denied Persons List or Entity List (collectively, the "Restricted Party Lists").
In accordance with Chargebee's Terms of Service, users certify that they will not use Chargebee's products or services in any manner that would result in Chargebee's non-compliance with applicable sanctions and export control laws."
Additional information to be shown on your invoice/credit note/quote PDFs can be selected here. Enabling/disabling any of these would not affect the PDFs for any regenerated invoices; only the PDFs for newly created invoices/credit notes/quotes would carry the changes.
Customer ID and Subscription ID: when enabled, the customer and subscription IDs will be displayed.
Billing address and customer VAT number: when enabled, the billing address and customer VAT number (if applicable) will be displayed.
Shipping address: when enabled, the shipping address will be displayed.
Payments/Refunds: when enabled, any successful payment or refund details will be displayed on the PDFs of invoices or credit notes respectively.
This feature can be used to add a handwritten signature to invoice/credit note/quote PDFs. You may upload an image of the signature and add the name to be shown below it. This feature affects the PDFs for regenerated invoices also.
Click here to learn how to add a logo to your invoice.
This is a BETA feature. Contact support to enable this feature in your Test and Live sites.
This feature provides a powerful yet intuitive platform for creating customized invoice templates. It supports drag-and-drop functionality for easy design, including essential elements like text, images, custom HTML blocks, merge variables, and more. This allows for the creation of detailed and branded invoices, ensuring templates meet unique business requirements efficiently.
To Customize your invoice template, follow these steps:
Login to your Chargebee account.
Navigate to Settings > Configure Chargebee > Invoices, Credit Notes and Quotes > General Settings > Invoice Templates. Click Manage.

In the Invoice Templates screen, follow the Setup Guide to get started.

Customize the template as per your requirements.
Click Preview or Save. The saved template is kept in Draft mode for further modification.

Click Edit to modify the invoice template in the Draft mode.

Click Publish. Once the template is published you cannot edit that template.

In the Setup Guide, click Mark as ‘Done'.
Click Use this template, once the template is published. You can use the template for all your invoices and this template is marked with an IN USE status. Click Confirm.
Or
Click Duplicate as draft to create a duplicate template once the template is published. You cannot create duplicate templates from the Chargebee template.
Click Stop using this template to stop using the IN USE template. Your invoices will be generated using the old template builder.
Click Transfer to LIVE site to move the template from a Test site to a Live site. Click Proceed to transfer the template to the Live site.
Notes:
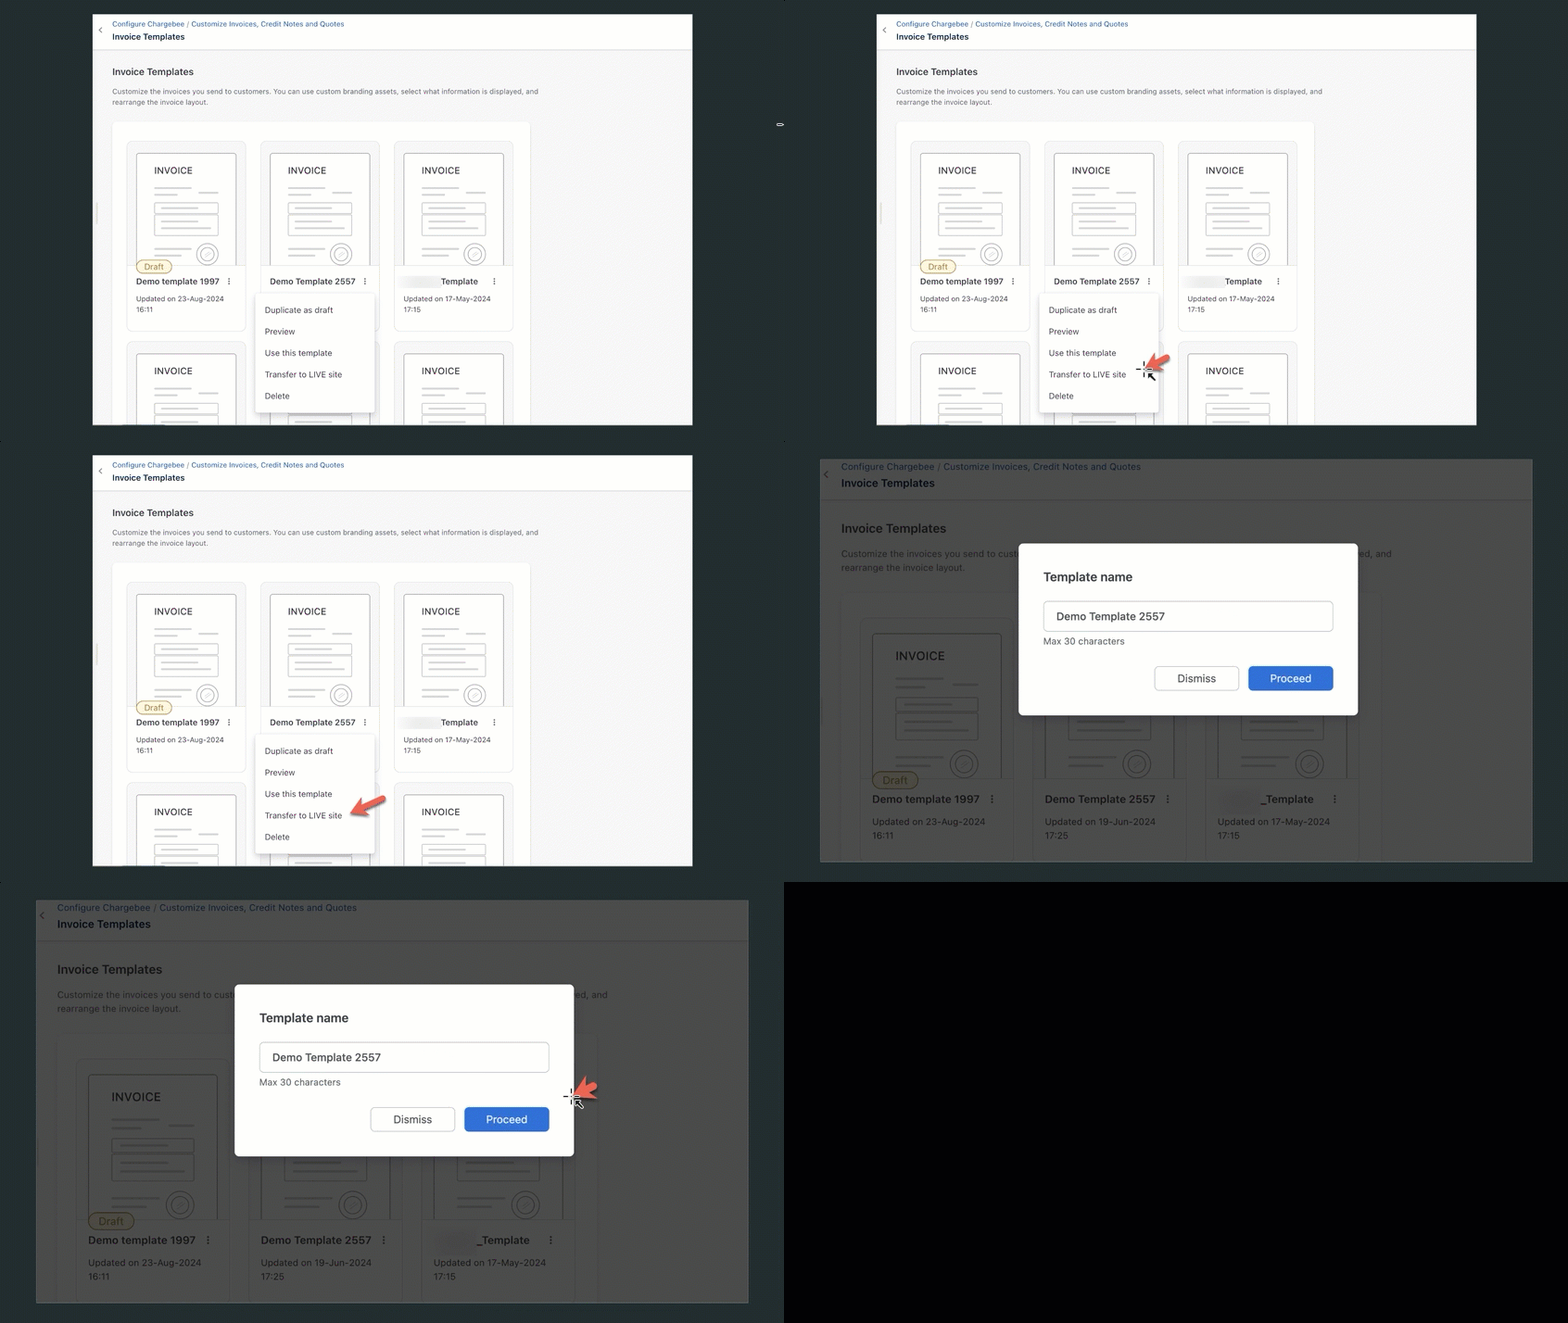
Click Delete to remove a drafted or published template. You cannot delete a Default template.
Note: You cannot delete the IN USE template and Chargebee template.

This section will talk about template customization through various editors, conditions, and more. You can use multiple content formatting options to customize your content like bold, italics, ordered list, unordered list, hyperlink, merge tags, smart text, and more.
The following are the template customization options:
Add Header
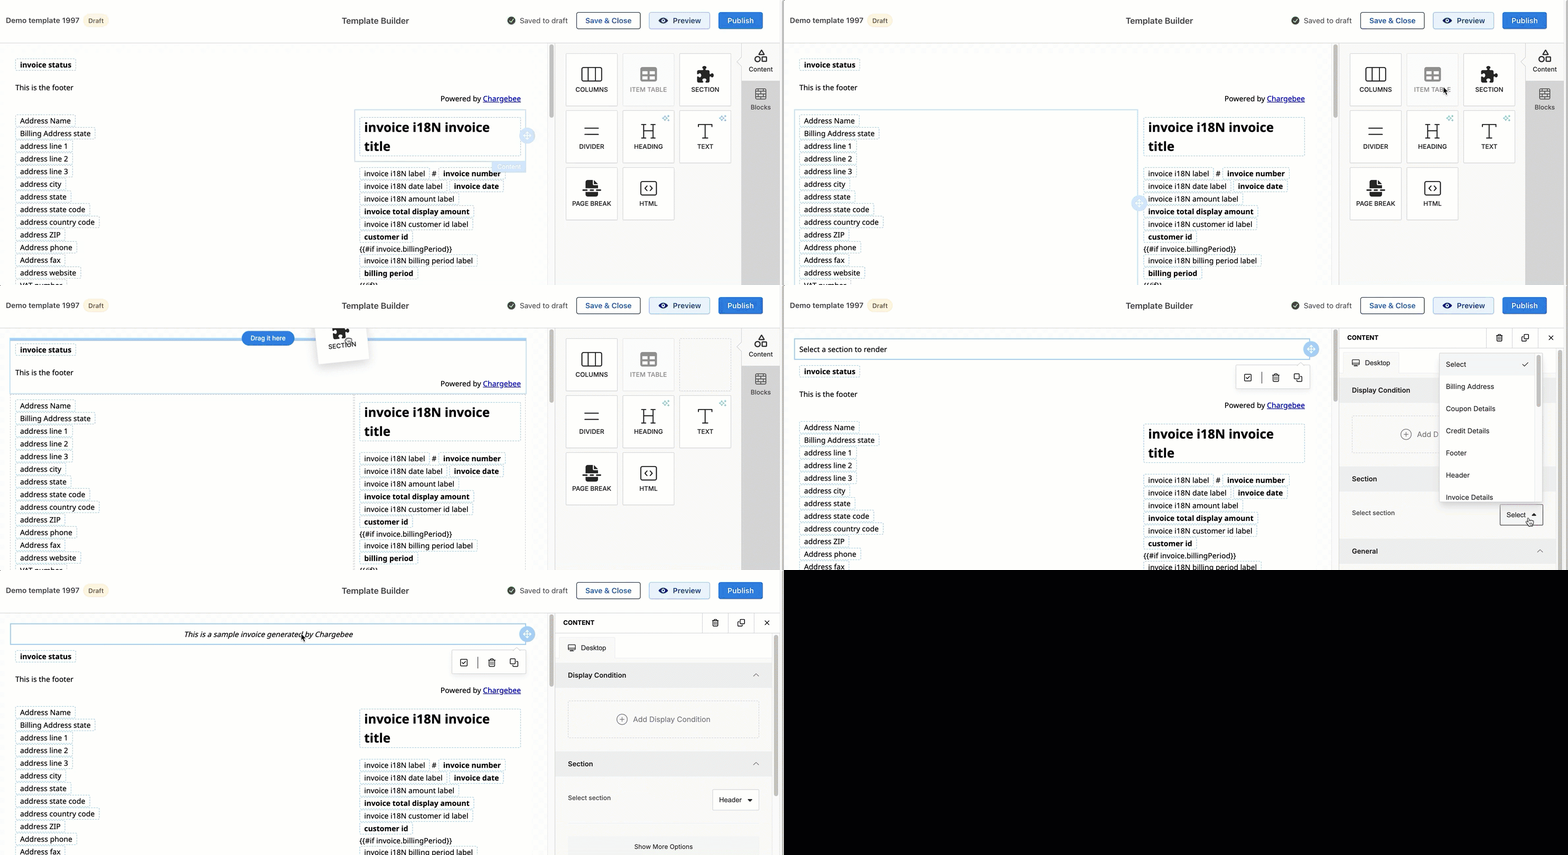
Add a header to your invoice by dragging the SECTION from the Content block and selecting Header from the dropdown. The header will be displayed at the top of every page, and you can drag and drop the header section to the top of your invoice.
Disable the toggle button under the Section to display the header on all pages of your invoice. By default, the Header toggle Display only on first page is enabled.
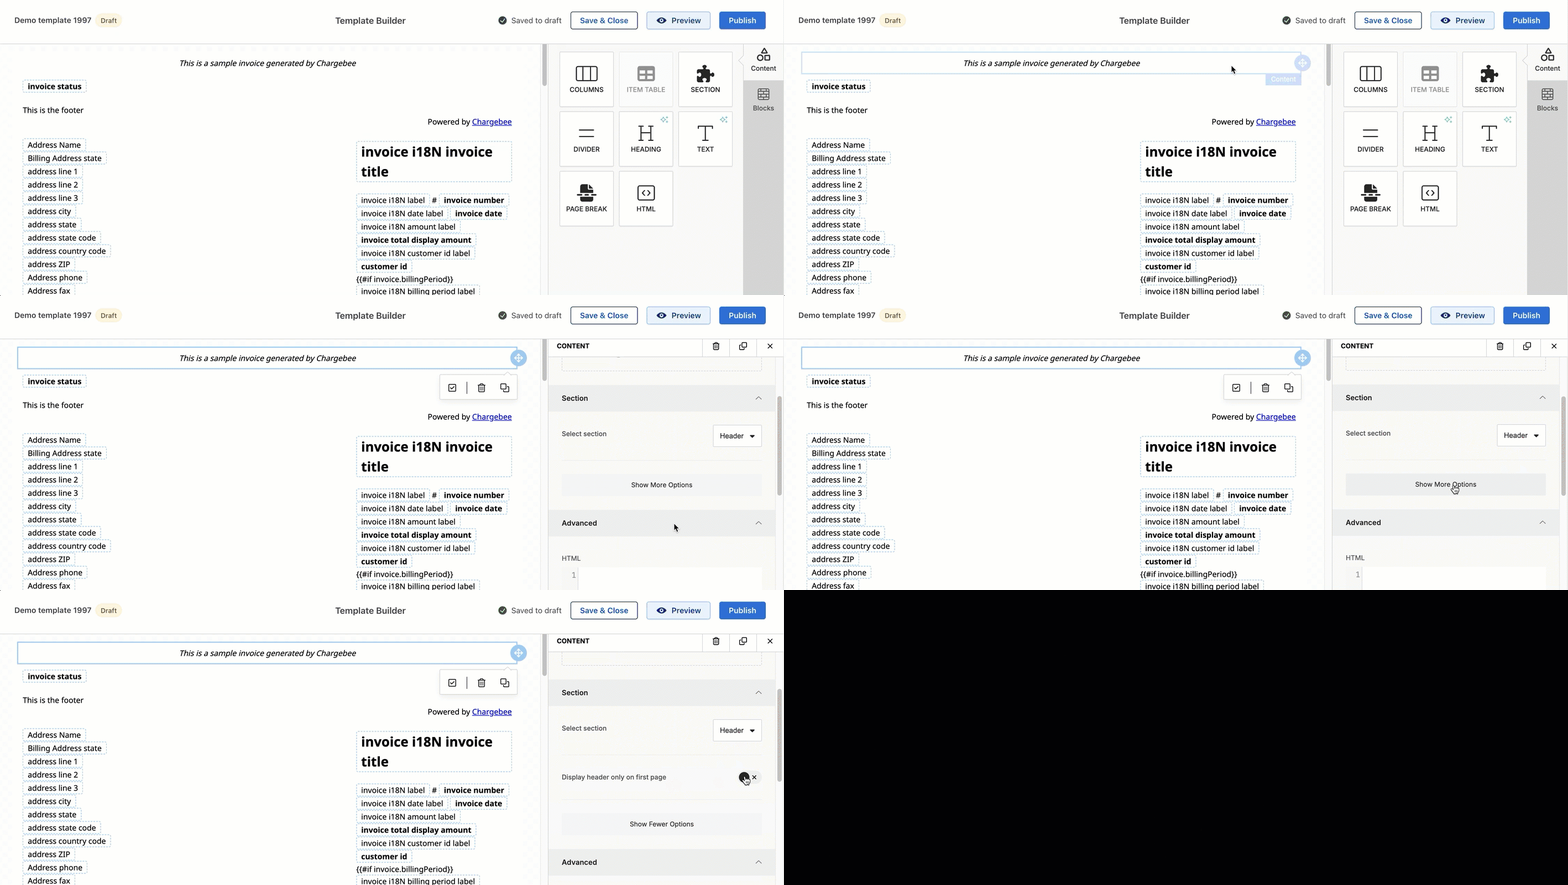
When the feature is enabled on your Test sites, the header contains the following text which cannot be removed: This is a sample invoice generated by Chargebee.

Add Text
Add custom text to your invoice using the TEXT block.

Add Heading
Define section titles using the HEADING feature.

Add Columns
Adjust the layout with COLUMNS to manage row width.

Add Divider
Use the DIVIDER to segment your invoice into clear sections.

Add Page Break
Use PAGE BREAK to control where a page ends and where a new page begins. However, the content before and after the page break can still cover more than one page, depending on the length of the content.

Add HTML
Embed custom HTML/CSS code with HTML blocks. Ensure to preview this HTML block before publishing the template.

Add Items Table
Organize charges, amounts, and taxes in the Items table.

Add Sections
Include various invoice components such as the Invoice block, Subscription block, Payments & Credits block, and more, in a visually intuitive manner for you to construct an invoice from scratch.

The fields within these sections are not editable. To modify fields, add an HTML block from the Content section, copy and paste the HTML code of the read-only Section Block into it, and then make field-level adjustments.
Add Links
Insert links to the invoice template for different purposes like Payment links for payment purposes.

Control Position
Adjust block positioning with the control position feature. You can re-position each block by dragging and dropping them.
Control Font and Font Size
Customize text appearance with font type, font size controls, and more.

Some fonts during PDF conversion have limitations, and we are currently determining which fonts will be compatible for selection from the UI dropdown.
Add Merge Variables
Include fields that already exist within the Chargebee like billing address, shipping address, subscription ID, Invoice status, and more using the Merge Tags option in the content format panel.

Operations supported on Merge Variables
For the merge variables use conditional statements to show the same template in multiple ways based on certain conditions like if, this, then, that, and more. This allows you to modify the template code.
Click on the Drag & Drop container, you will get the autogenerated code as follows:
{{invoice.hasAnyNote}}
{{invoice.hasAnyPaymentInstruction}}
{{invoice.transferDetails.hasBankTransferInstruction}}
{{invoice.hasAnyPayments}}
{{invoice.hasAnyCredits}}
Example of an if statement
If the invoice does have credits, it displays the word "CREDITS." This allows for the automatic acknowledgment of credits on an invoice when they are present.
{{#if invoice.hasAnyCredits}}
CREDITS
{{/if}}
Example of an if and else statement
If the total amount of the invoice exactly equals "0.00," it displays the message "Zero amount invoice." If the total amount is anything other than "0.00," it displays "Non-Zero invoice." This allows for customized messaging on invoices depending on whether or not there is an amount due.
{{#if (equals invoice.totalExactVal "0.00") }}
  Zero amount invoice
{{else}}
  Non-Zero invoice
{{/if}}
Example of each statement
This code snippet iterates over all subscriptions associated with an invoice and displays each subscription's ID. It lists every subscription ID on the invoice, one after the other.
{{#each invoice.subscriptions as |subscription|}}
{{subscription.id}}
{{/each}}
Add Custom Fields as Merge Variables
Include custom fields that are created by you and inserted into the template to show your customers using the Merge Tags option in the content format panel.

Update Date Format using Edit Merge Tag option
By default the invoice date merge tag will be of the format ‘MMM dd, yyyy' and the service period dates of charges table will be of the format 'MMM dd'.
To change the date format, select the respective section, click Edit merge tags option and edit the format of the date.

Add Page Number
You can add a page number only to a Header or Footer. Use the merge tag {{invoice.pageNumber}} inside the HTML editor. The format of the page number will be
The Roman numbers and special characters are not compatible with page numbering formats such as /, i, ii, iii, iv, and more.
Add Display Condition
Include the display condition for the content appearance on your invoice. You can add one display condition at a time.

Add Quality Text Content
You can use the Smart Text option in the content format panel powered by artificial intelligence to enhance the accuracy of your text content.

Add Footer
Add a footer to your invoice by dragging the SECTION from the Content block and selecting Footer from the dropdown. The footer will be displayed at the bottom of every page, and you can drag and drop the footer section to the top of your invoice.
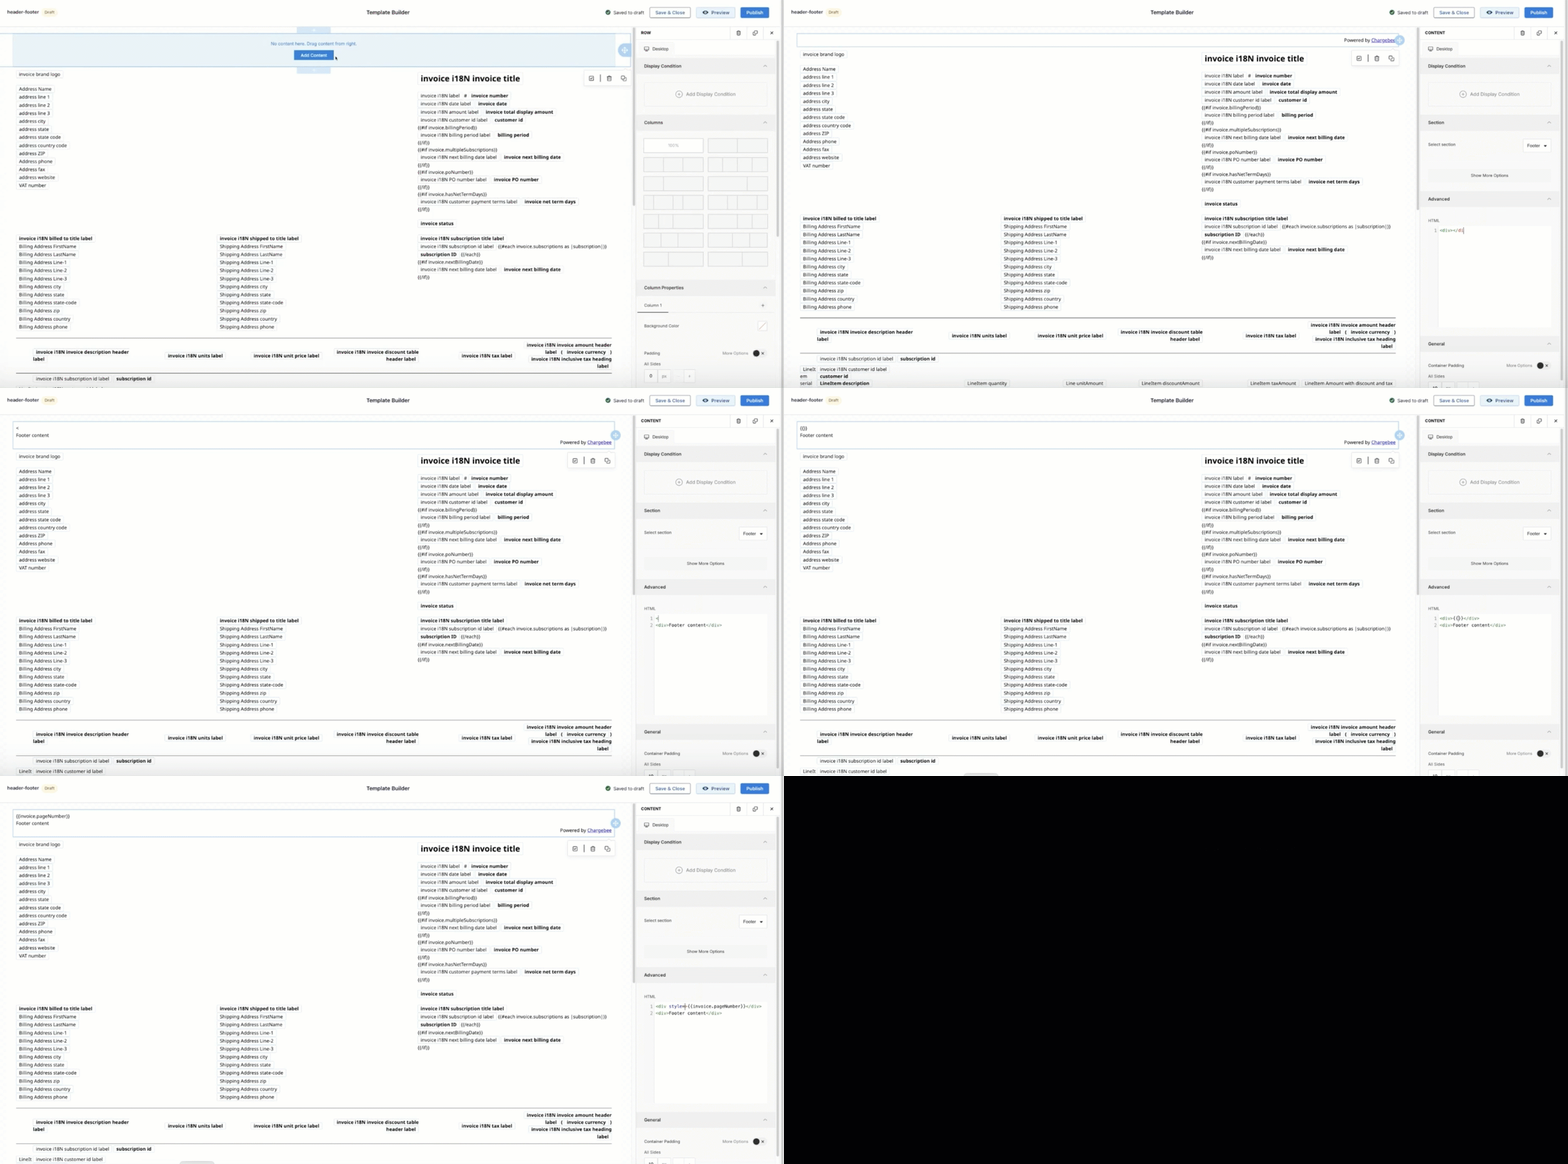
Disable the toggle button under the Section to display the footer on all pages of your invoice. By default, the Footer toggle Display only on first page is enabled.
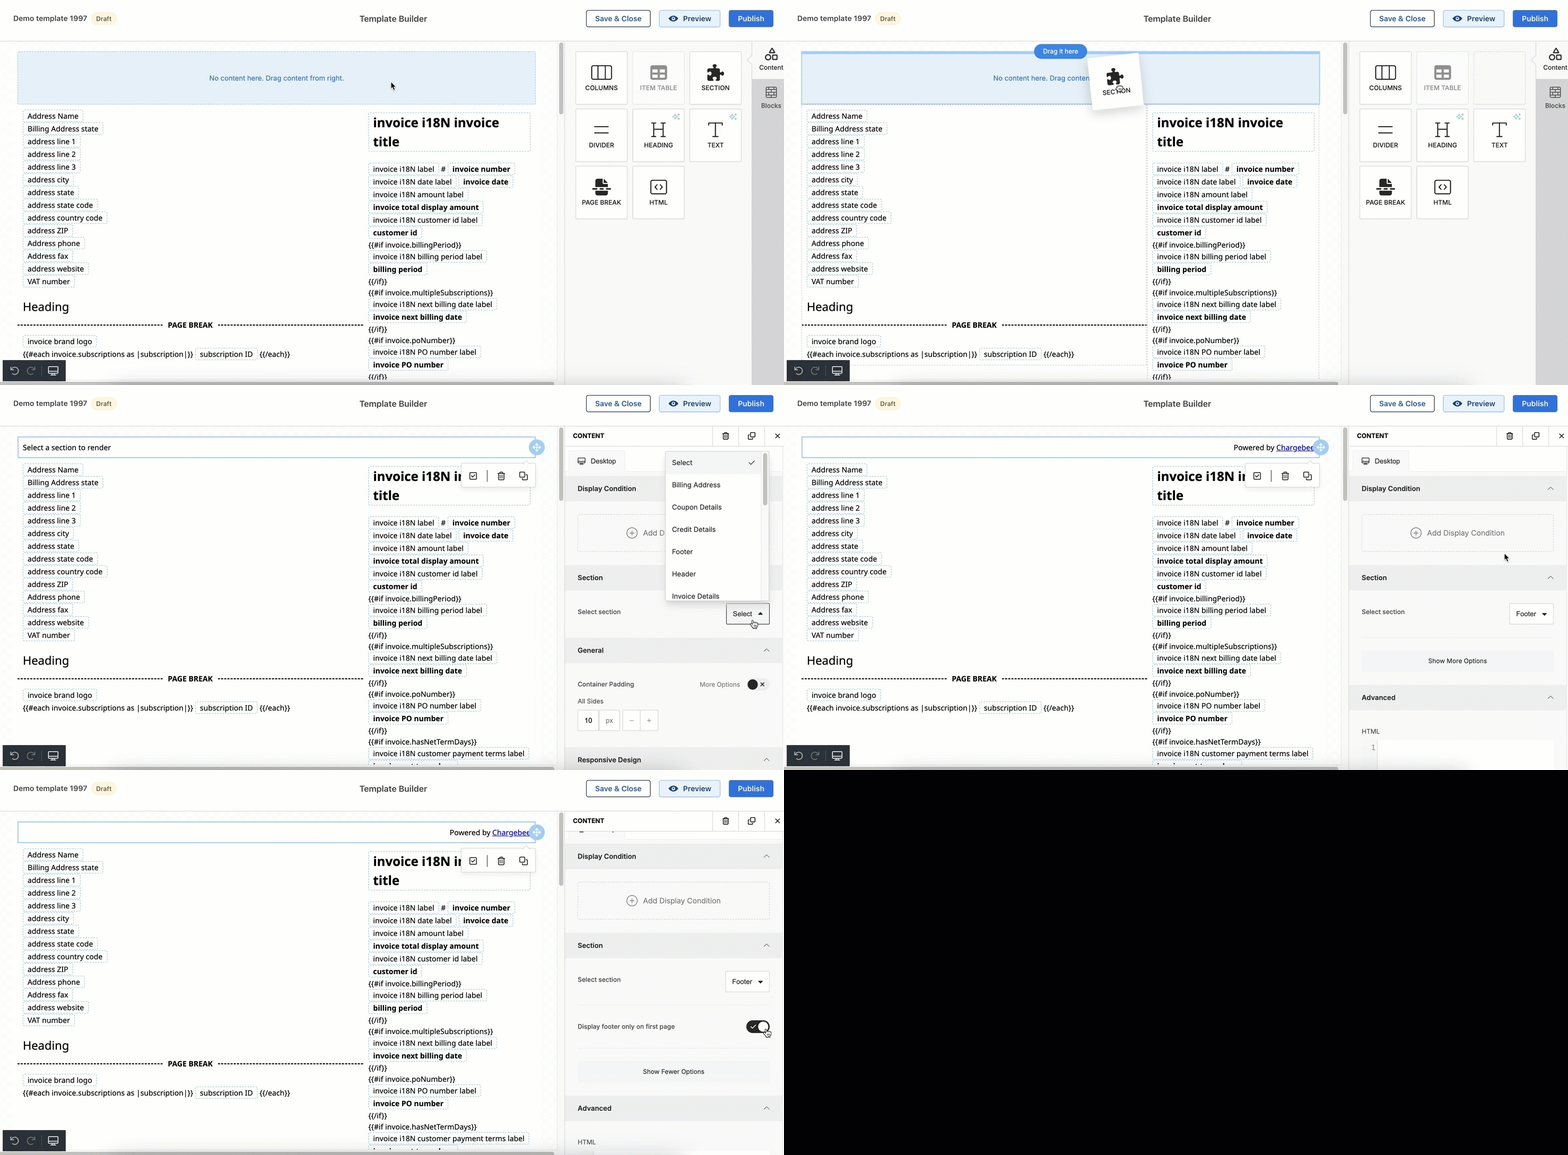
When the feature is enabled on your Test sites, the footer will contain the text Powered by Chargebee, which cannot be removed.

To preview the invoice template, follow the steps:
Click Preview, once your invoice template is saved as a draft. You can also preview the invoice after editing your saved invoice or before publishing your invoice refer to step 5.

In the Preview screen, select the Customer from the drop-down and select the Invoice ID that is associated with the customer. This feature will help you to preview your template for a specific invoice of a customer.

Enabling this option hides the ‘Units' and ‘Unit Price' columns in invoices/credit notes/quotes when the line items are not quantity-based.
If the invoices/credit notes/quotes have both quantity and non-quantity-based products/services, the quantity-related columns will be visible.

The Invoices tab gives you options specific to customizing the invoice PDFs for your customers.
If the invoice numbering customizations are left in the draft state, there is a possibility that those settings may no longer be feasible due to the risk of generating duplicate invoice numbers. Chargebee protects you from such conditions by warning you automatically and not allowing you to apply the changes till you fix them.
Additionally, the following information may be added:
Invoice status: Enabling this setting will show the invoice status.
Billing period: Adds the billing period(s) for the line items in the invoice. If the billing period is the same for all recurring line items, the period will be shown at the header level. If the billing periods of the line items differ, then the periods will be shown at the line-item level. Please note that this option is only applicable for recurring line items and not for one-time invoices.
Next billing date: Displays the next billing date. This option is also only applicable for recurring invoices and not for one-time invoices. Next billing date does not apply to subscriptions in Non-Renewing state.
Payment terms & Due date: If you have enabled Net-D, enabling this setting will display the payment terms and the invoice due date on the PDF for invoices that are posted.
Credit note number: When a credit note is created and applied on the invoice (both adjustment and refundable), the credit note number gets displayed on the invoice PDF along with the allocated credit amount or adjustments under Credits & Adjustments.
Custom fields: If you track additional information about a customer or their subscription using Custom Fields, then up to 3 of those can be displayed.
Here you can set generic notes that should be part of every upcoming PDF invoice. These notes will appear in the Notes section following other invoice notes that may have been set.
To access this information navigate to Settings > Configure Chargebee > Customize Invoices, Credit Notes and Quotes > Invoices
When offline payments are to be made by the customer (For example, using bank transfer/PayPal/ACH credit transfers), complete instructions for doing so can be shown on the PDF invoice using this feature. Payment instructions are not shown for Paid invoices; they are only shown for Payment Due, Not Paid and Posted invoices.
3 kinds of payment instructions can be configured:
While Bank Transfer and PayPal options are available by default as shown below, ACH Credit Transfer is made available only when applicable.

Since you may have different bank transfer particulars for different regions, any number of Bank Transfer type payment instructions can be added to the PDF invoice. For each such instruction, up to 9 fields can be added.

For PayPal instructions, a section title and description can be specified. Only one PayPal payment instruction may be configured for your site.

ACH Credit Transfer option shows up under Payment Instructions automatically when Stripe ACH credit transfer is enabled and is removed when Stripe ACH credit transfer is disabled.
Manual addition/removal of this payment instruction cannot be done. Only one ACH credit transfer payment instruction is configurable for your site.

When a customer has a Stripe virtual bank account, ACH credit transfer instruction (if enabled) is included in their PDF invoices. Whenever ACH credit transfer instruction is present, bank transfer instructions (if any) are not included in the PDF.
SEPA Credit Transfer option shows up under Payment Instructions automatically when Stripe SEPA credit transfer is enabled and is removed when Stripe SEPA credit transfer is disabled.
Manual addition/removal of this payment instruction cannot be done. Only one SEPA credit transfer payment instruction is configurable for your site.
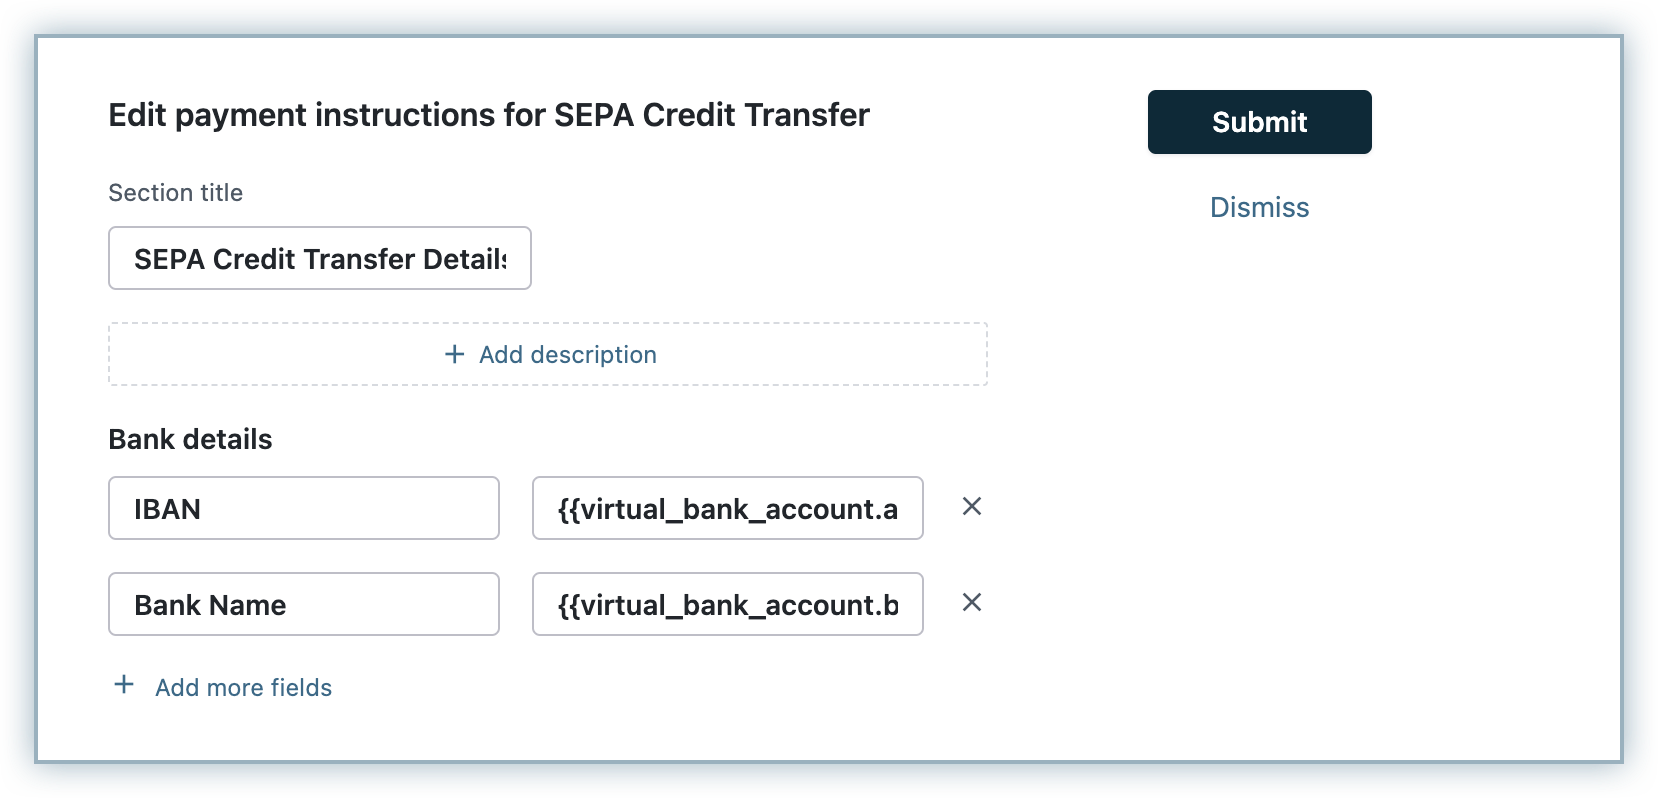
When a customer has a Stripe virtual bank account, SEPA credit transfer instruction (if enabled) is included in their PDF invoices. Whenever SEPA credit transfer instruction is present, bank transfer instructions (if any) are not included in the PDF.
Localization is supported for all the information fields under Payment Instructions. More details on configuring multiple languages for localization can be found here.
Whenever a payment instruction is added, it is crucial that any such information that may have been added via invoice notes, be removed. Since past invoices may already have such notes associated with them, Chargebee restricts adding new payment instructions to PDFs of regenerated invoices to avoid duplication. However, you may contact support if you would still like to remove this restriction for your site.
The Credit Notes tab gives you options specific to customizing credit note PDFs.
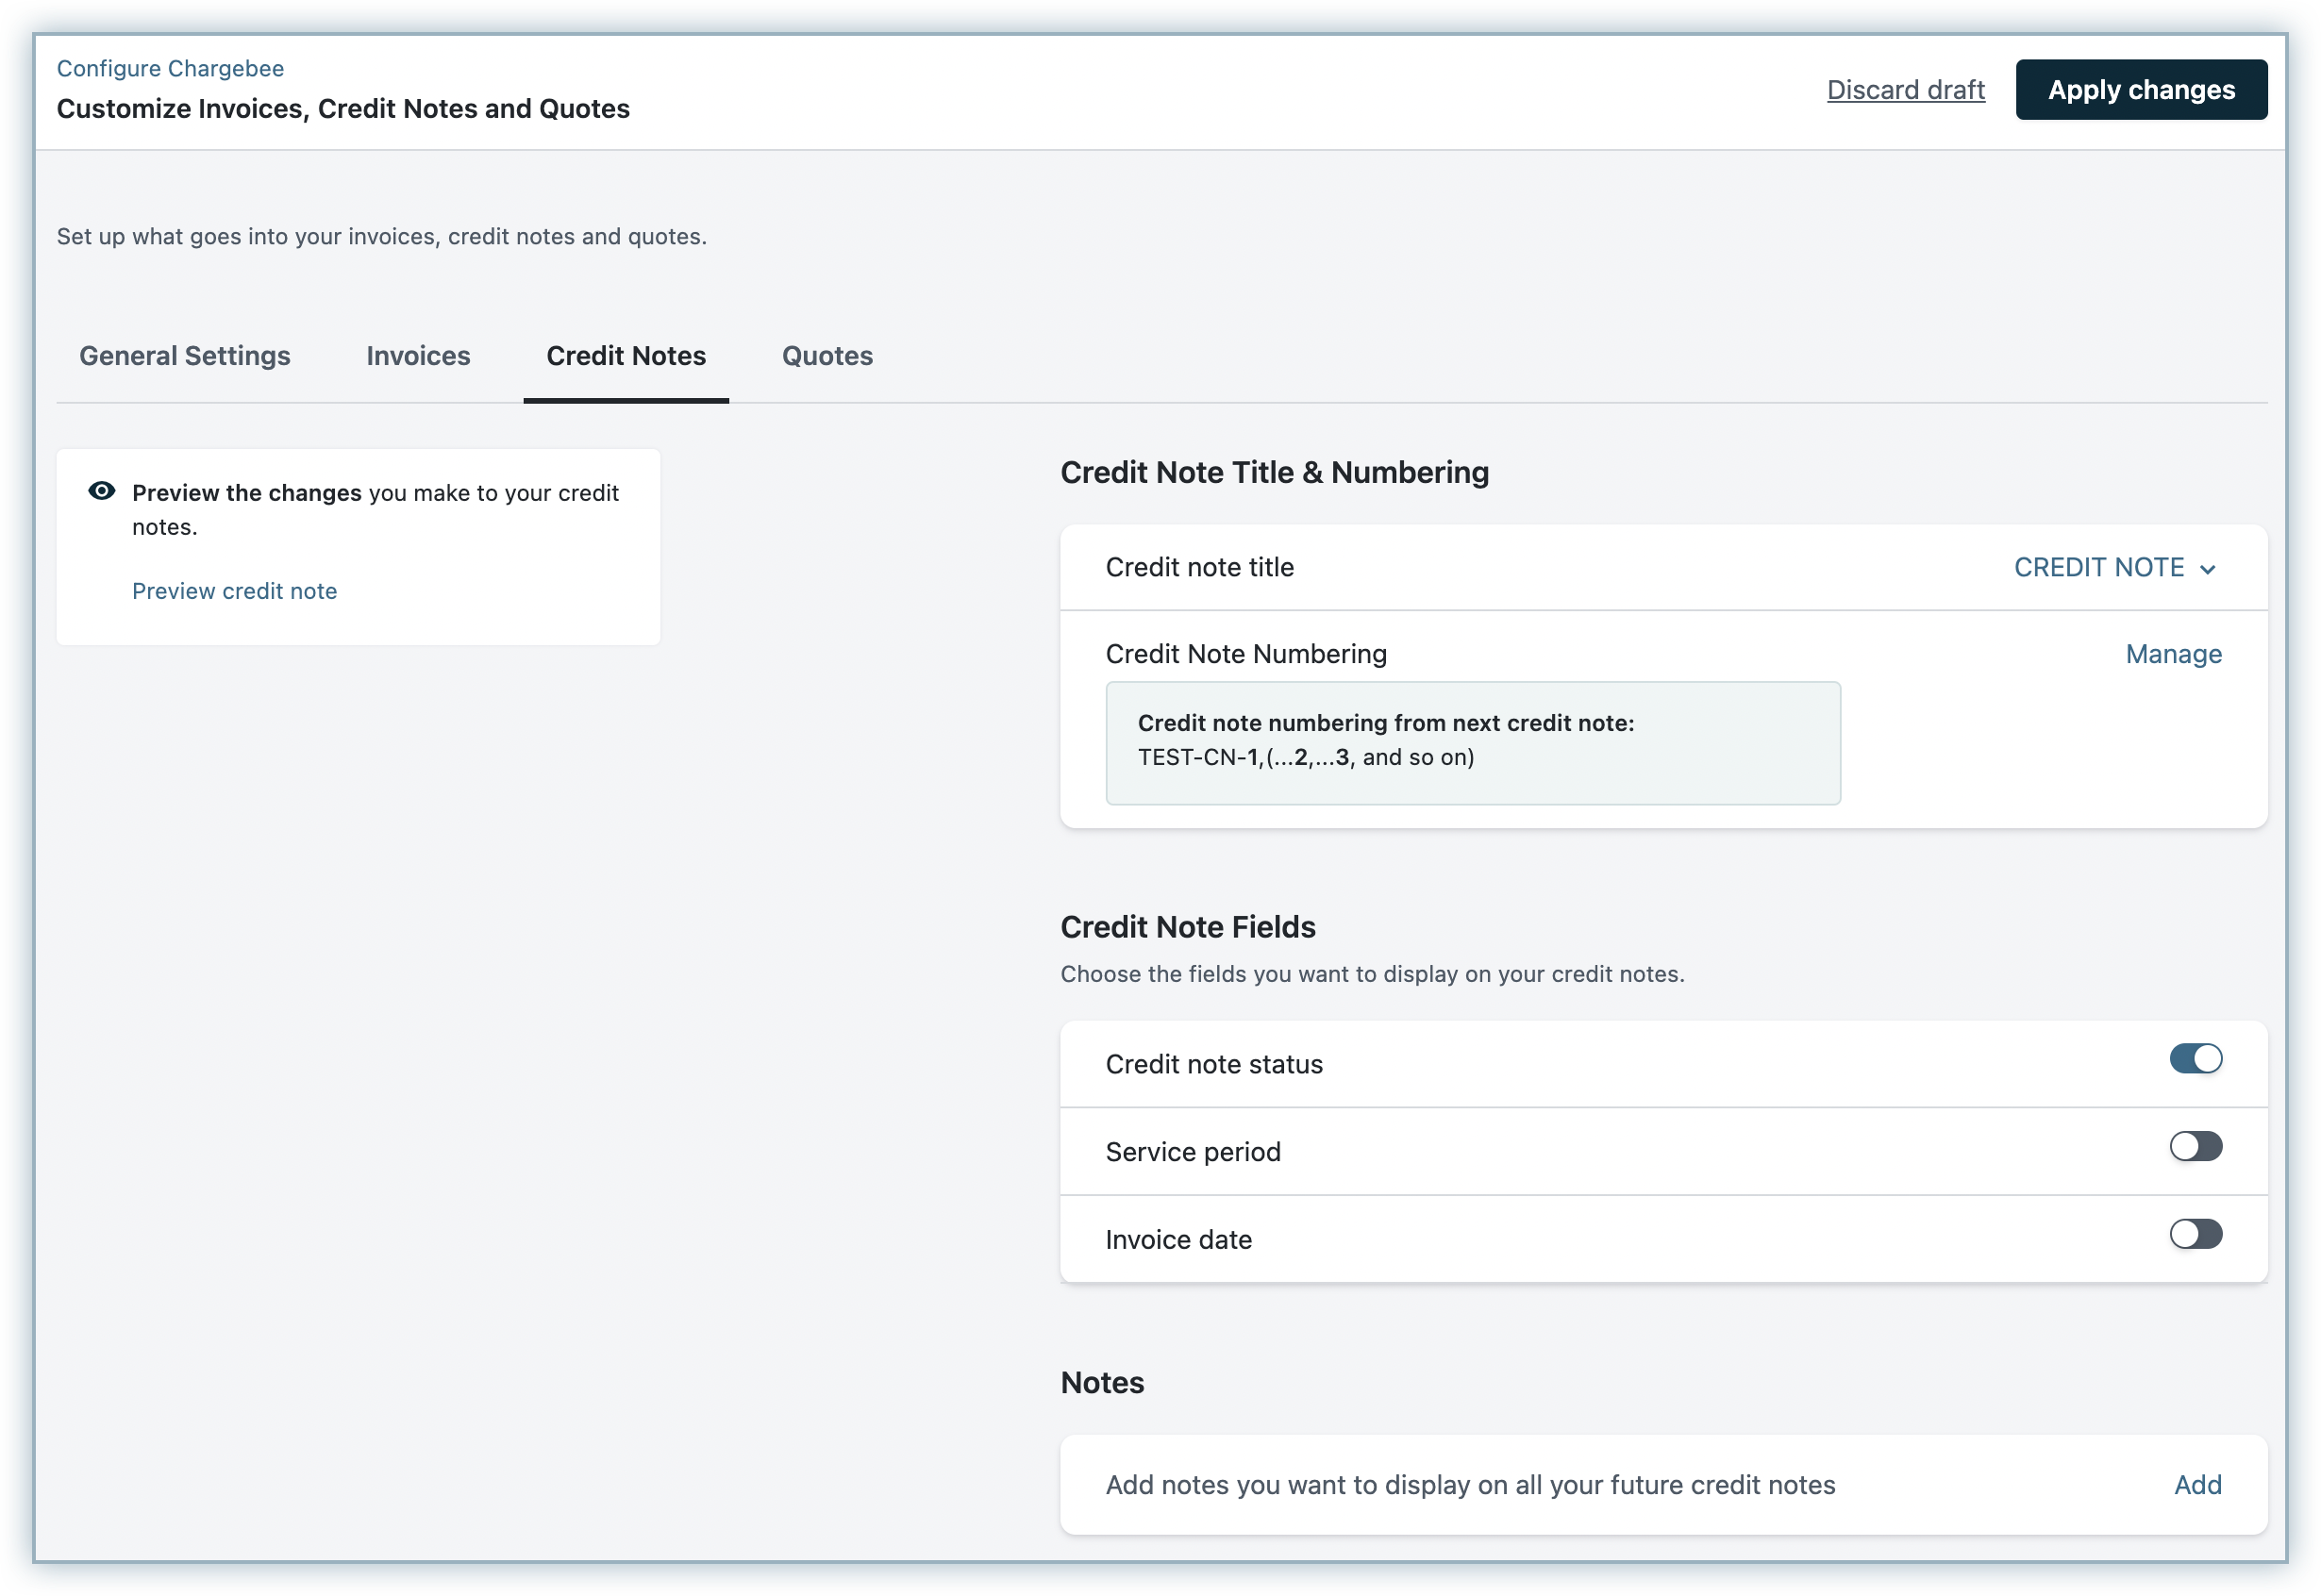
Credit note title: Select the title that appears at the top for refundable credit note PDFs. For adjustment credit notes, the title is always "Credit Note".
Credit Note Numbering: Credit note numbering offers advanced customizations for the generated credit note numbers. More information on this feature is here.
Additional information to be included in credit note PDFs can be selected from the following options:
Credit note status: Enabling this setting adds the status of the credit note to the PDF such as Adjusted, Refunded, Refund Due, or Voided.
Service period: Enabling this setting adds the service period of the credit note to the PDF. If the service period is not provided for the credit note, then the date on which the credit note was created gets displayed.
Invoice Date: Enabling this setting adds the date on which the credit note is applied to the PDFs.
Generic notes that are to be part of every credit note PDF sent are set here.