Docs
The Google Play Store integration helps you record in-app subscription purchases made on your Google Play Store app using Google billing libraries into Chargebee and maintain the subscription state in Chargebee by listening to Google server notifications .
purchase_token already exists in Chargebee.purchase_token from the initial purchase has expired, Google treats the transaction as a new subscription. Chargebee follows the same behavior and processes the Record a Purchase API request as a new subscription. 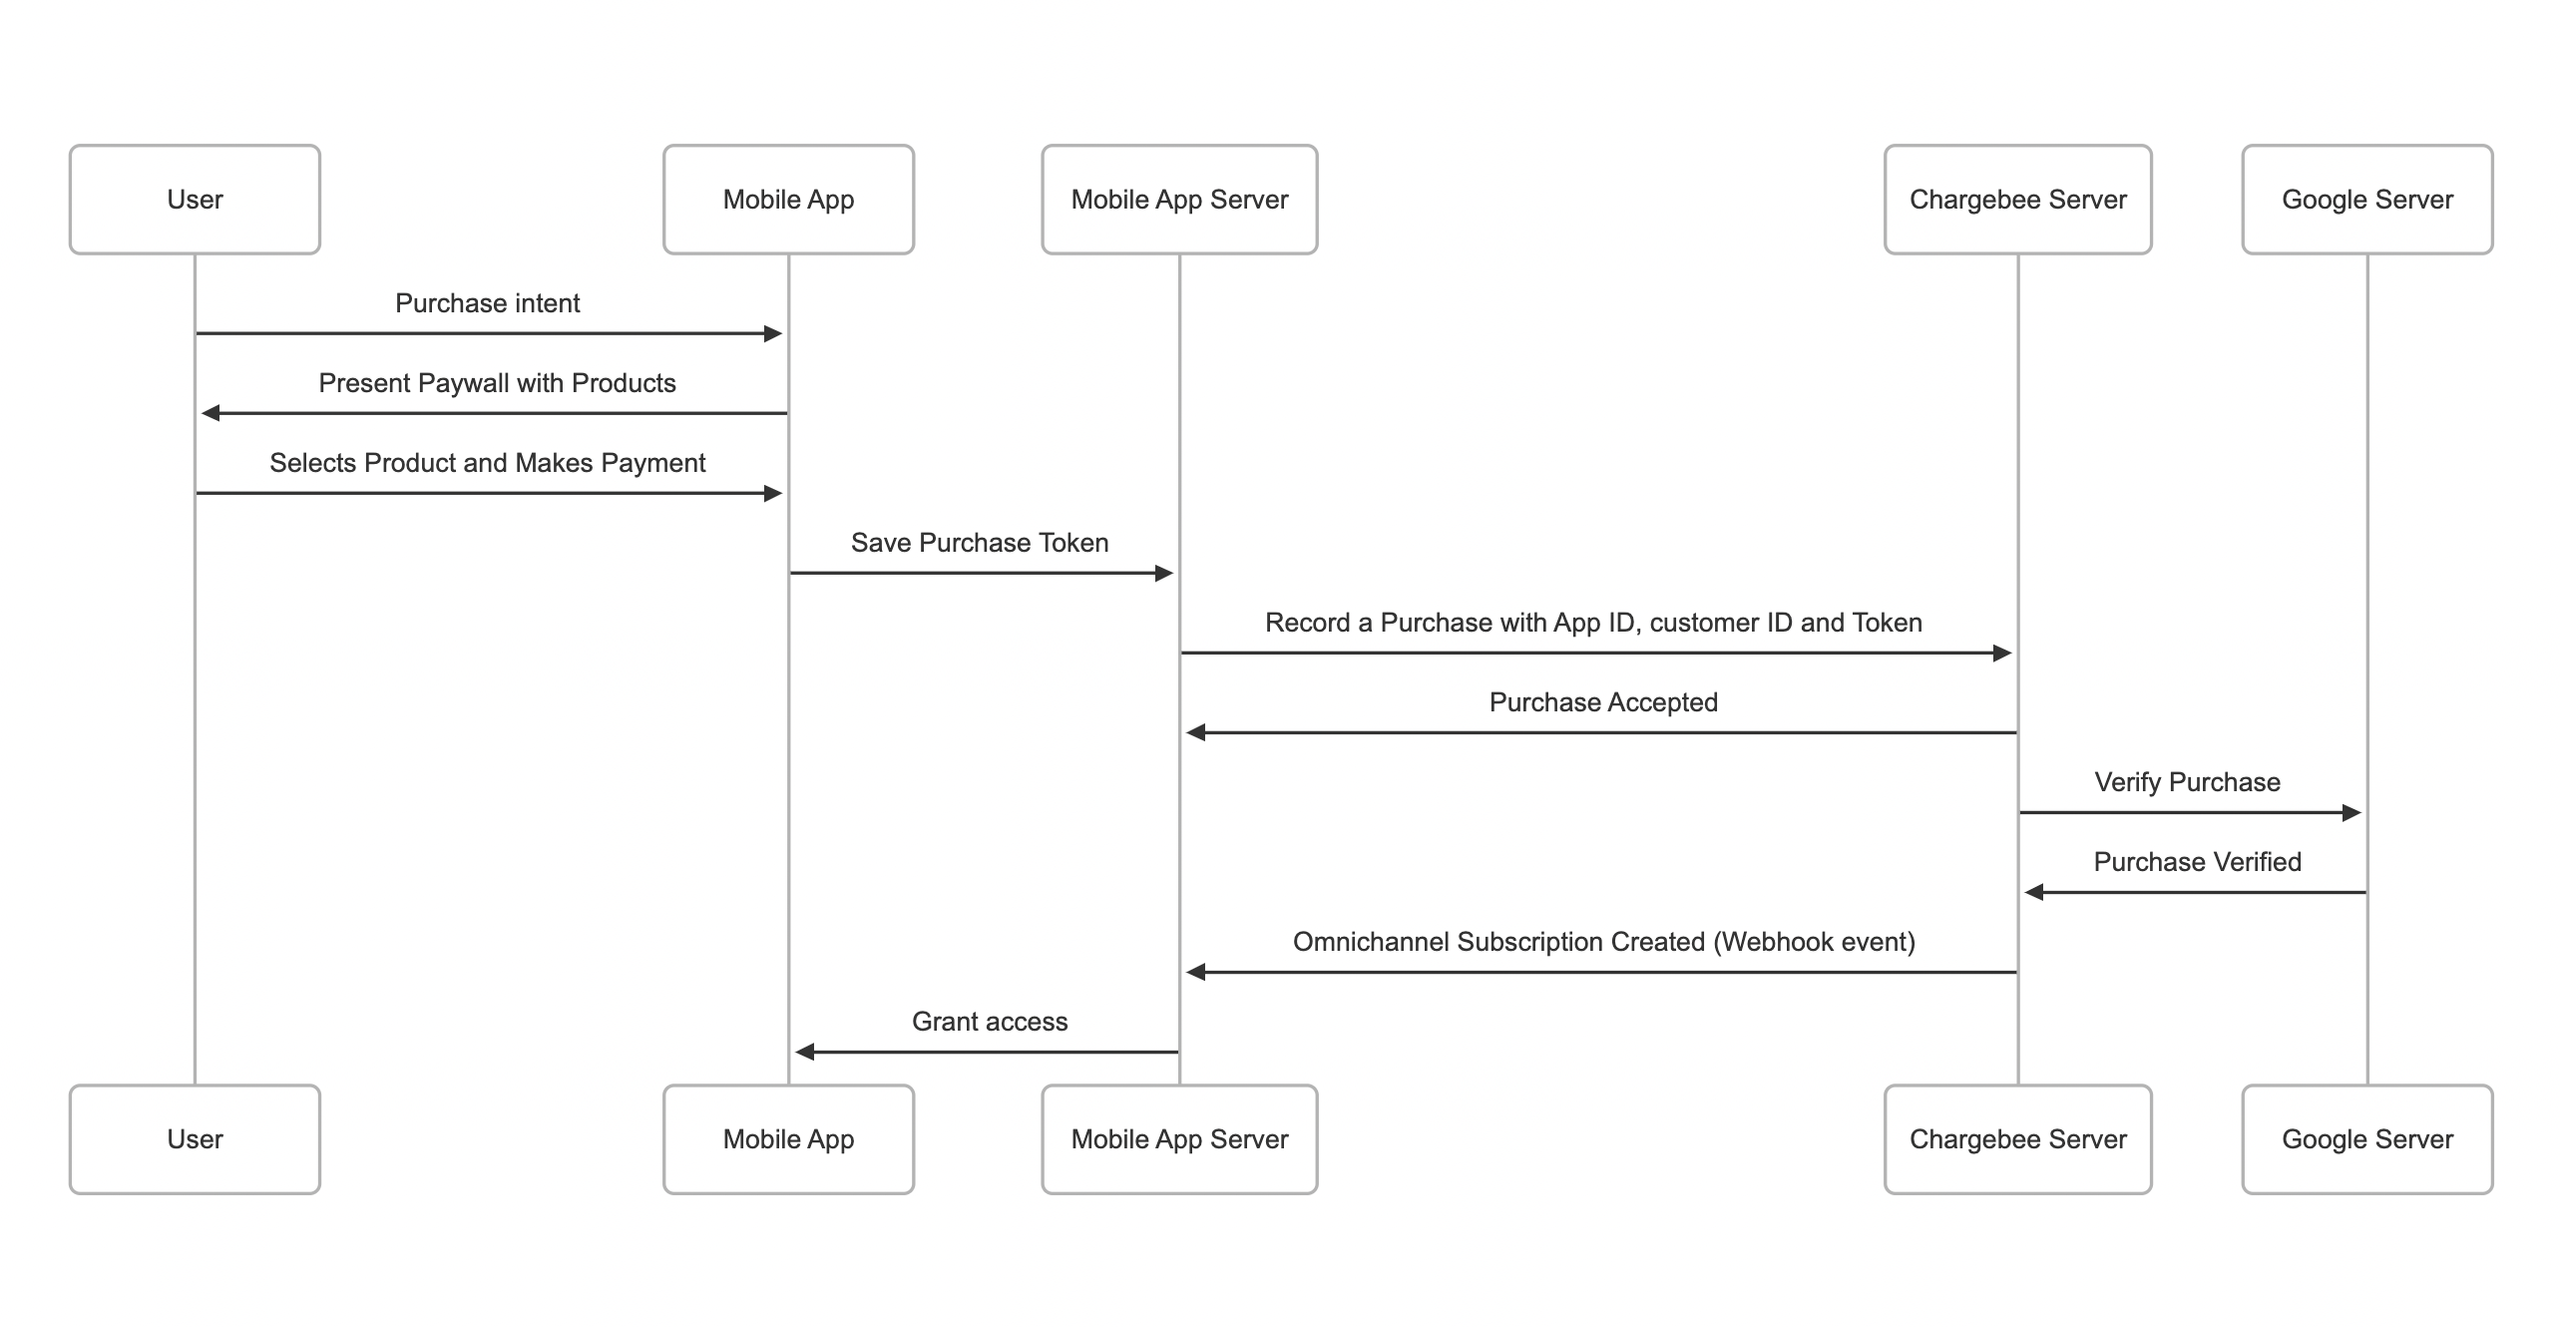
These are the steps that you need to complete to make your app ready for in-app purchases.
Configure the products that your app merchandises in Google Play Console .
Google billing library offers the entire set of client APIs that help you retrieve the in-app purchase products configured in Google Play Console, make a purchase using billing library methods, and keep track of the purchase using the purchase token. Go through this Google documentation to implement the billing library in your app and start with in-app purchases. For every transaction made using the Google billing library, Google will return a purchase token. You need to save this token at your backend and pass this token while invoking Record a purchase API for Chargebee to verify the purchase and create the corresponding omnichannel subscription.
Once you invoke the record of a purchase API of Chargebee with the purchase token, Chargebee will verify the purchase with Google servers using the purchases.subscriptionsV2 API , create a corresponding omnichannel subscription.
Once you have an active Chargebee test or live site, follow these steps to start recording in-app subscription purchases in Chargebee.
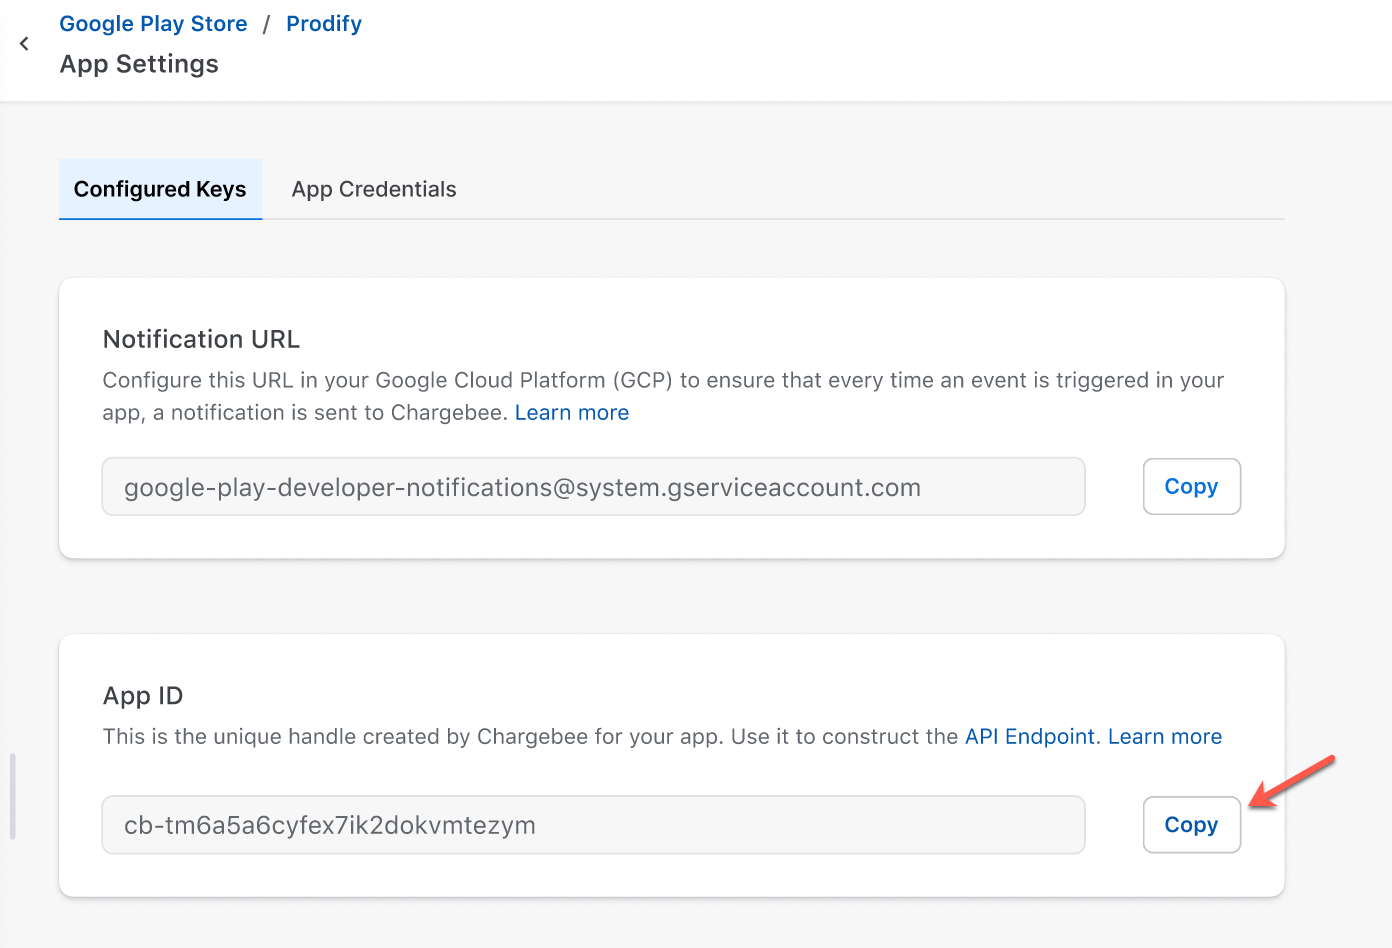
Connect your apps listed in the Google Play Store to Chargebee to record and manage your Google Play Store subscriptions through Chargebee. Once your app is connected, Chargebee will generate a unique App ID that can be used for recording purchases and a unique Notifications URL that can be configured in the Google Cloud Platform to relay the Google in-app subscription state change events to Chargebee.
To connect your app with Chargebee, follow the steps:
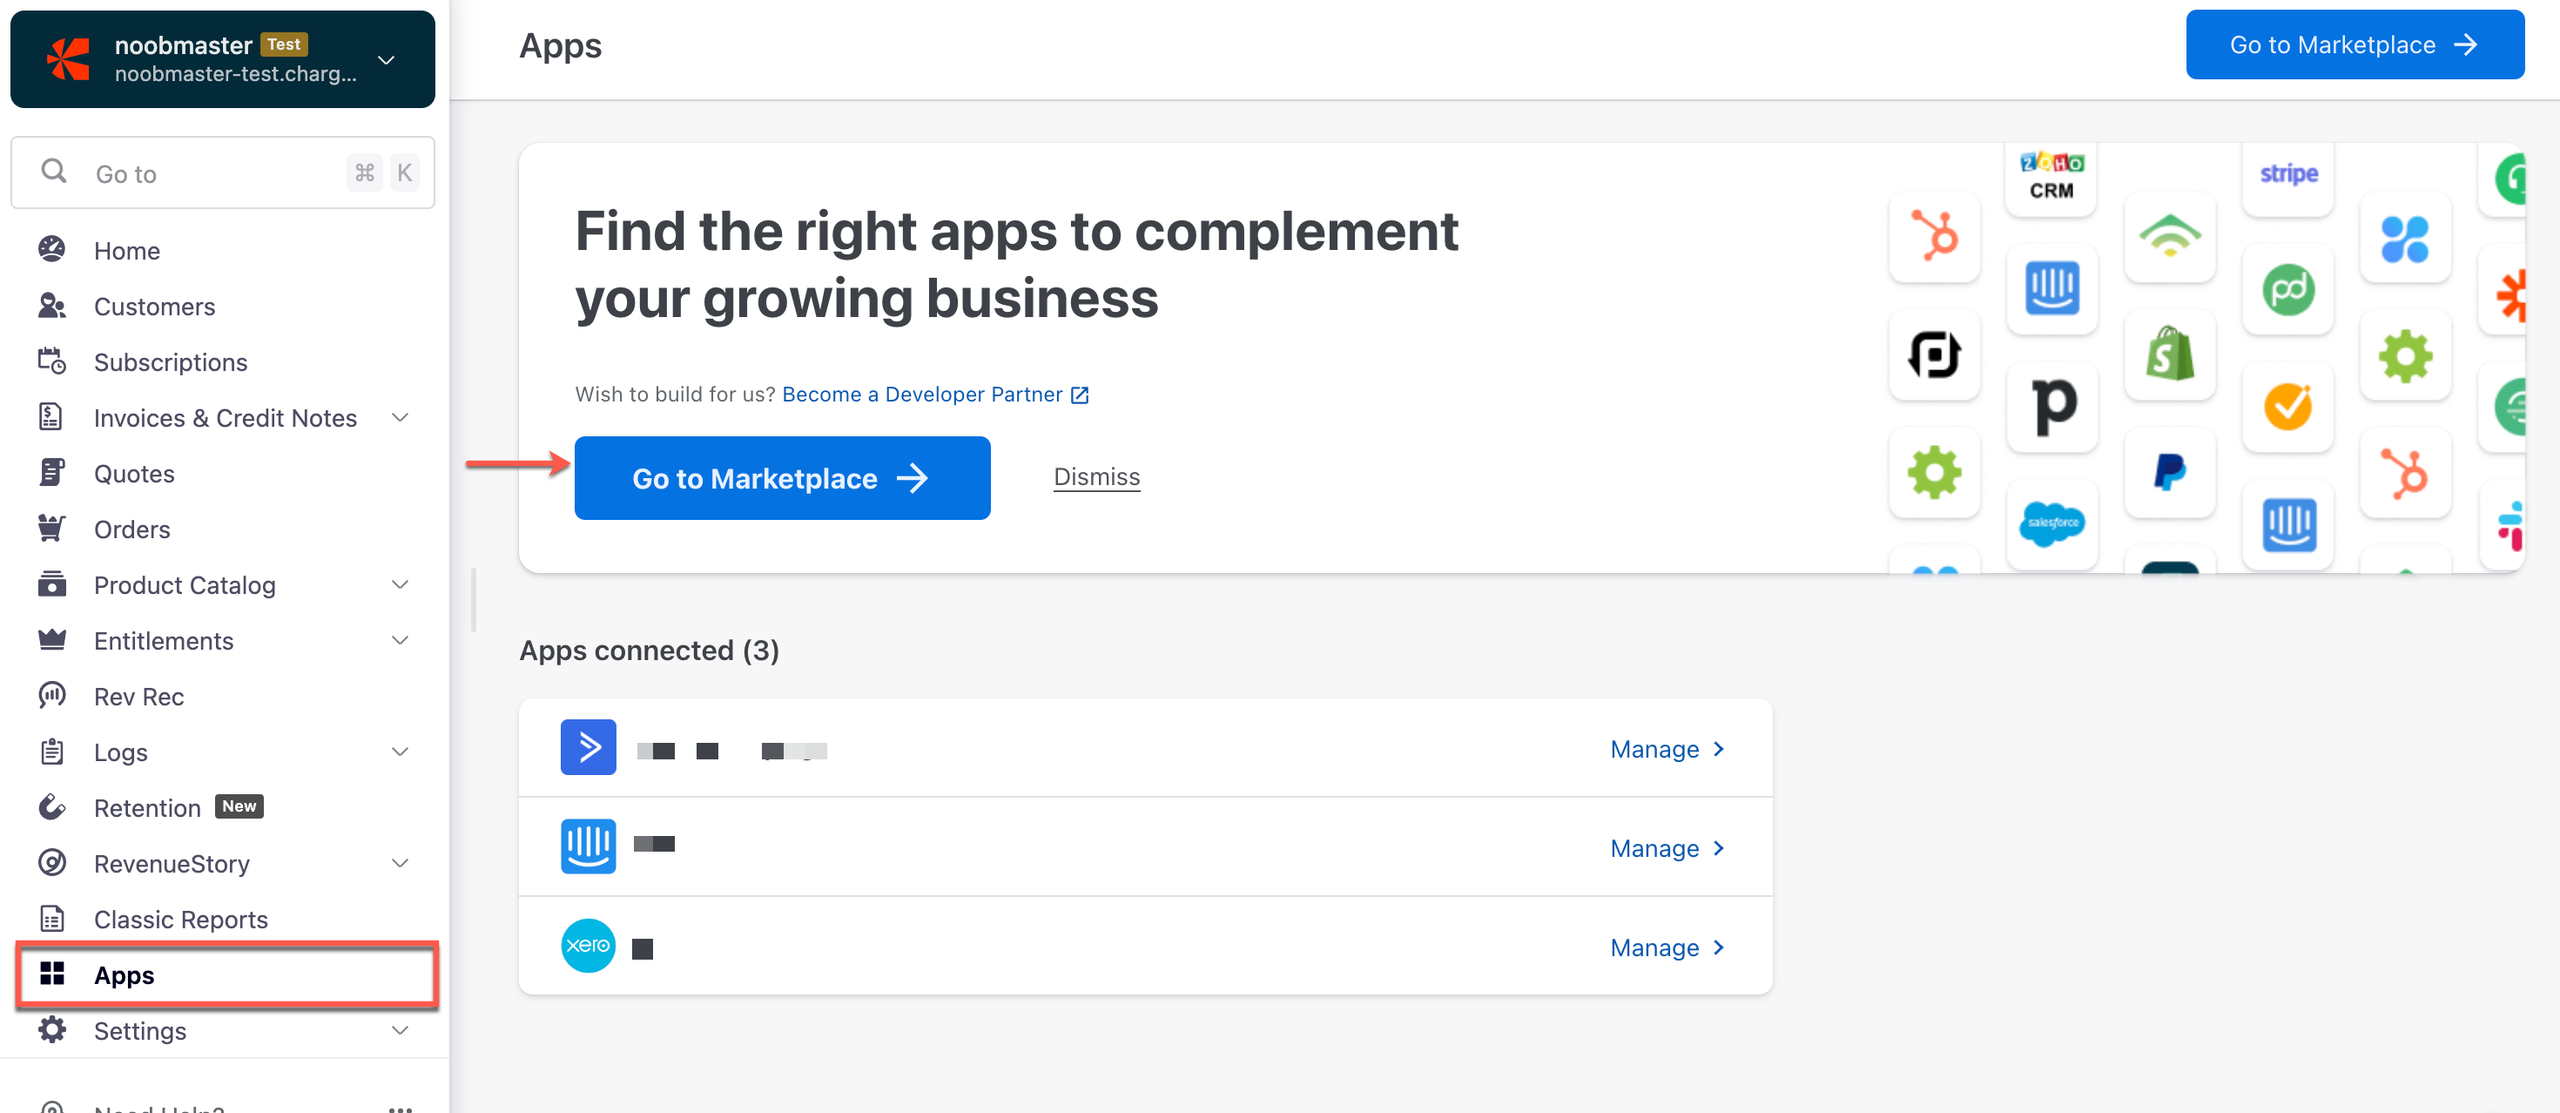
Login to your Chargebee site and navigate to Apps on the left menu. Click Go to Marketplace.
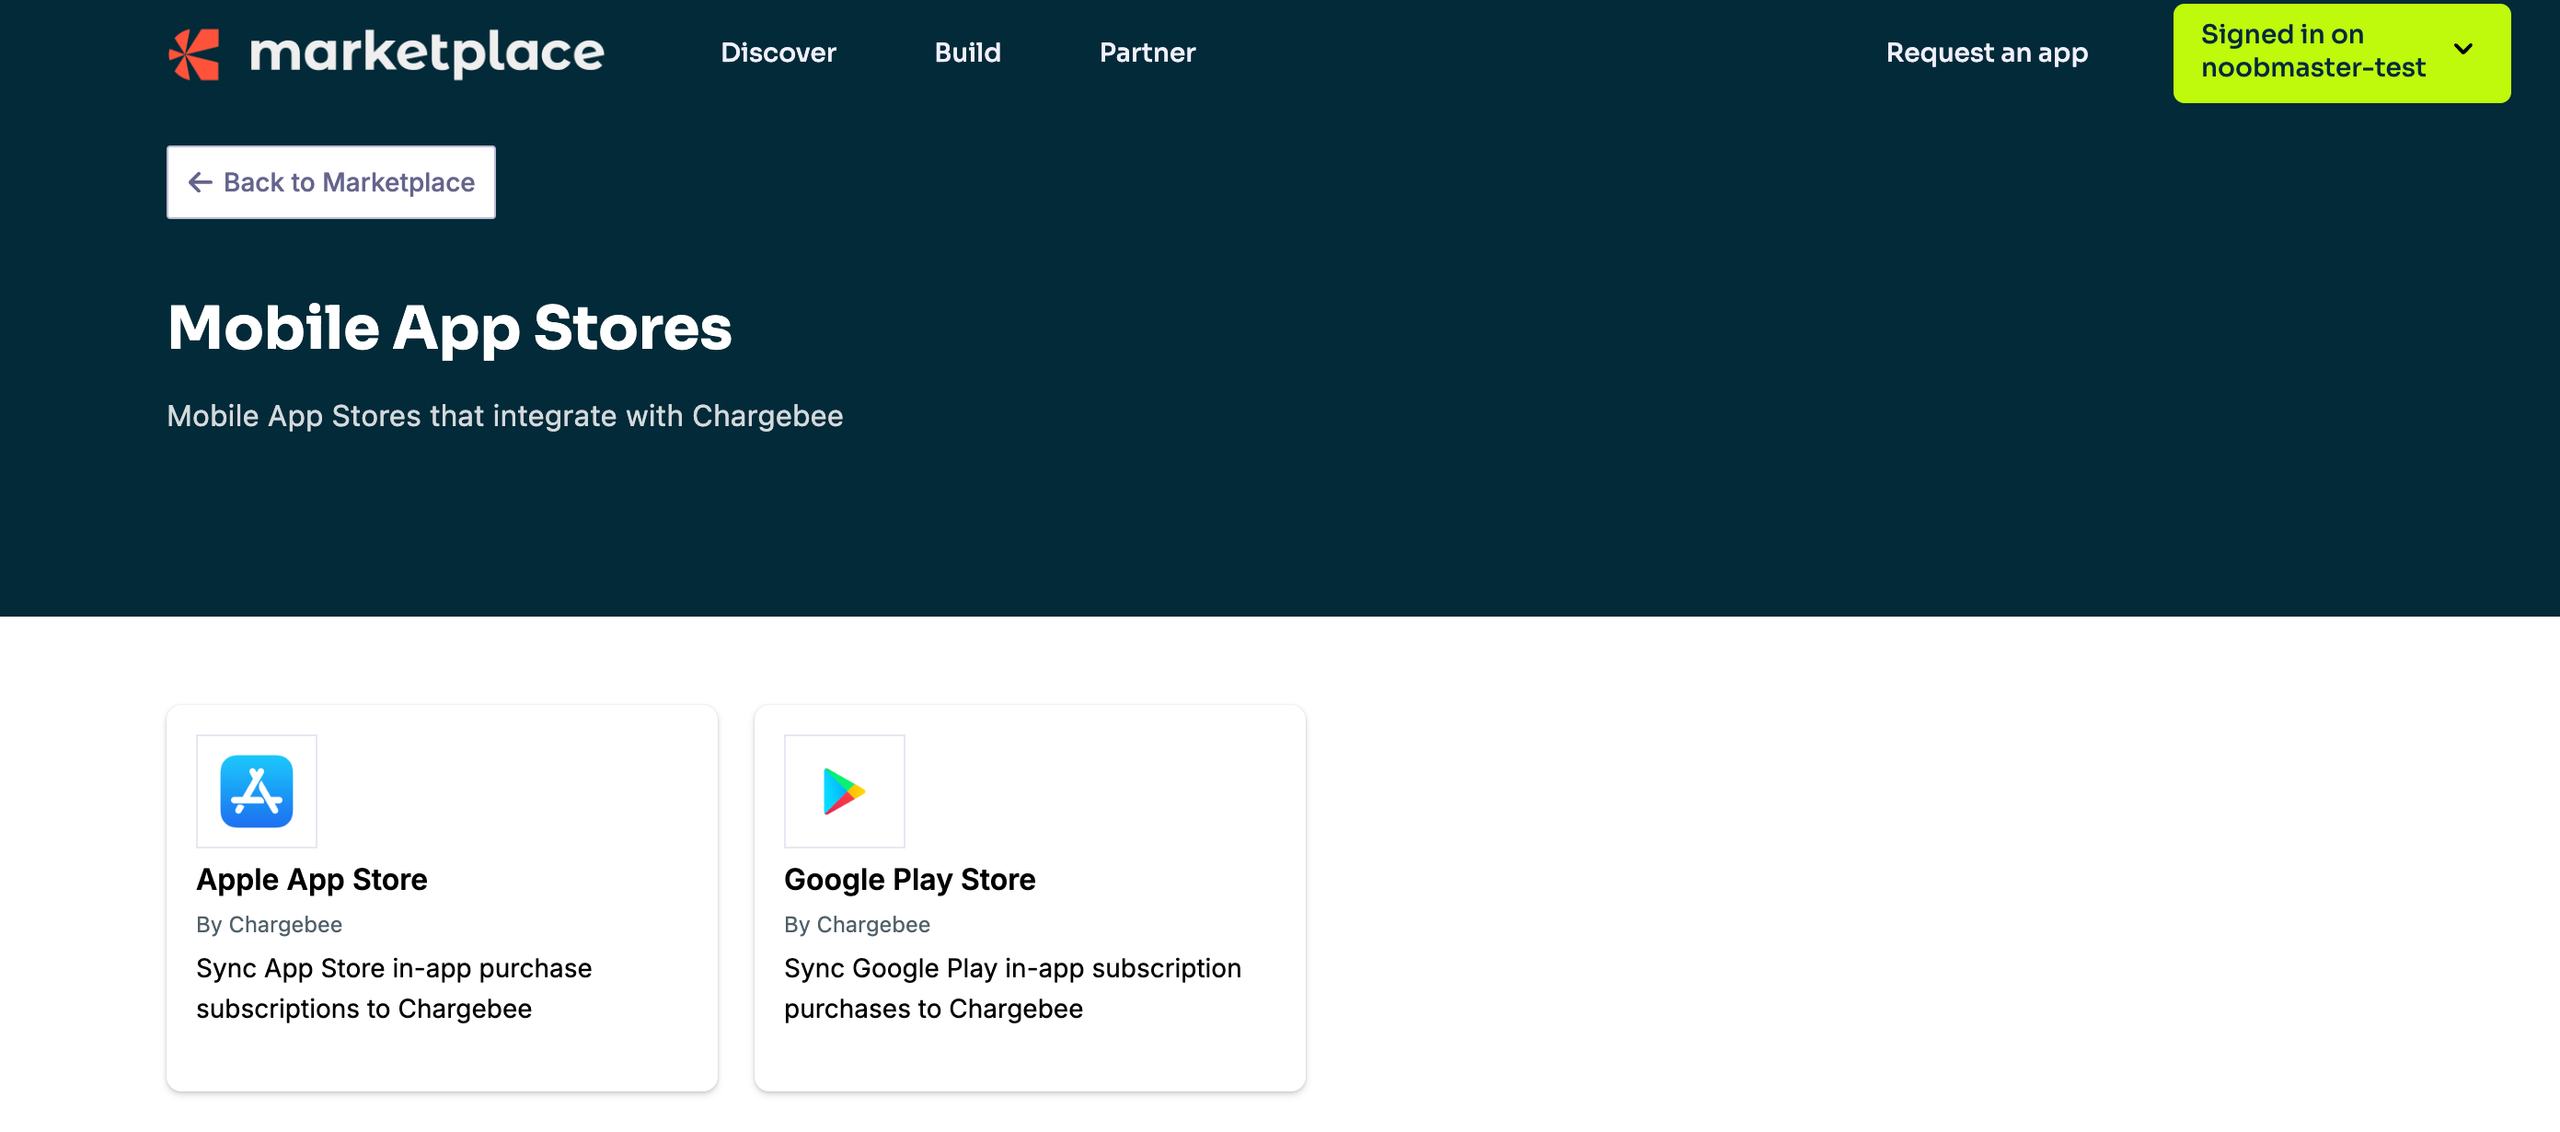
Click Mobile App Stores > Google Play Store.
Click Connect and Proceed.
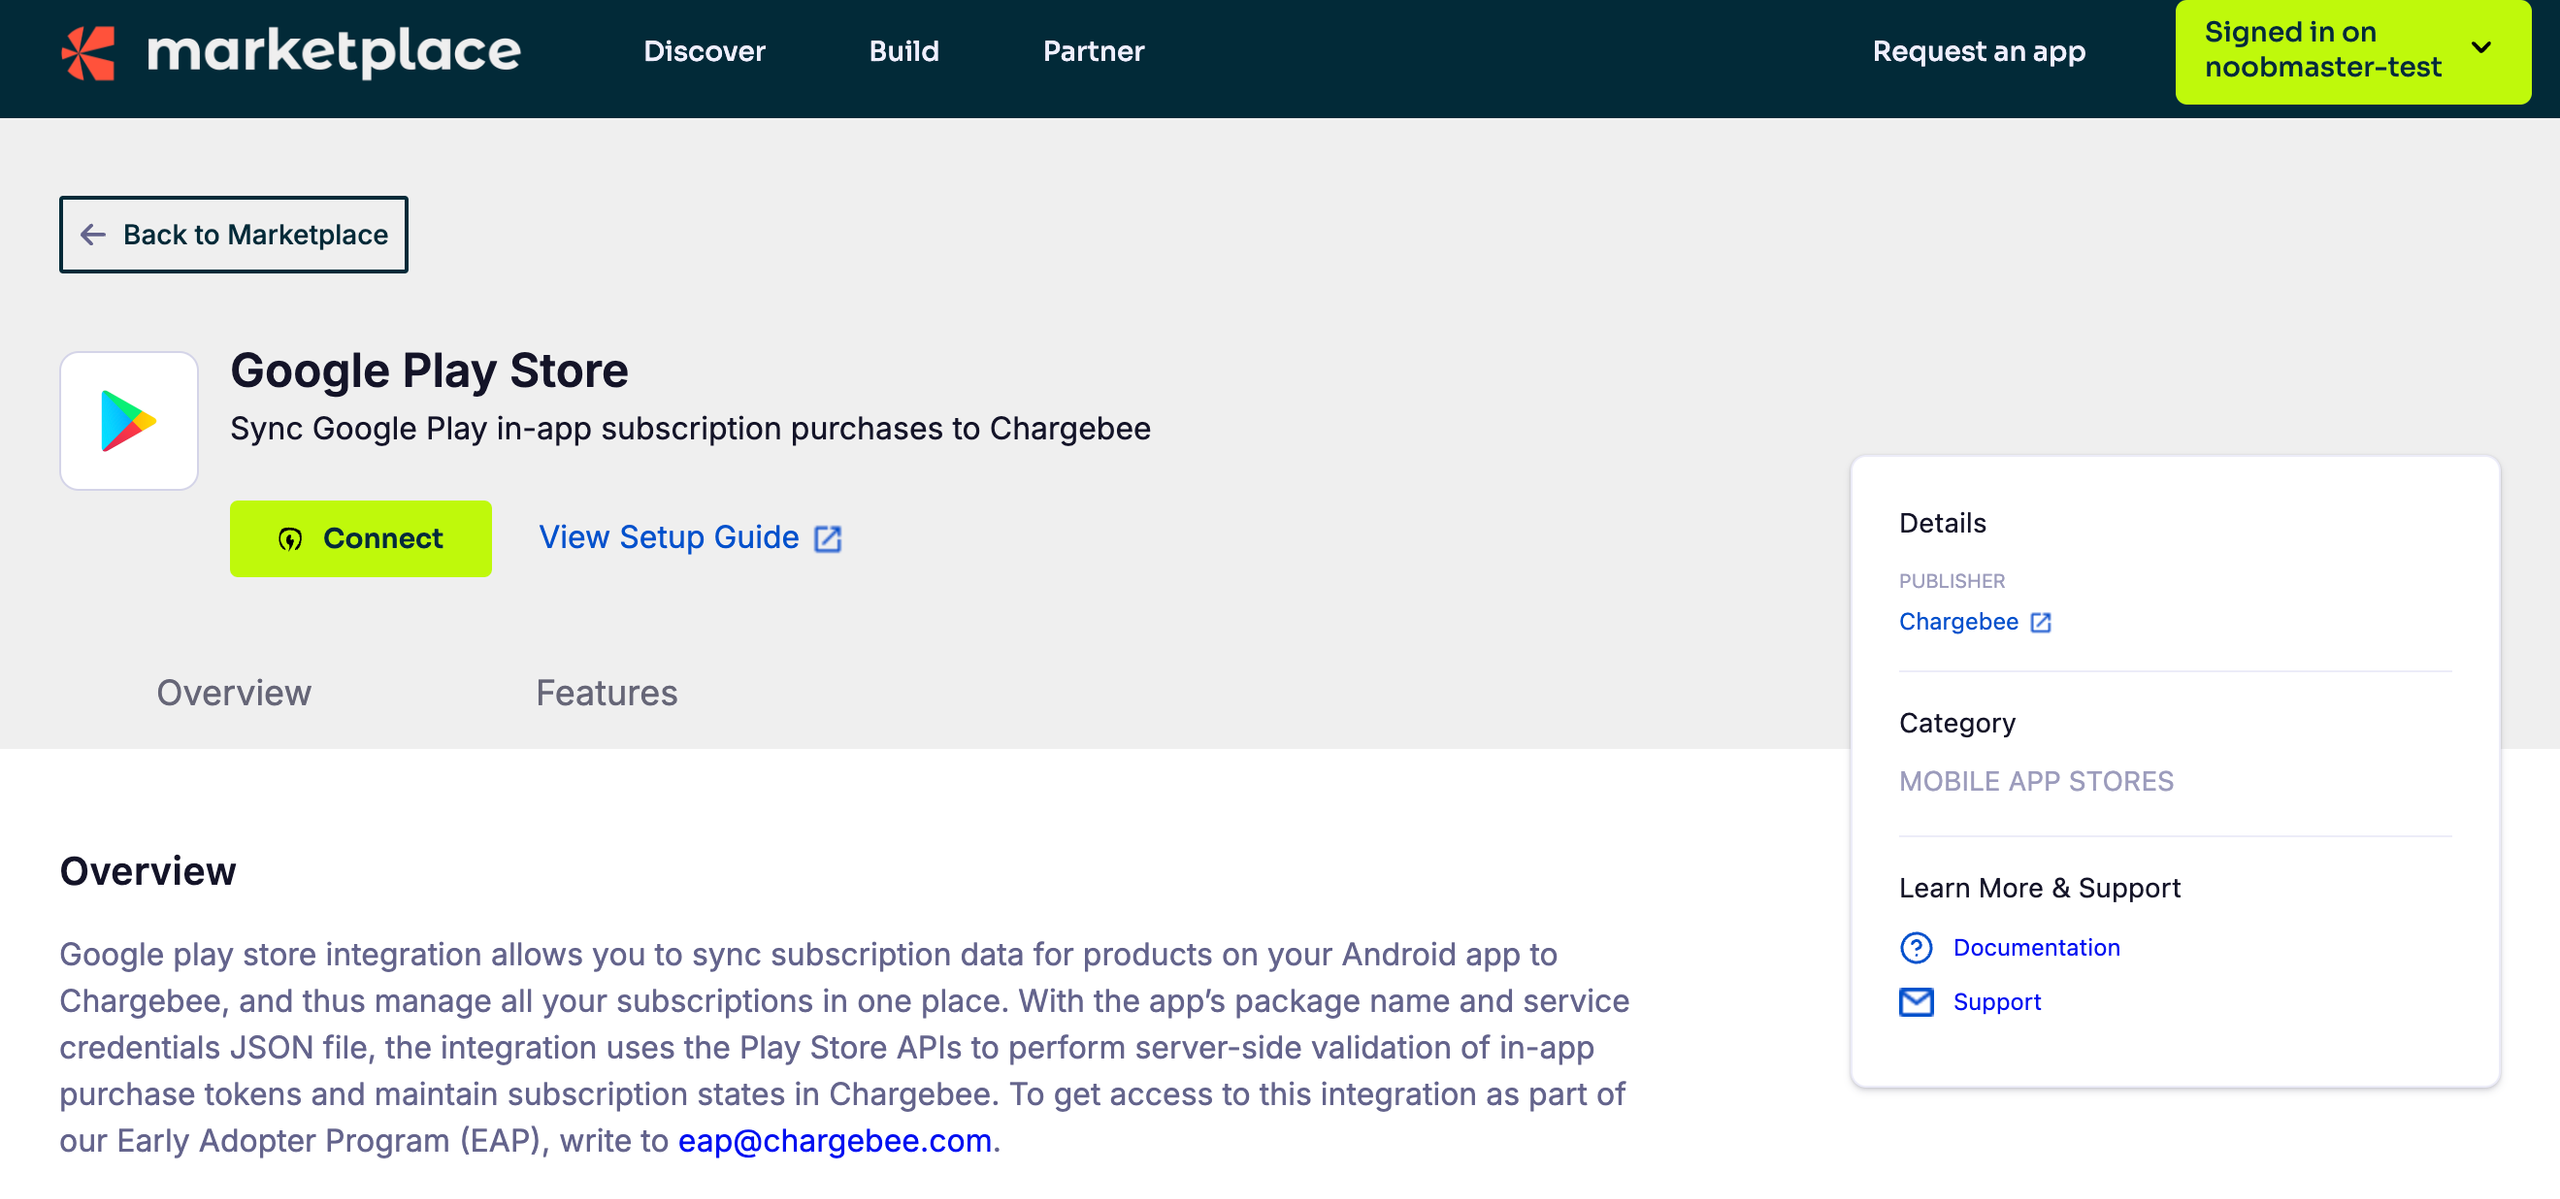
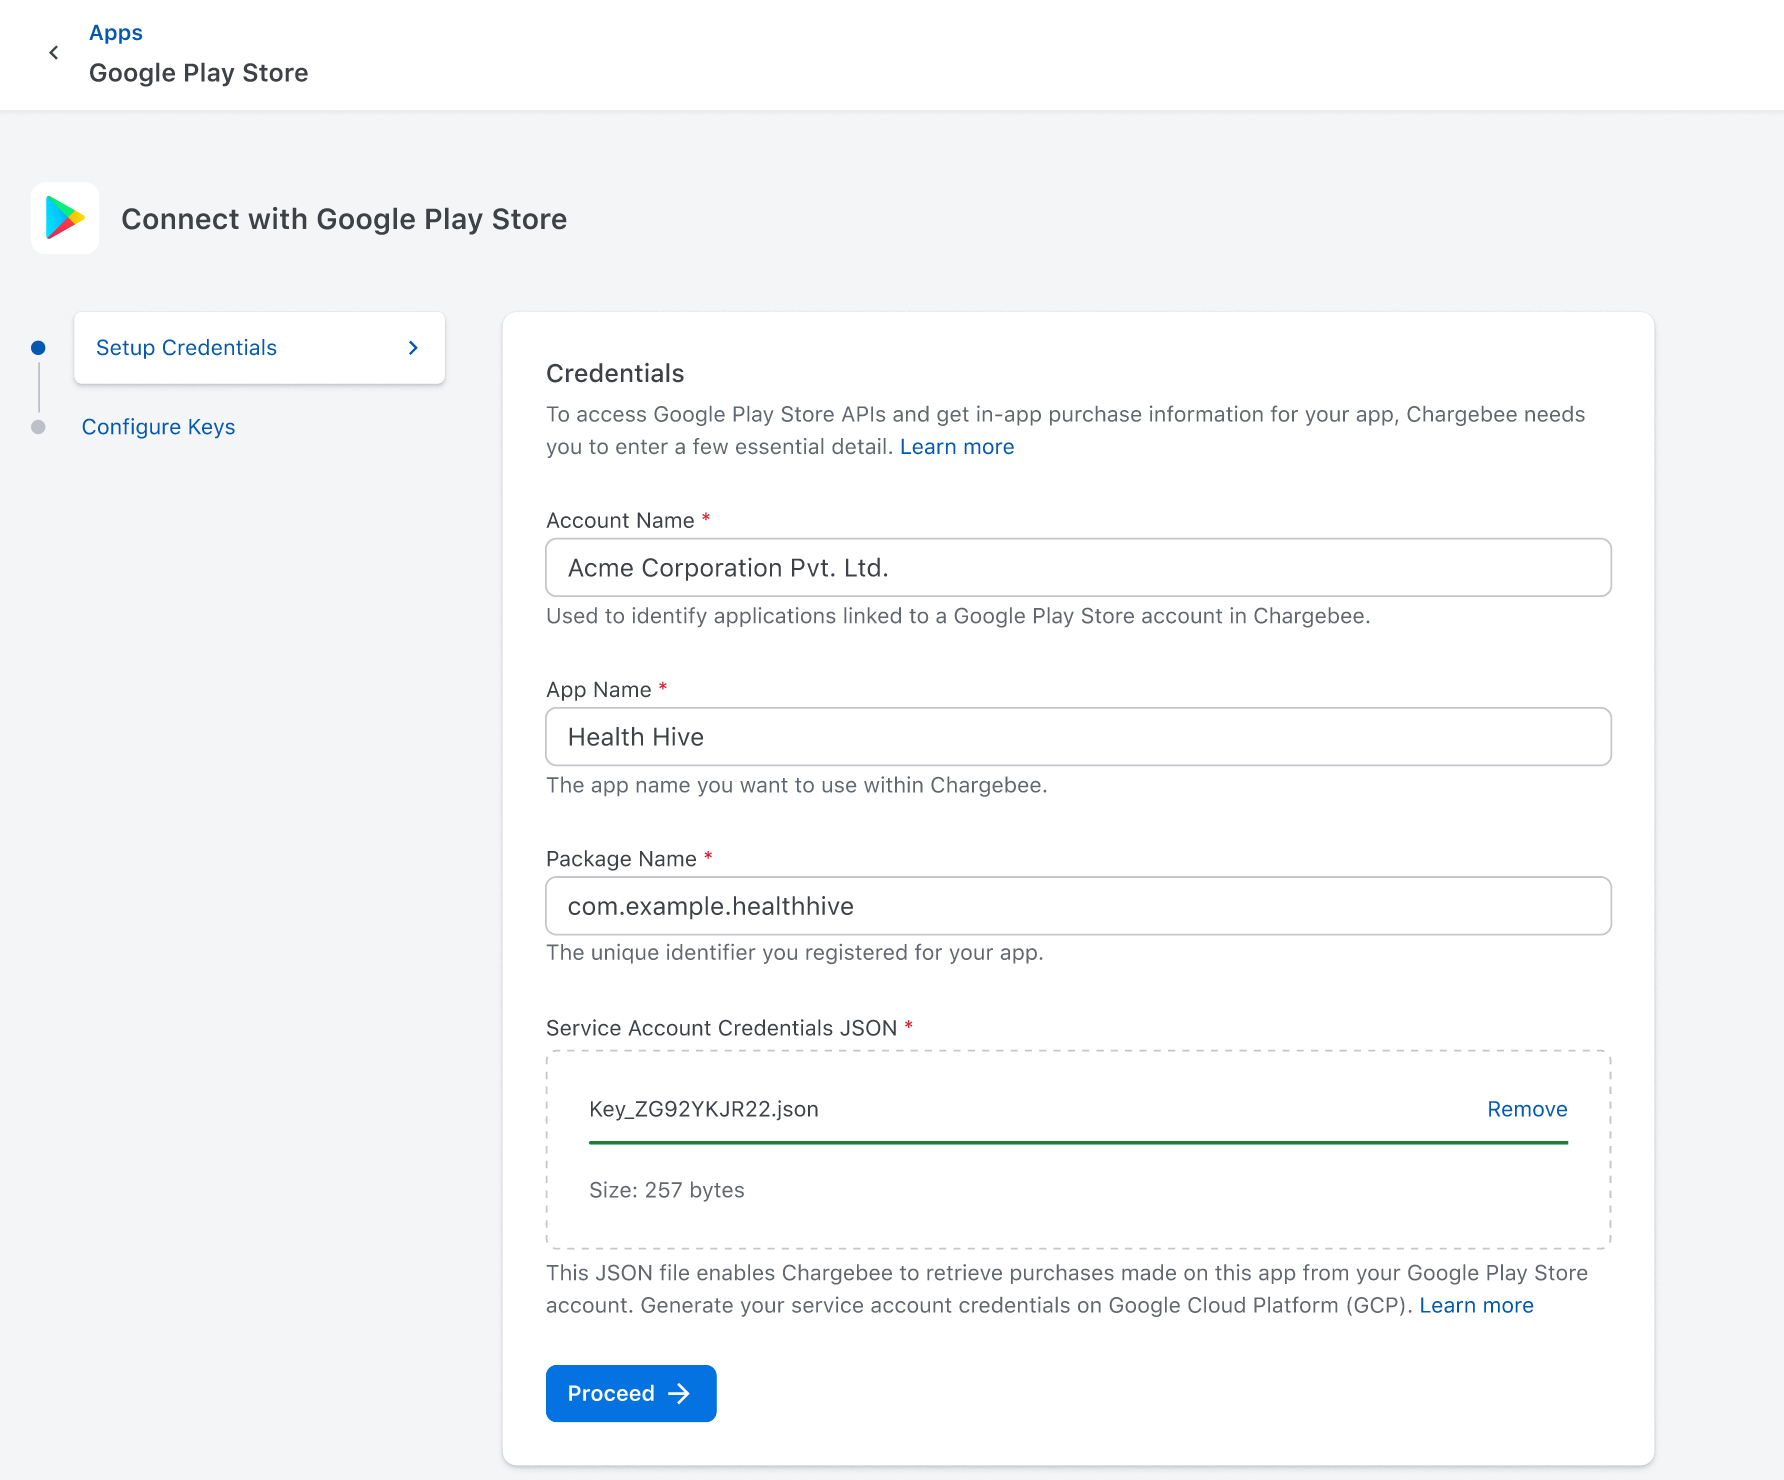
Enter Setup Credentials. Chargebee needs you to set up the credentials below to access Google Play Store APIs. To understand how to retrieve the setup credentials from the Google Play console.
After the successful connection, Chargebee generates a unique App ID for recording purchases via the Record a Purchase API, along with a notifications URL to be configured in the Google Cloud Platform to track subscription state change events.
If you want to connect multiple apps that are linked to the same or different Google Play Store account, then you need to follow these steps:
Login to your Chargebee site and navigate to Apps on the left menu.
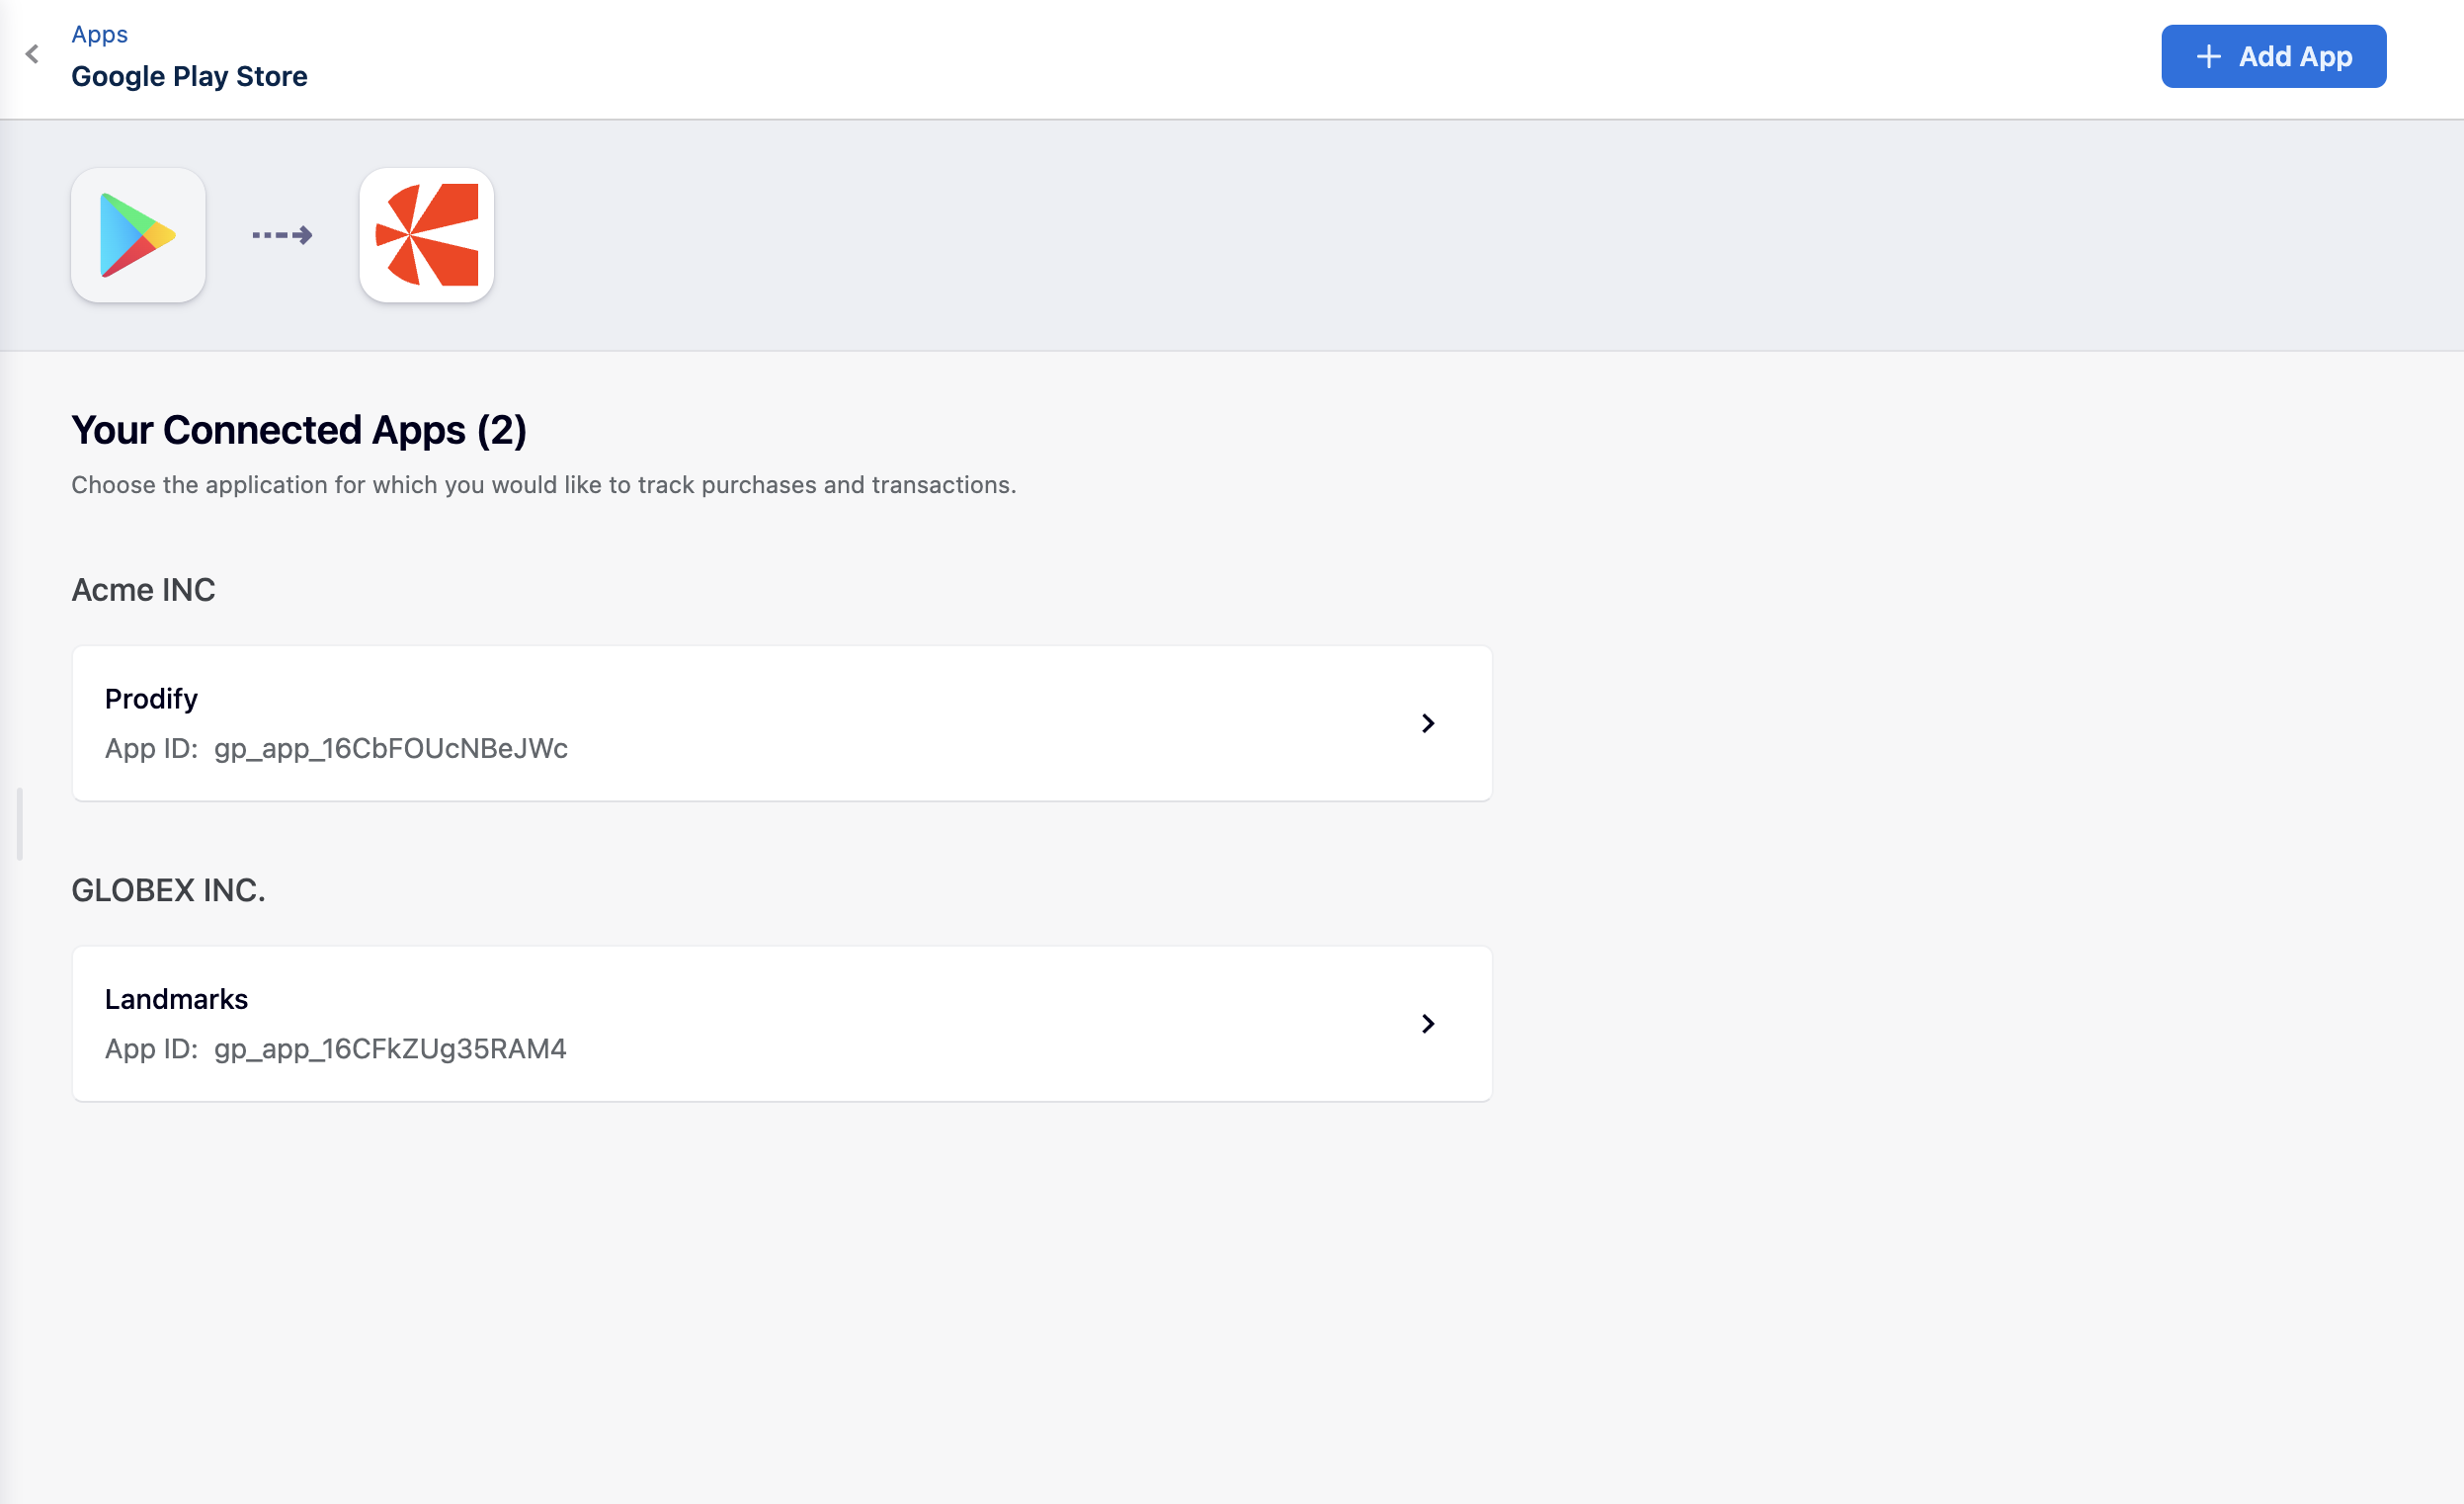
Click Google Play Store to view the already connected apps under different accounts.
Click Add App on this Apps page to connect another app to Chargebee.
Click the account to which you want to connect the app, and you'll be redirected to the Setup Credentials page. Here, you can enter the app's credentials and connect them.
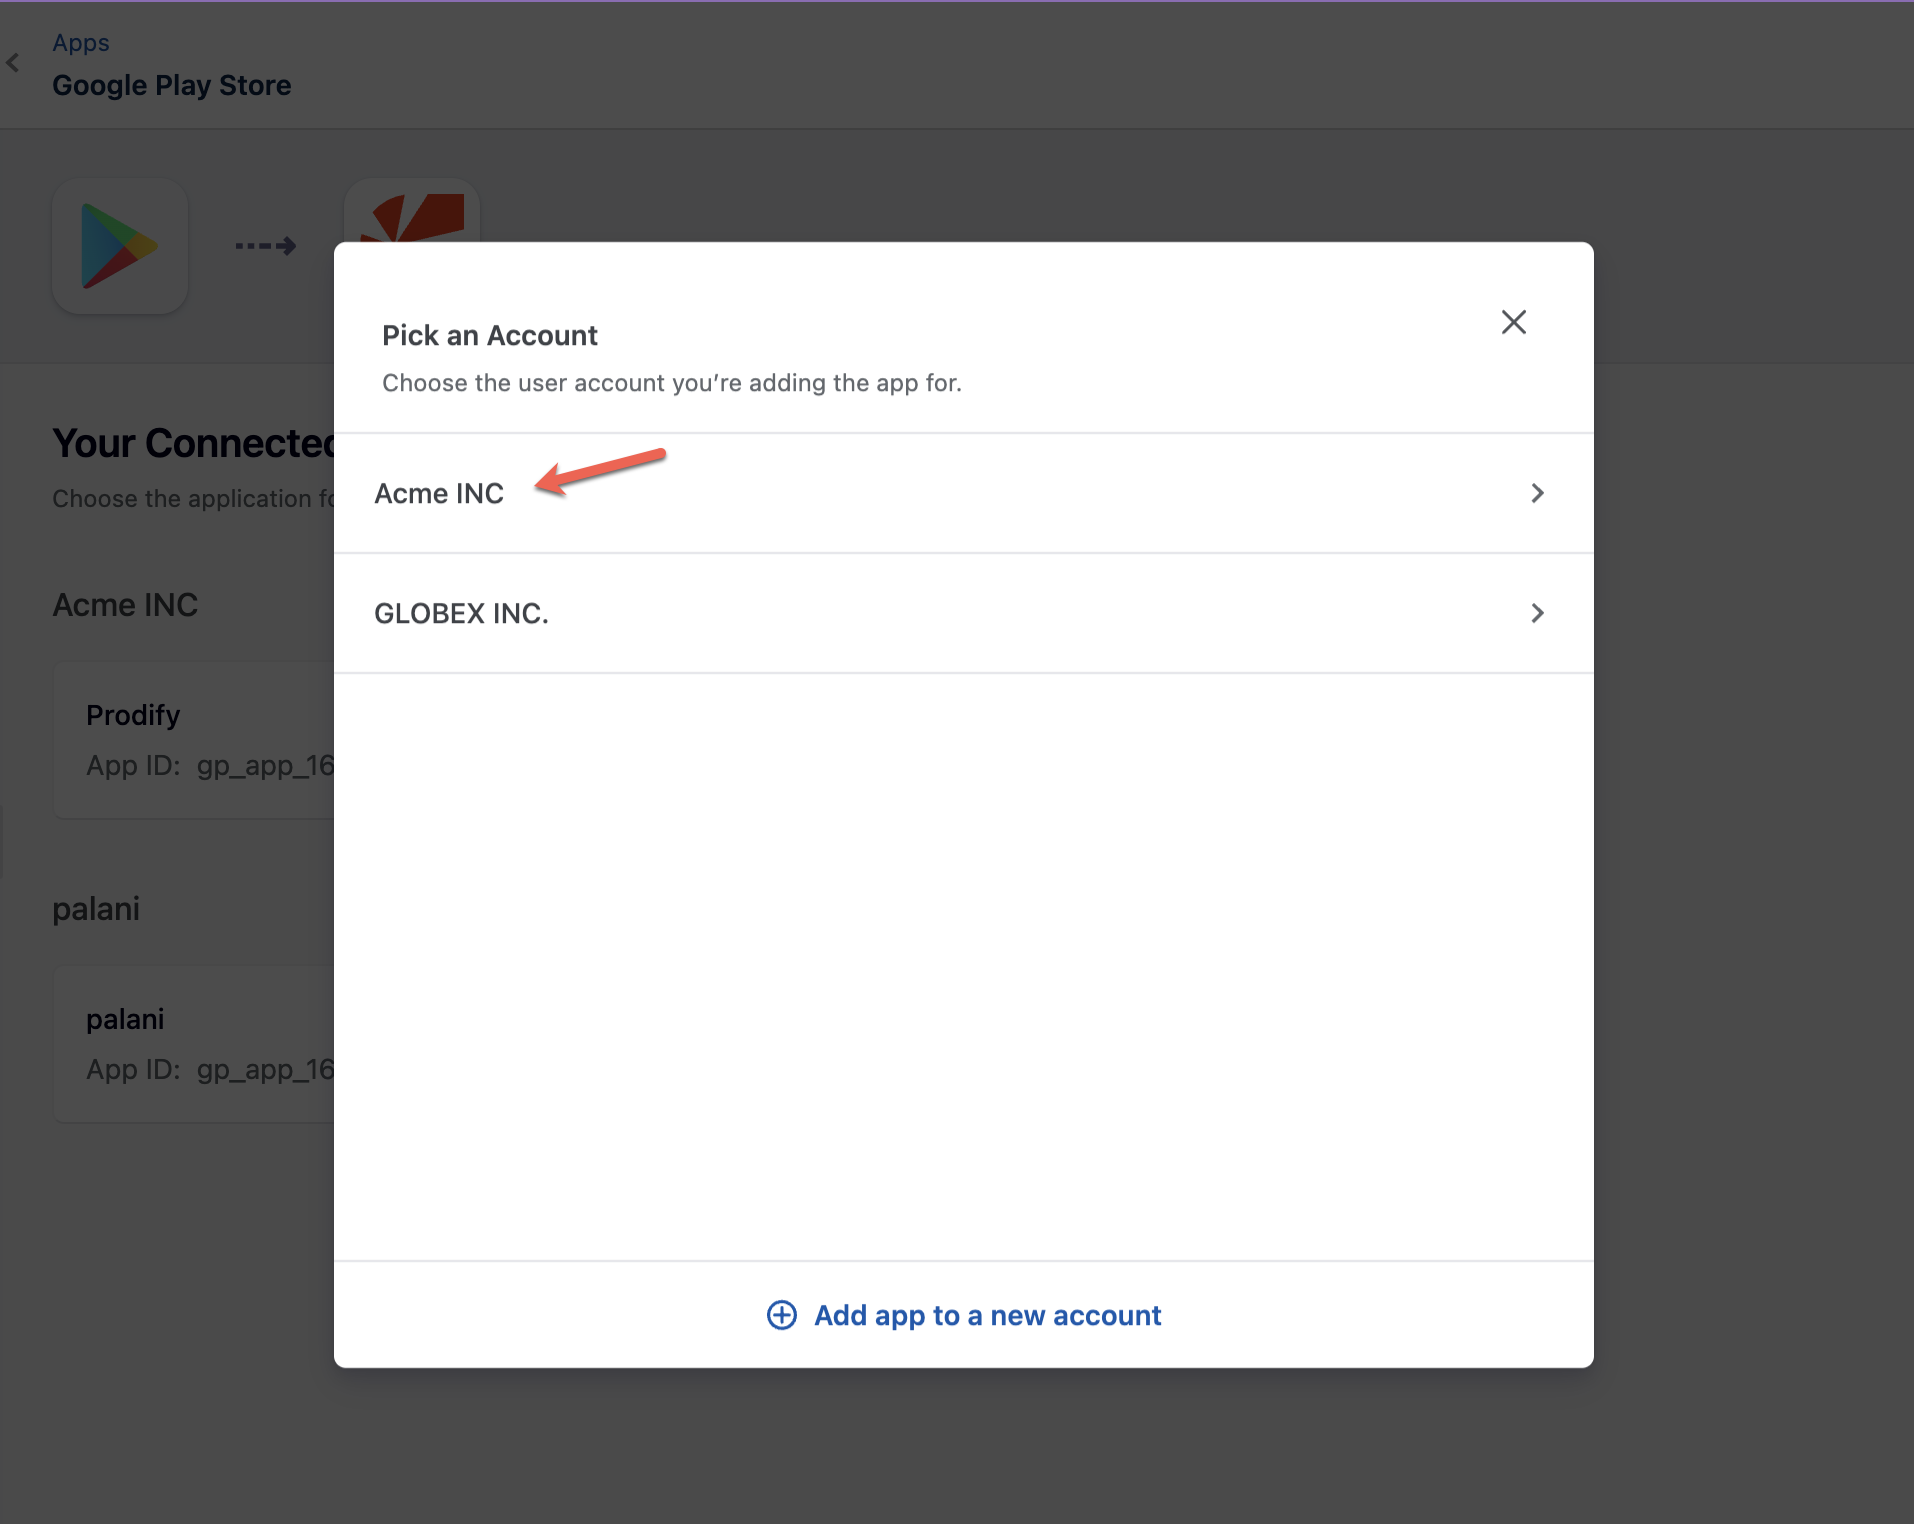
If you want to connect the app to a different Google account, click Add app to a new account at the bottom. You'll be redirected to the Setup Credentials page, where you can enter the app's credentials along with the new account name to connect to the new app.

Once the connection is successful, view all the apps belonging to all your accounts on the Apps page.
To view subscription purchases made on the Google Play Store in Chargebee, you must record these purchases using the Record a Purchase API. You need the App ID to invoke this API.
Retrieve the App ID generated by Chargebee from the Apps page. or the App Settings page.
Option 1: Navigate to Apps > Google Play Store > Apps and Copy the App ID associated with the App.

Option 2 : Navigate to Apps > Google Play Store > Apps. On the Apps page, click on the application for which you want to retrieve the App ID, click App Settings, copy the App ID, and keep it for further use.
Invoke the Record a Purchase API with the app_id, customer_id, and purchase_token parameters. This returns a recorded_purchase resource with the status in_process. Chargebee invokes Google APIs to initiate the verification of the purchase. After successful verification of the purchase, an omnichannel subscription will be created in Chargebee, and a webhook event omnichannel_subscription_created will be triggered.
Omnichannel subscription state changes rely entirely on server notifications from Google. To allow Chargebee to receive and process these notifications, you must complete the following setup.
After the integration is successfully completed, Chargebee will generate a notification URL. Configure the notification URL in Google Cloud Platform to sync subscription state changes with Chargebee in real-time.
To set up the notification URL in Google Cloud Platform, follow these steps:
Once Chargebee's notification URL is successfully set in GCP, Chargebee will receive the Google server notifications for subscription state changes in the Play Store and generate corresponding omnichannel webhook events.
These omnichannel webhook events are needed for your downstream operations, such as provisioning content, generating reports, planning email campaigns, and more.
To receive these omnichannel subscription state change events from Chargebee, you need to subscribe to the omnichannel subscription webhook events. Learn all about Chargebee webhook events.
As an app developer, you may want to view in-app purchases and transactions made through the Google Store. Chargebee's Purchases page displays all recorded Google purchases.
To view in-app purchases in Chargebee, follow these steps:

As a customer care, marketing, or revenue growth professional, you can use Chargebee's Omnichannel Subscriptions page to view all the omnichannel subscriptions corresponding to all the apps listed on the Google Play Store. App-specific filters can be applied to view subscriptions corresponding to specific apps. You can click any omnichannel subscription ID and access the omnichannel subscription's details page to check the subscription details and respond to customer queries quickly.

To enable communication between Chargebee and Google servers, a connection needs to be established between Chargebee and Google. To establish this connection, Chargebee needs app details and service account credentials. Once the connection is established, the topic ID configurations need to be done in Google Play Console and Google Cloud Console for Chargebee to maintain the subscription state. The below steps detail these configurations and will be handy when you are connecting the Google App to Chargebee.
To retrieve your App Name and App Package Name, follow these steps:
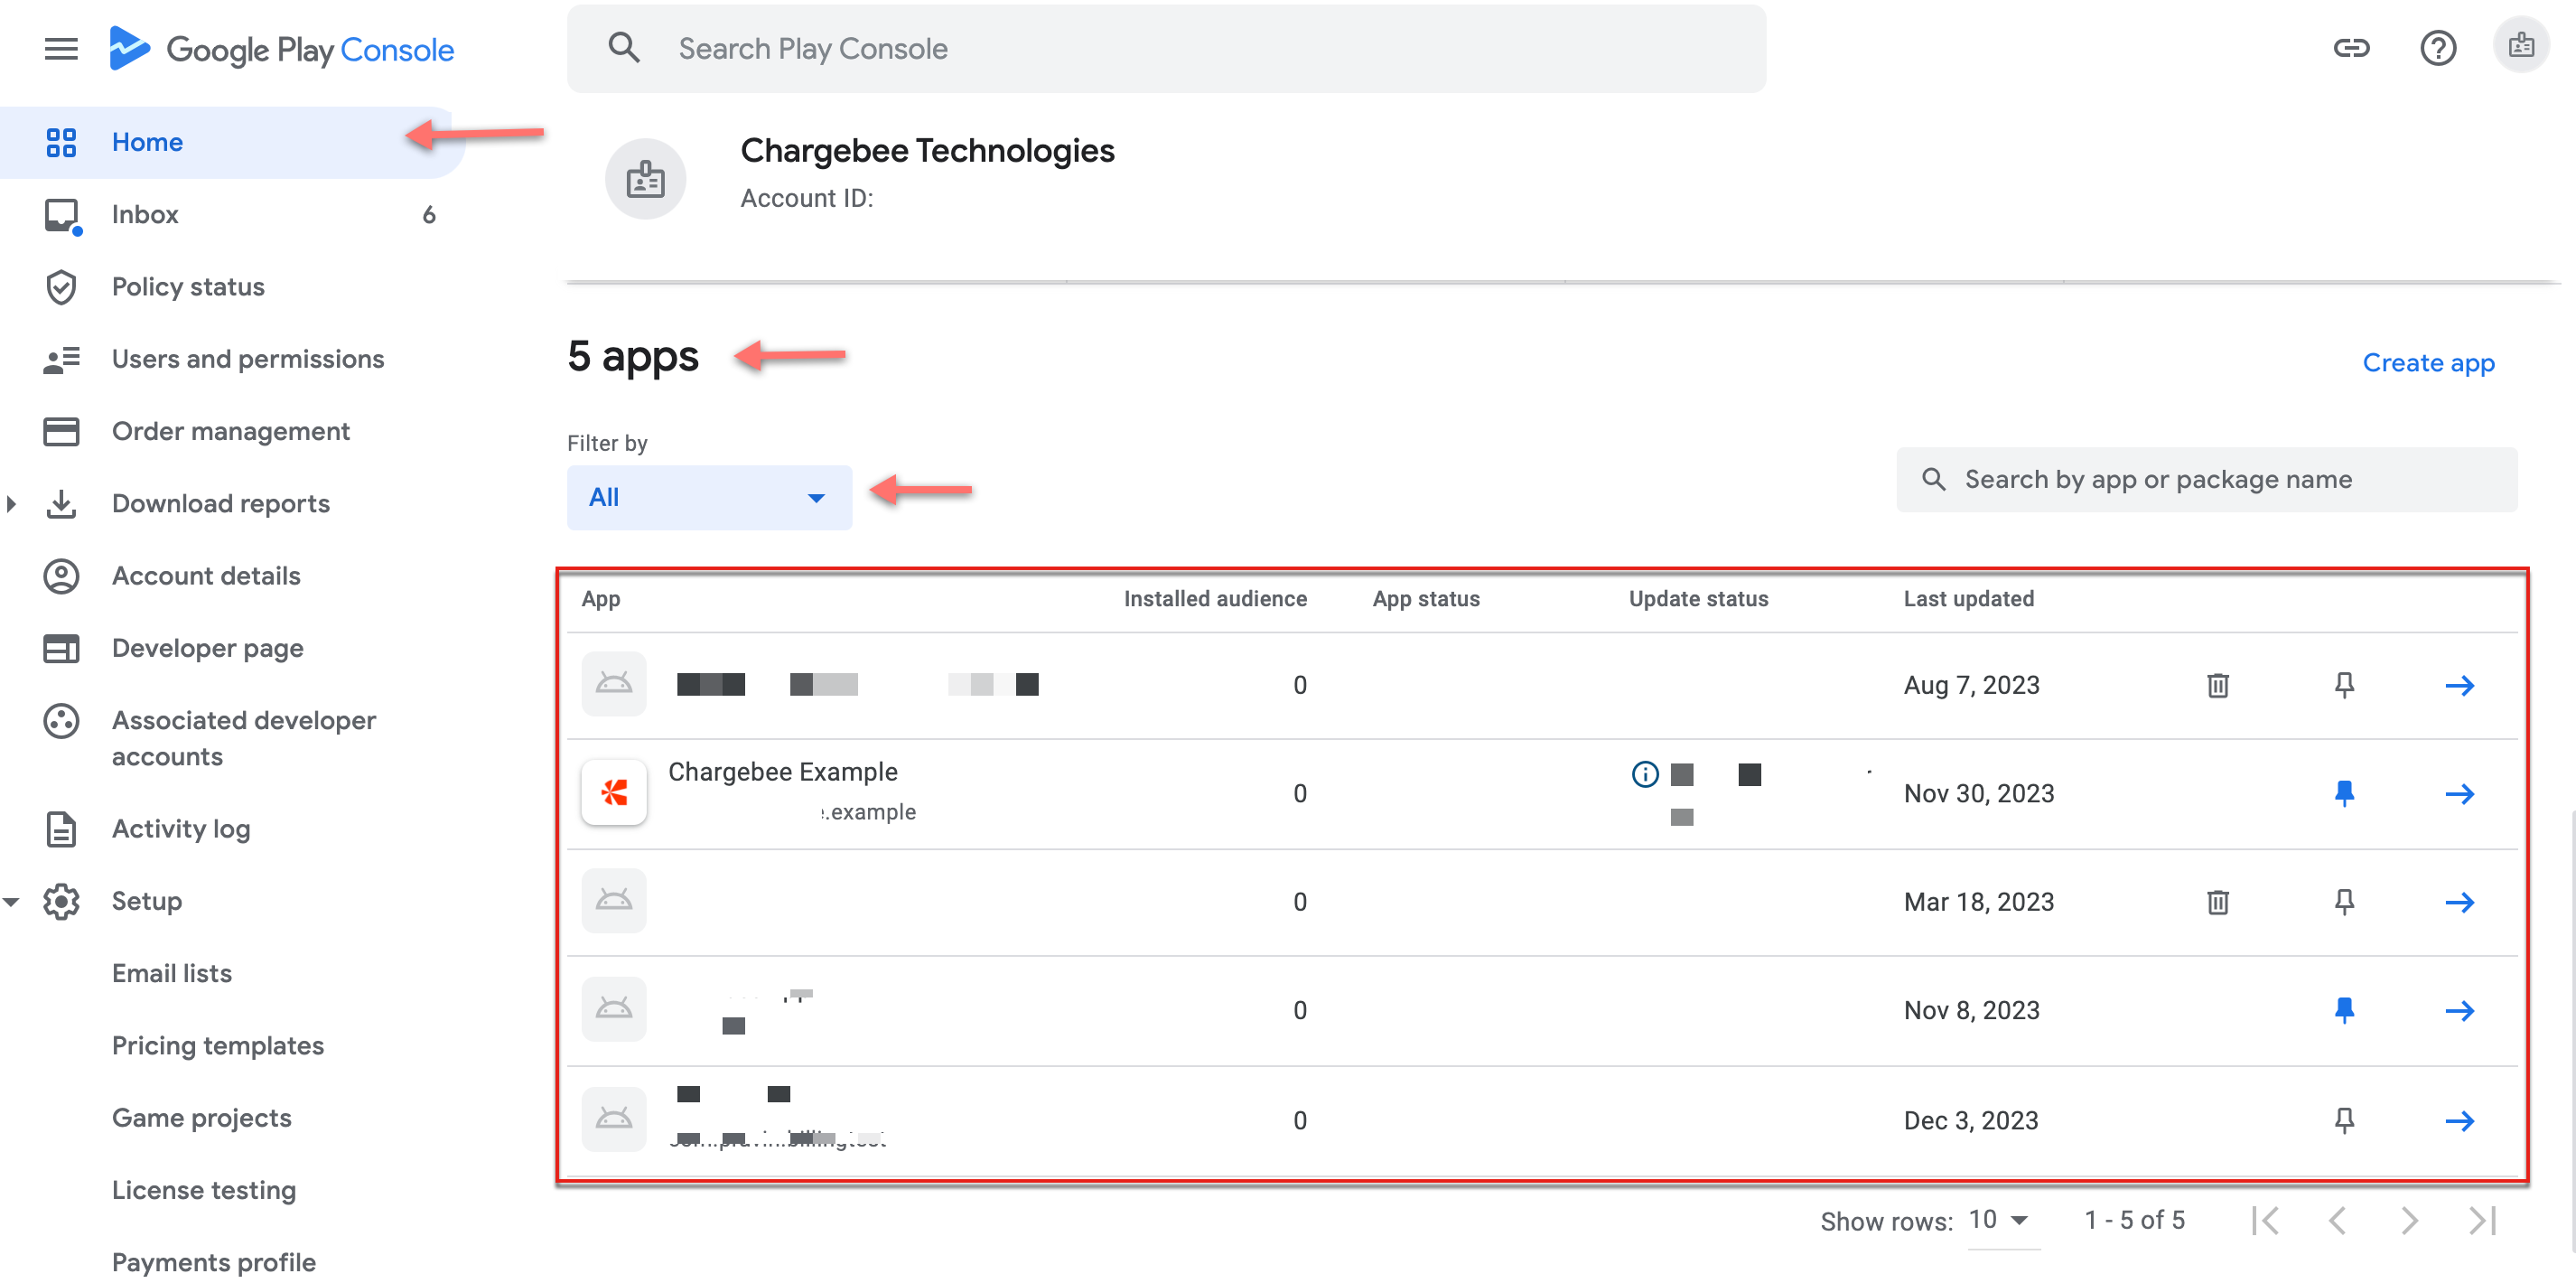
Login to your Google Play Store Console .
Click Home from the main menu.
Review the list of apps present in your Google Play Console.
Click the specific App from the list and navigate to Dashboard to check the App Name and App Package Name.
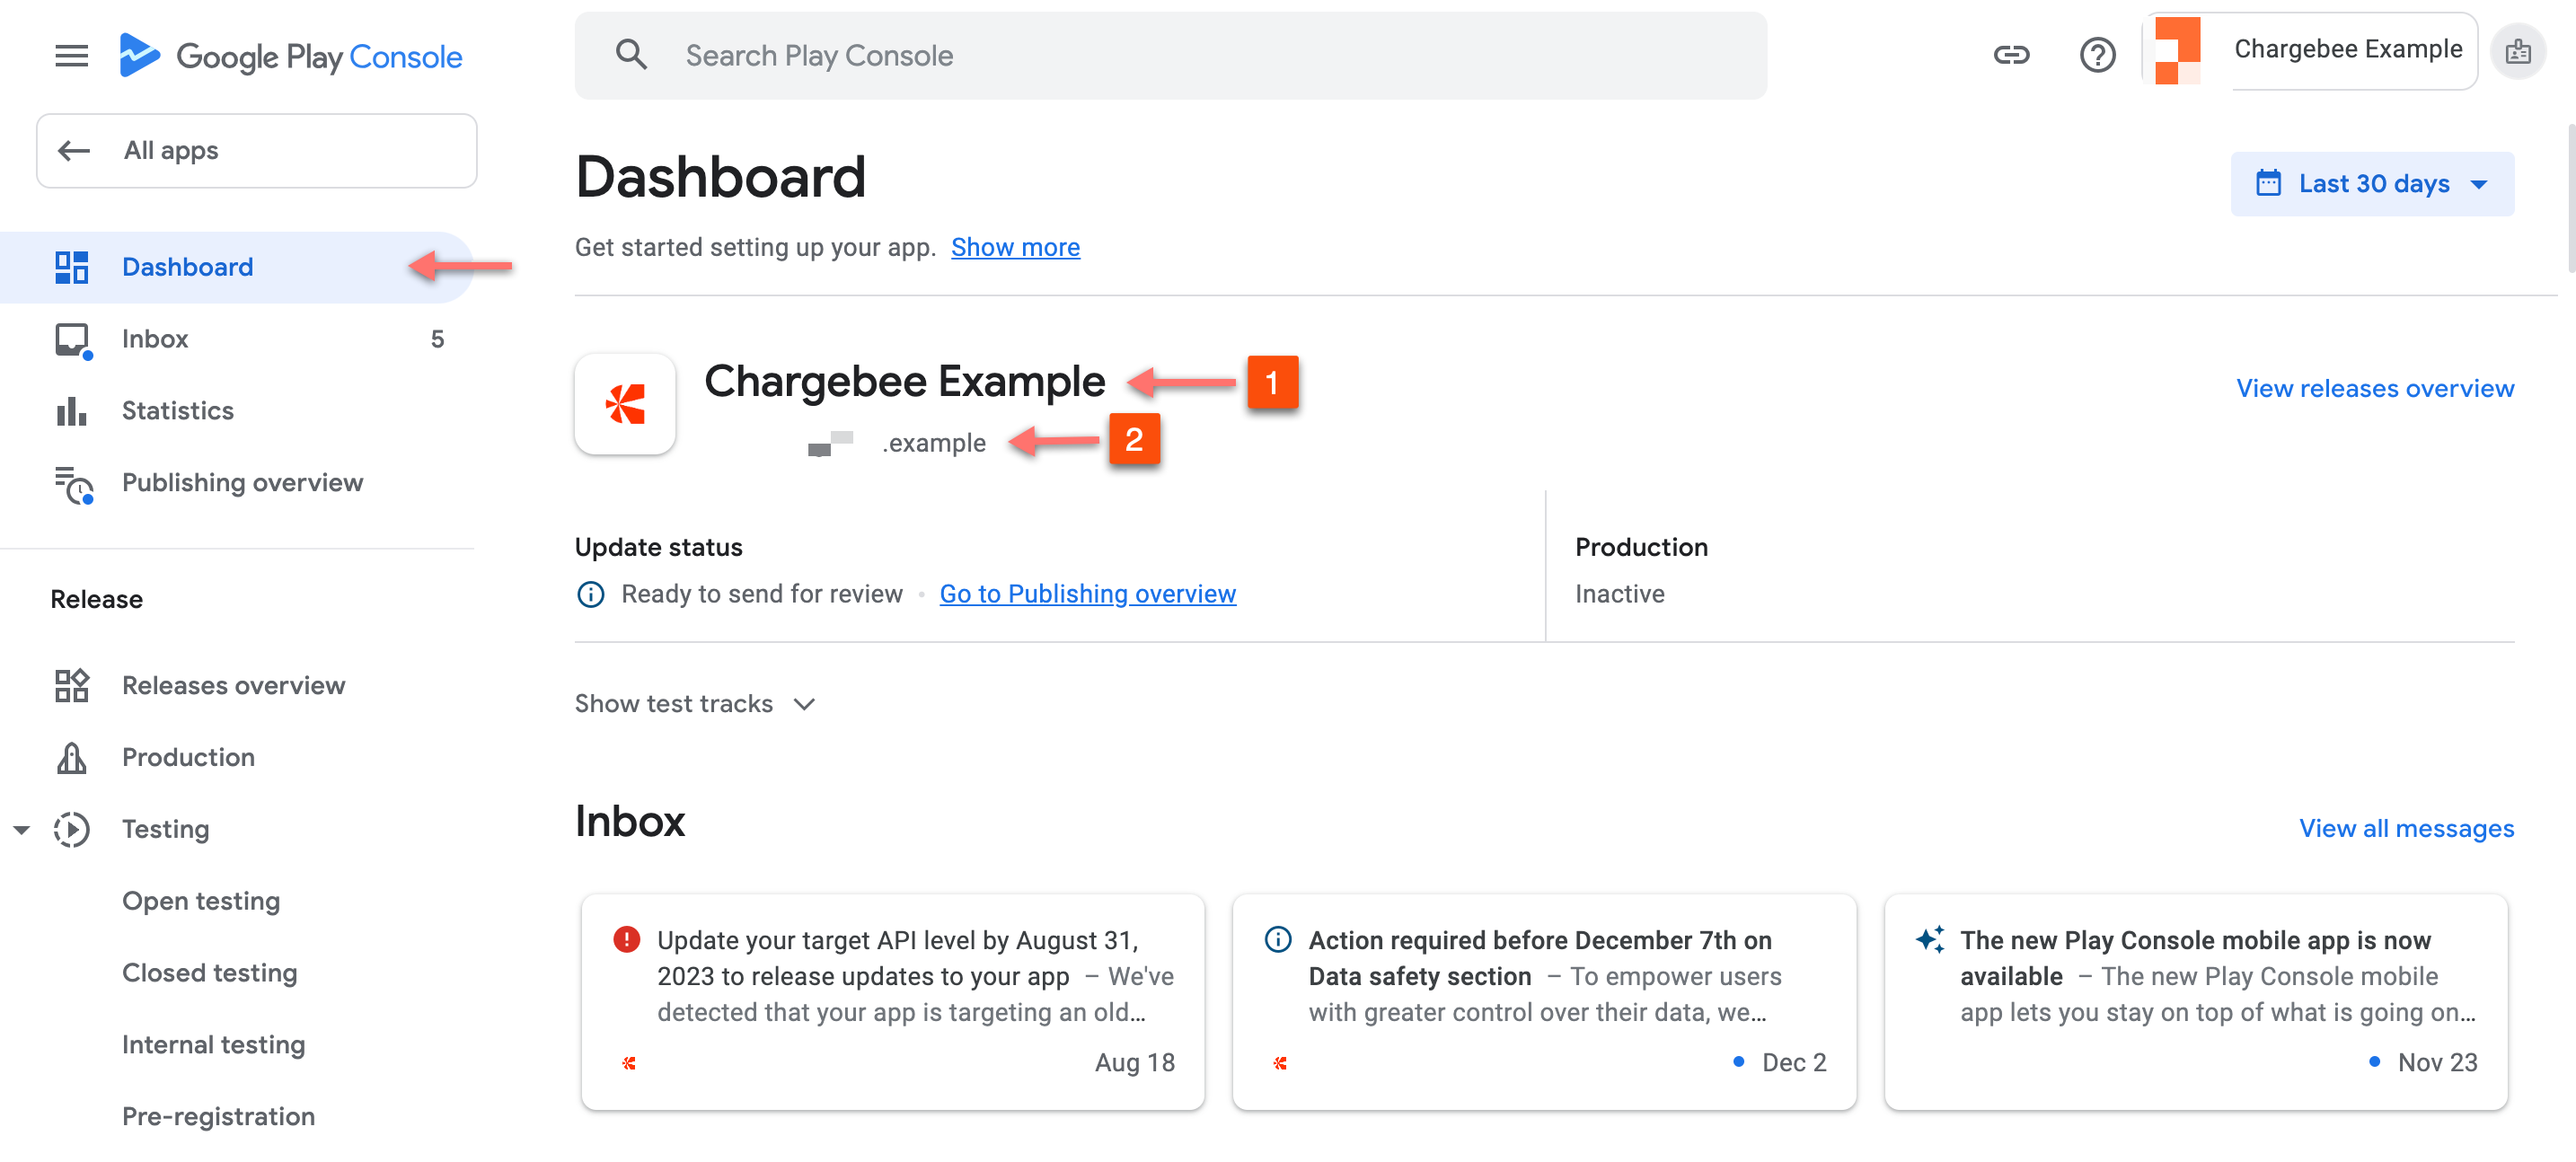
Take a note of the App Name and App Package Name that you want to connect with your Chargebee account.
To enable Chargebee servers to communicate with Google on behalf of your app, you need to provide service credentials by generating a service account credentials JSON file. Follow the steps carefully to generate this file.
Google Play Service Credentials might require up to 36 hours to become fully operational with the Google Play Android Developer API.
These APIs have to be enabled to manage your app in the Google Play Store and consume the data from Google Play Console for reporting.
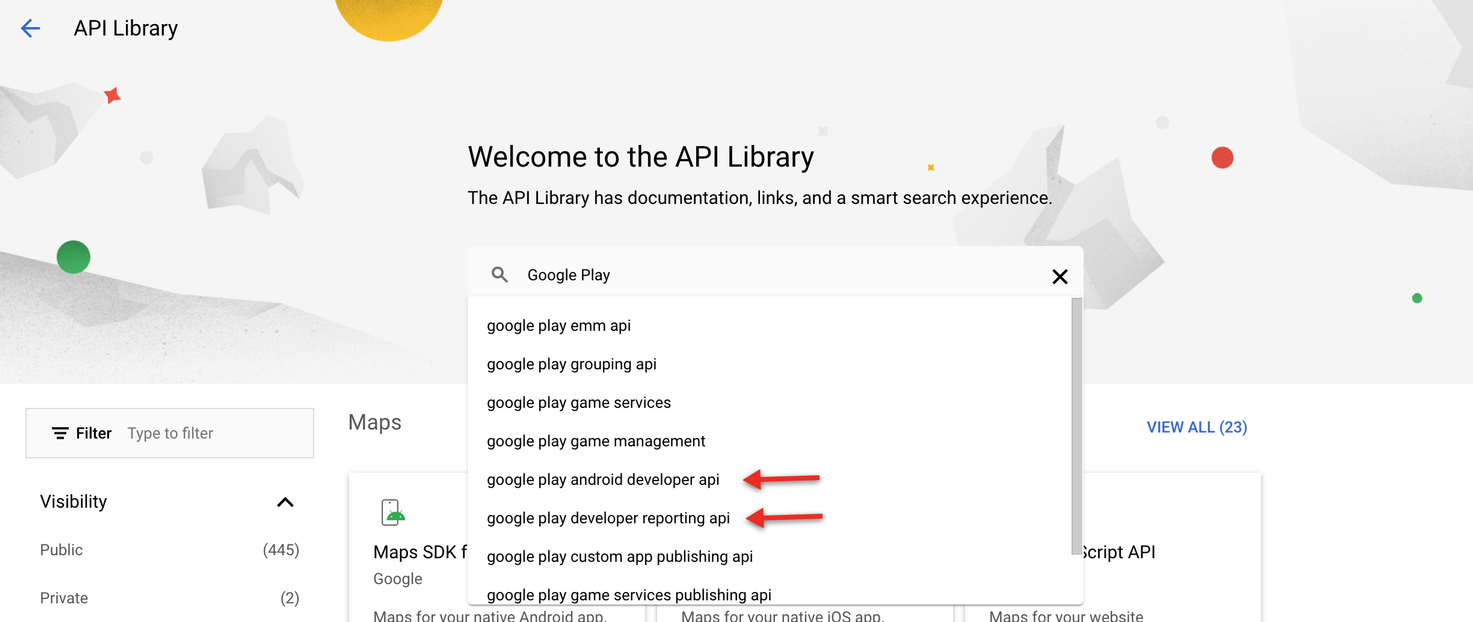
To enable Google Play Android Developer API and Google Play Developer Reporting API, follow these steps:
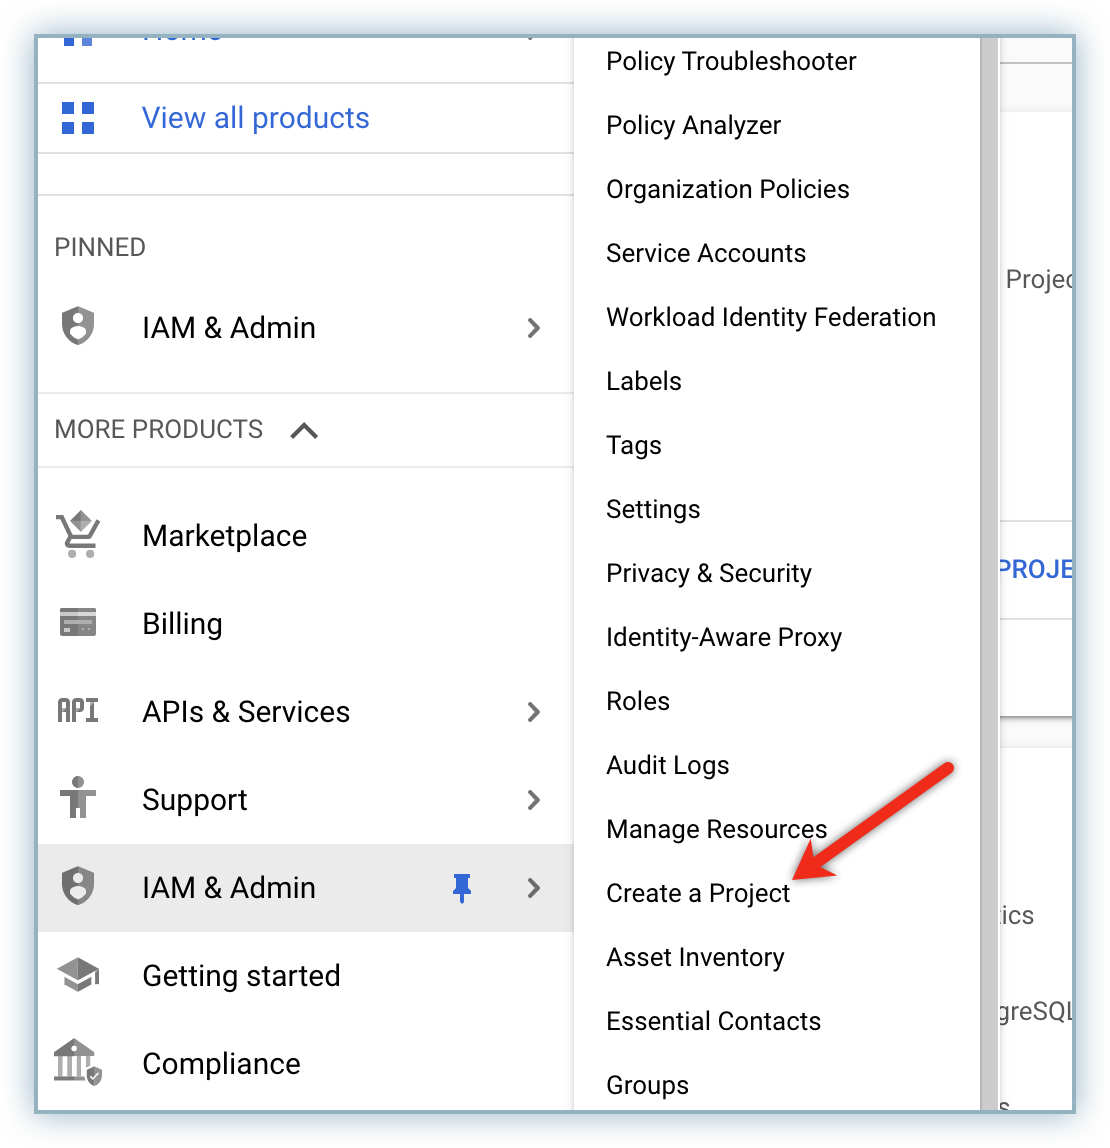
Login to your Google Cloud Console .
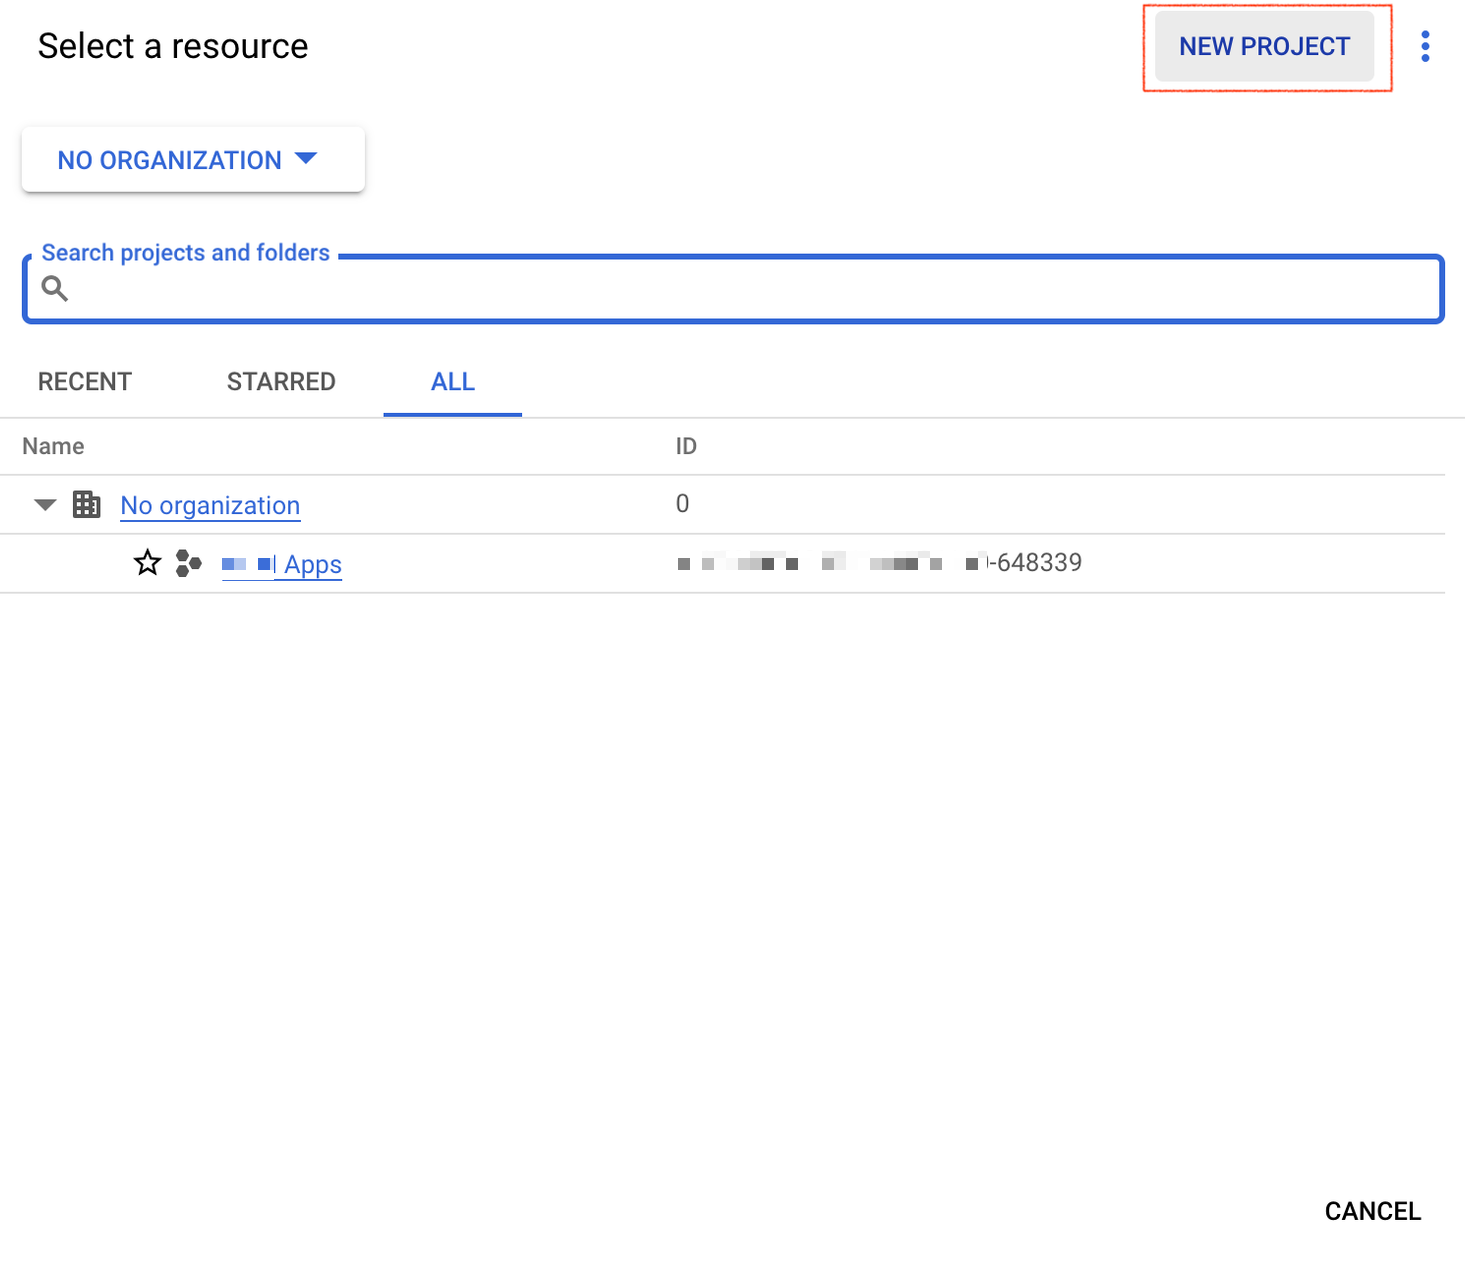
Select a project from the dropdown list.
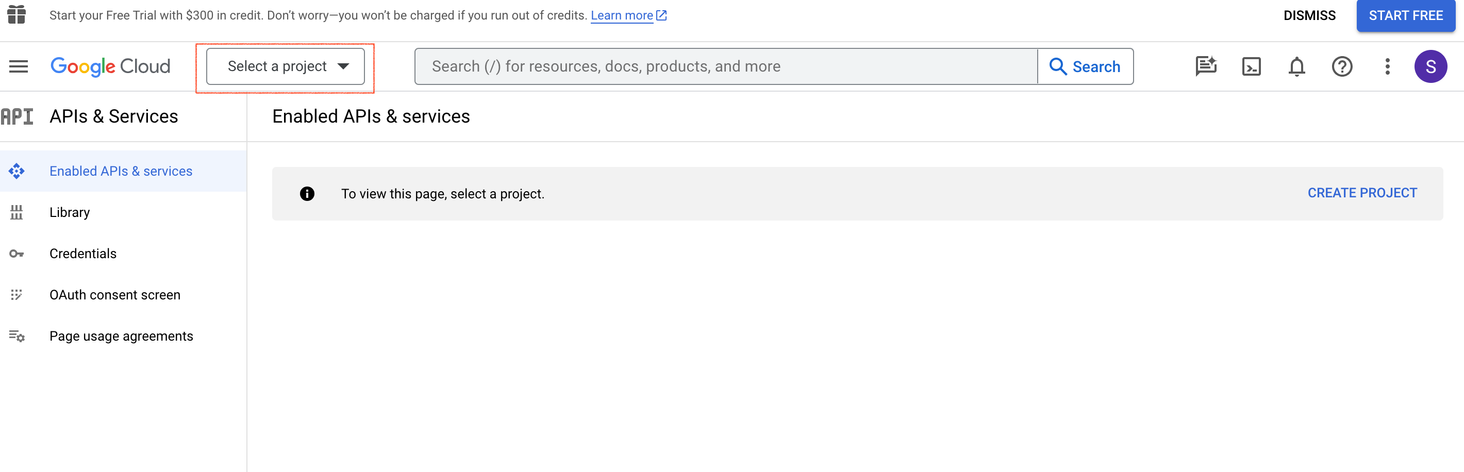
Optional: Click NEW PROJECT to create a new project if you do not have an existing project.
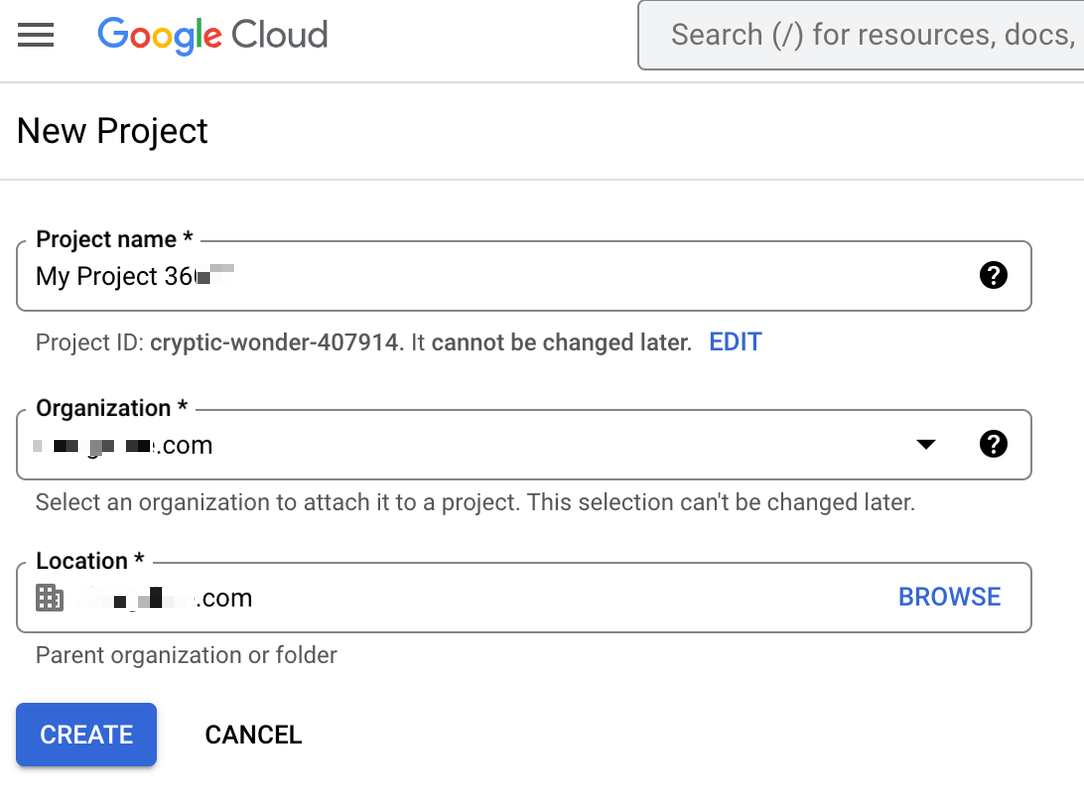
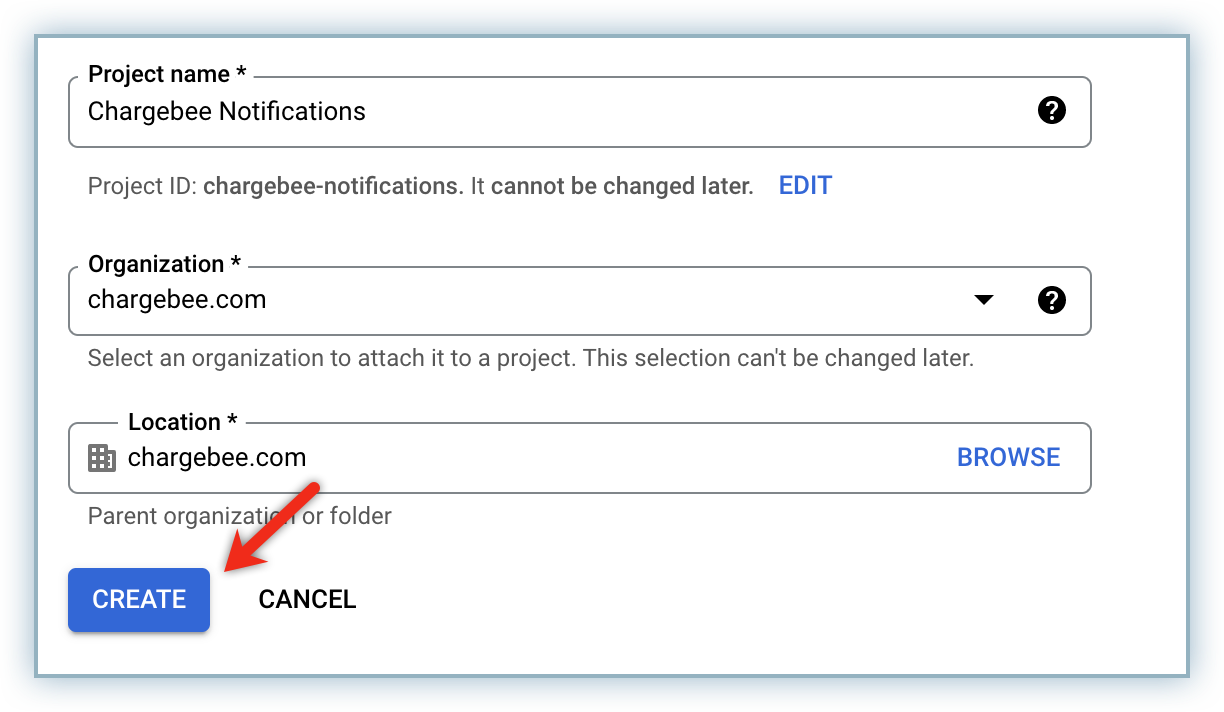
Enter the Project name, Organization, and Location to create a new project and click CREATE.
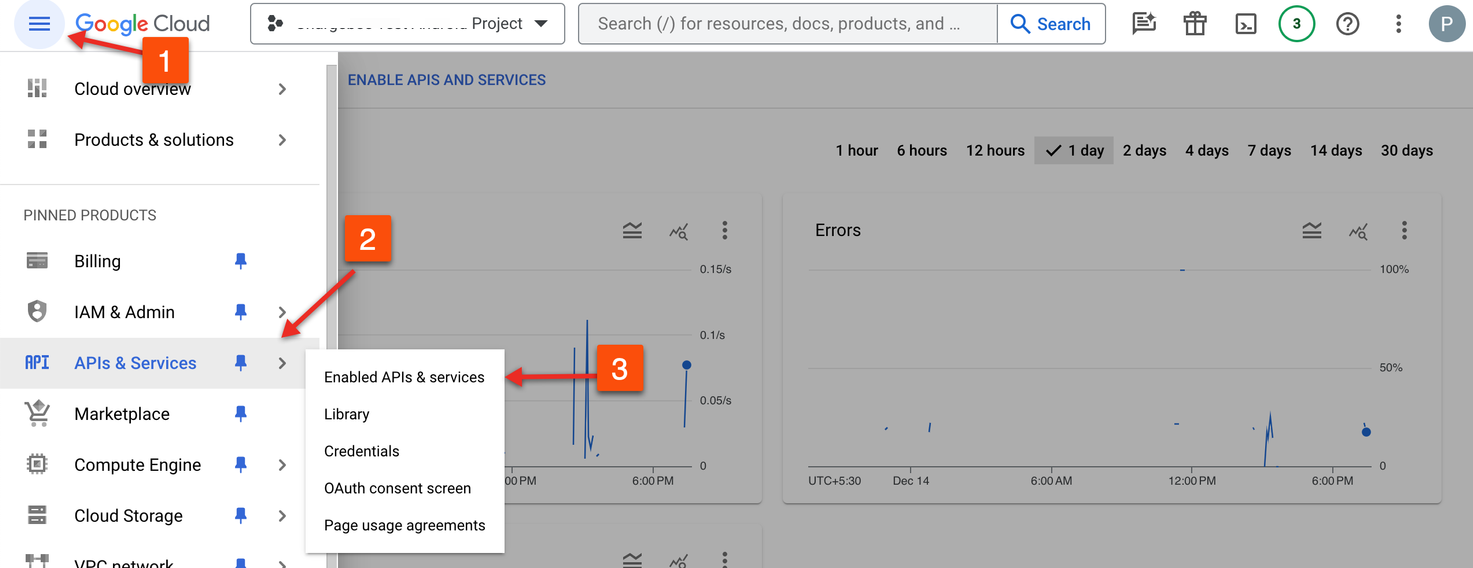
Navigate to APIs & Services > Enable APIs & services. Click + ENABLE APIS AND SERVICES.
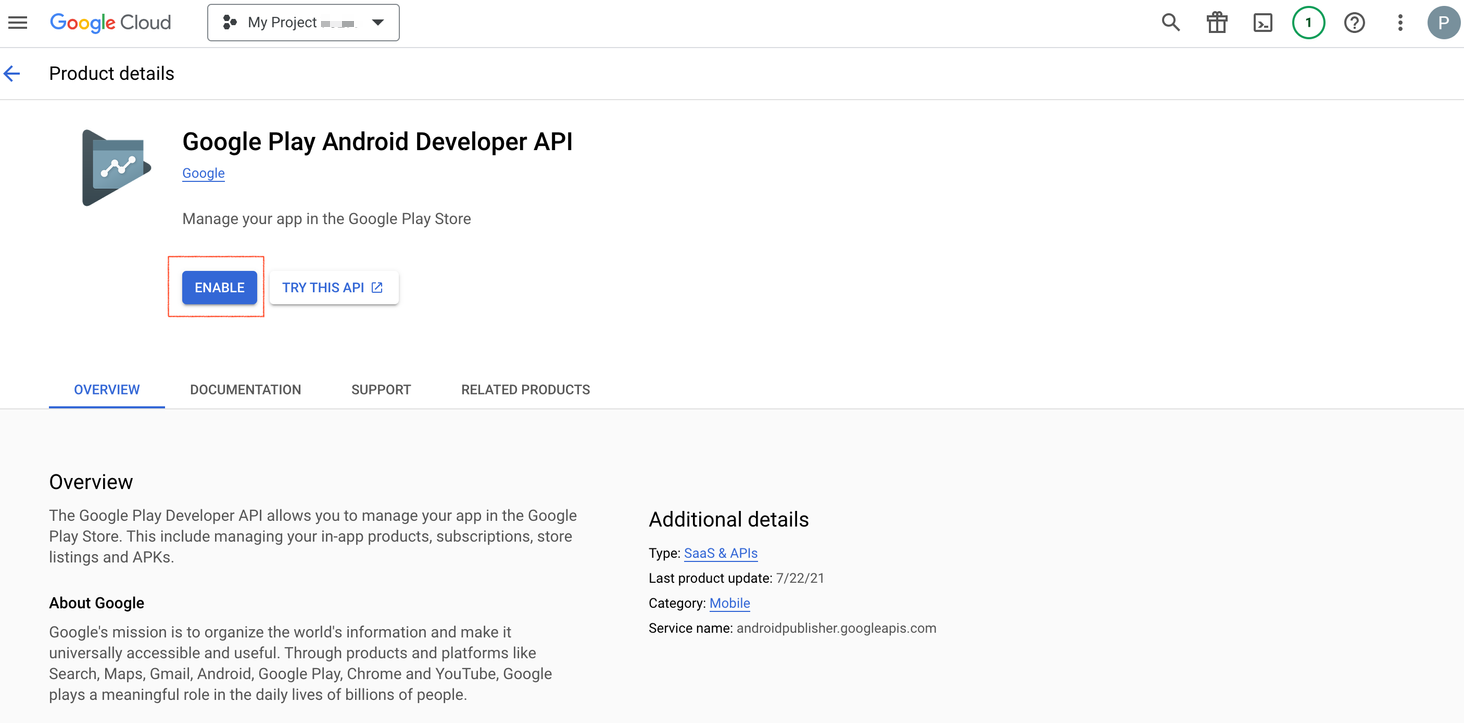
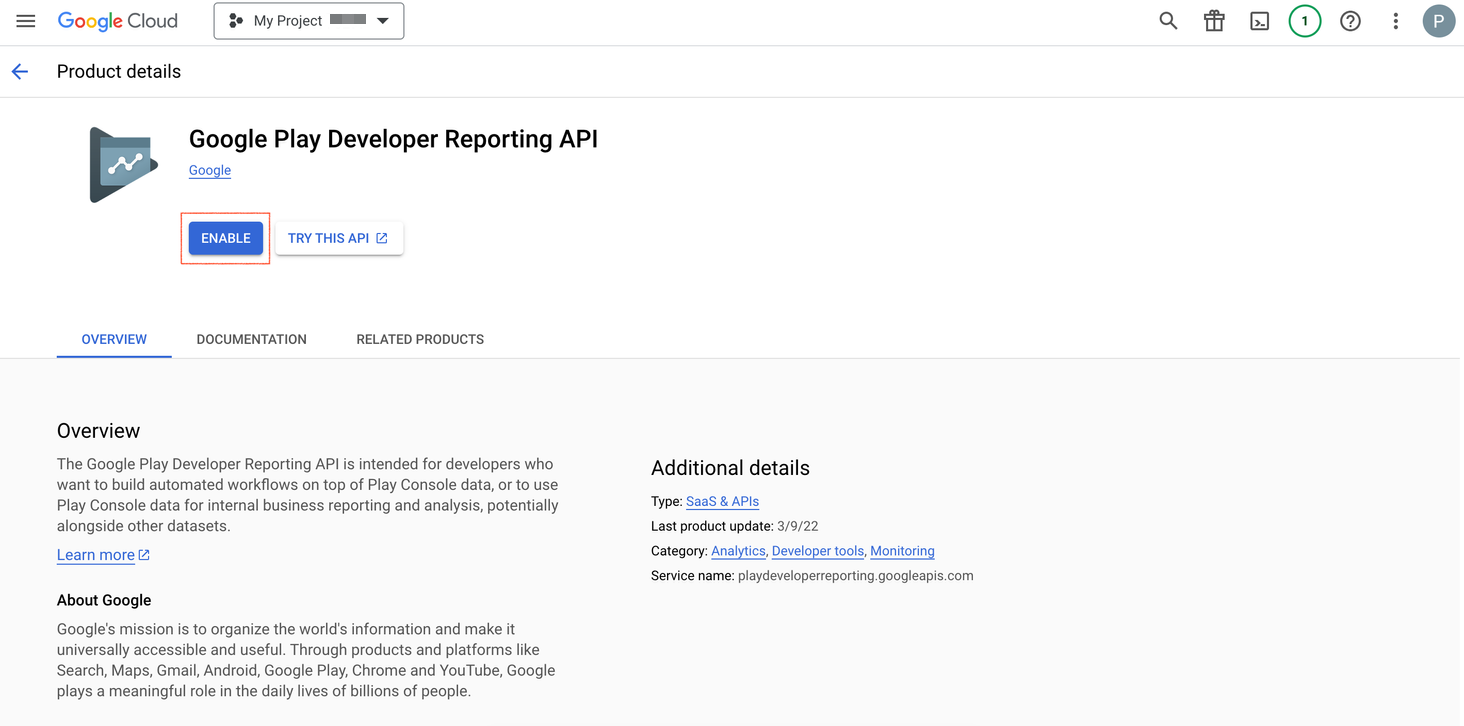
Search Google Play Android Developer API and Google Play Developer Reporting API.
Enable both APIs.
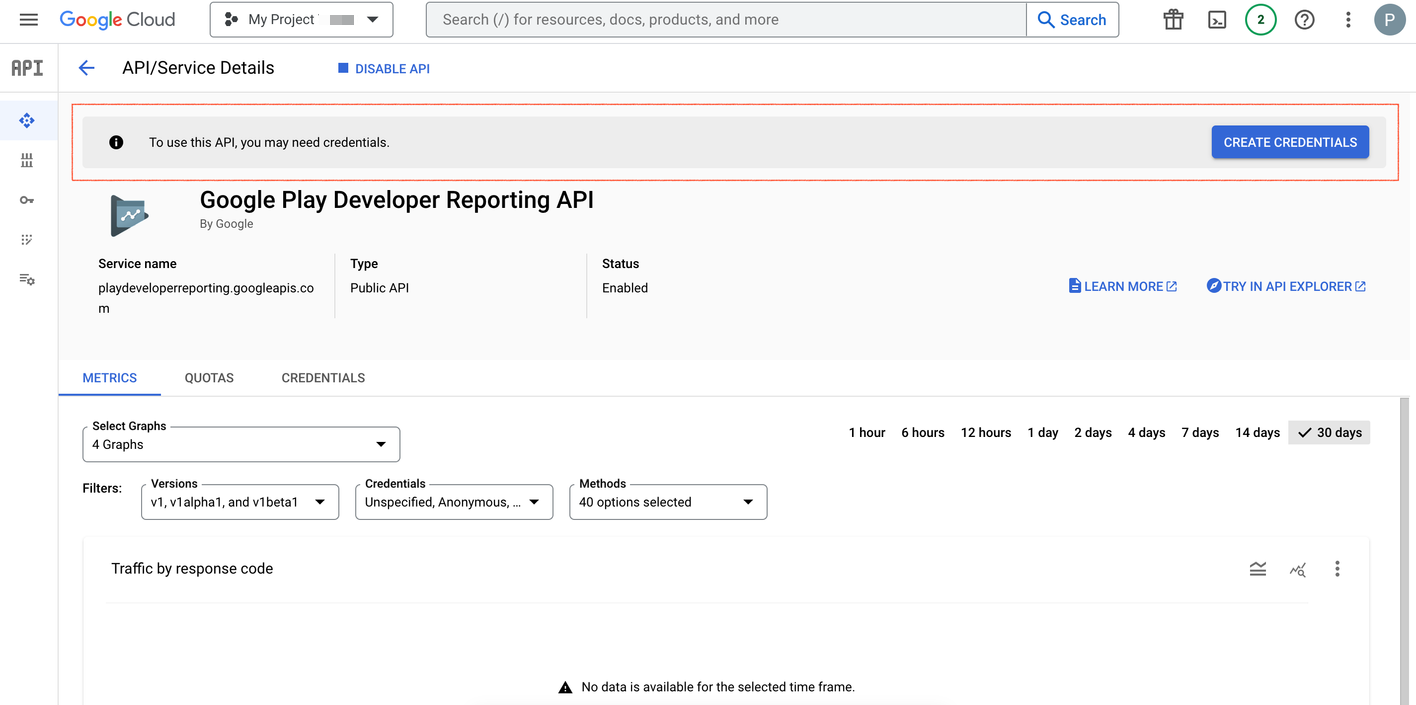
Post enabling these APIs, you'll be redirected to the Google Cloud API page. If you already have credentials to access this API then proceed to Step 2. If you don't have credentials to access these APIs, then follow below two steps
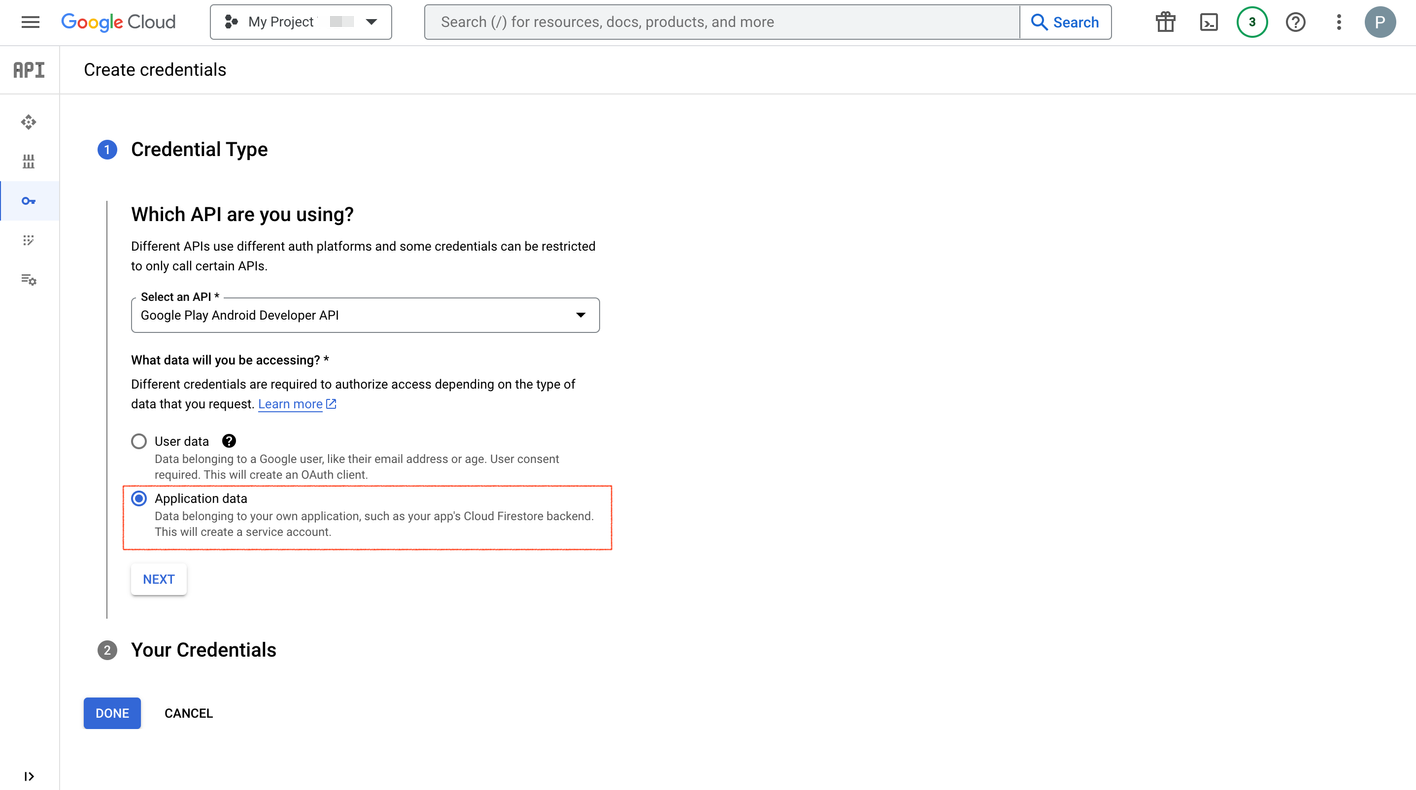
Click Create Credentials.
In the Credential Type screen, the API will be auto-selected for which you are going to create credentials. What data will you be accessing? option,select the Application data as Chargebee only needs the application data, and click Next.
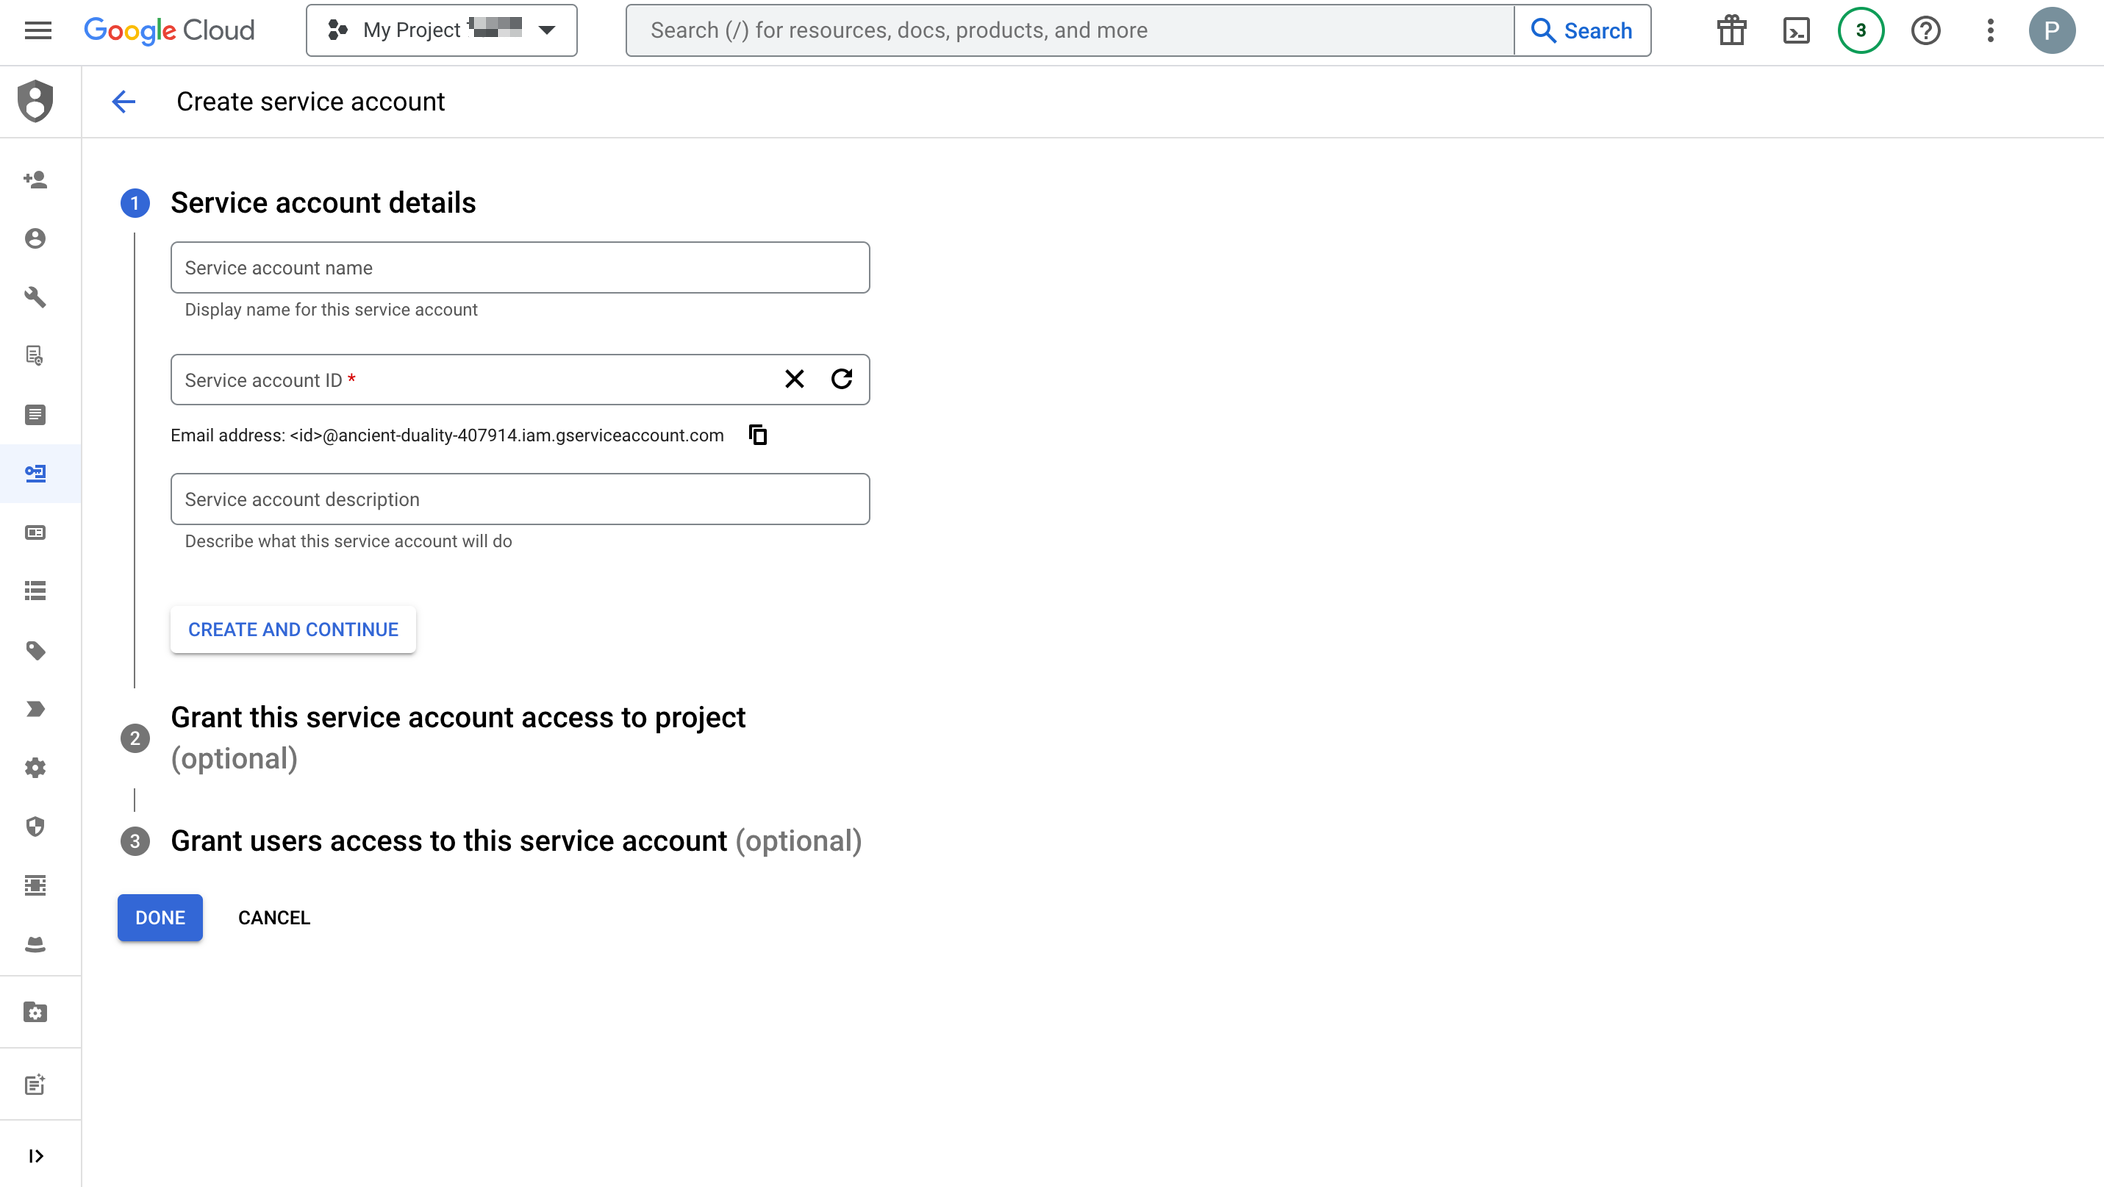
In the Service account details screen, enter the Service account name, Service account ID, and Service account description. To create a service account follow Step 2 and click CREATE AND CONTINUE > DONE.
If you have just created credentials, a message will appear - To use this API, you may need credentials. This message appears because Google takes some time to validate credentials.
You need to create a service account for Chargebee to make authorized API calls for your app.
To create a service account, follow these steps
Navigate to IAM & Admin > Service Account in the Google Cloud Console. Ensure that the project for which the service account needs to be created is selected. Ideally, it is the same as the one selected in the previous step.
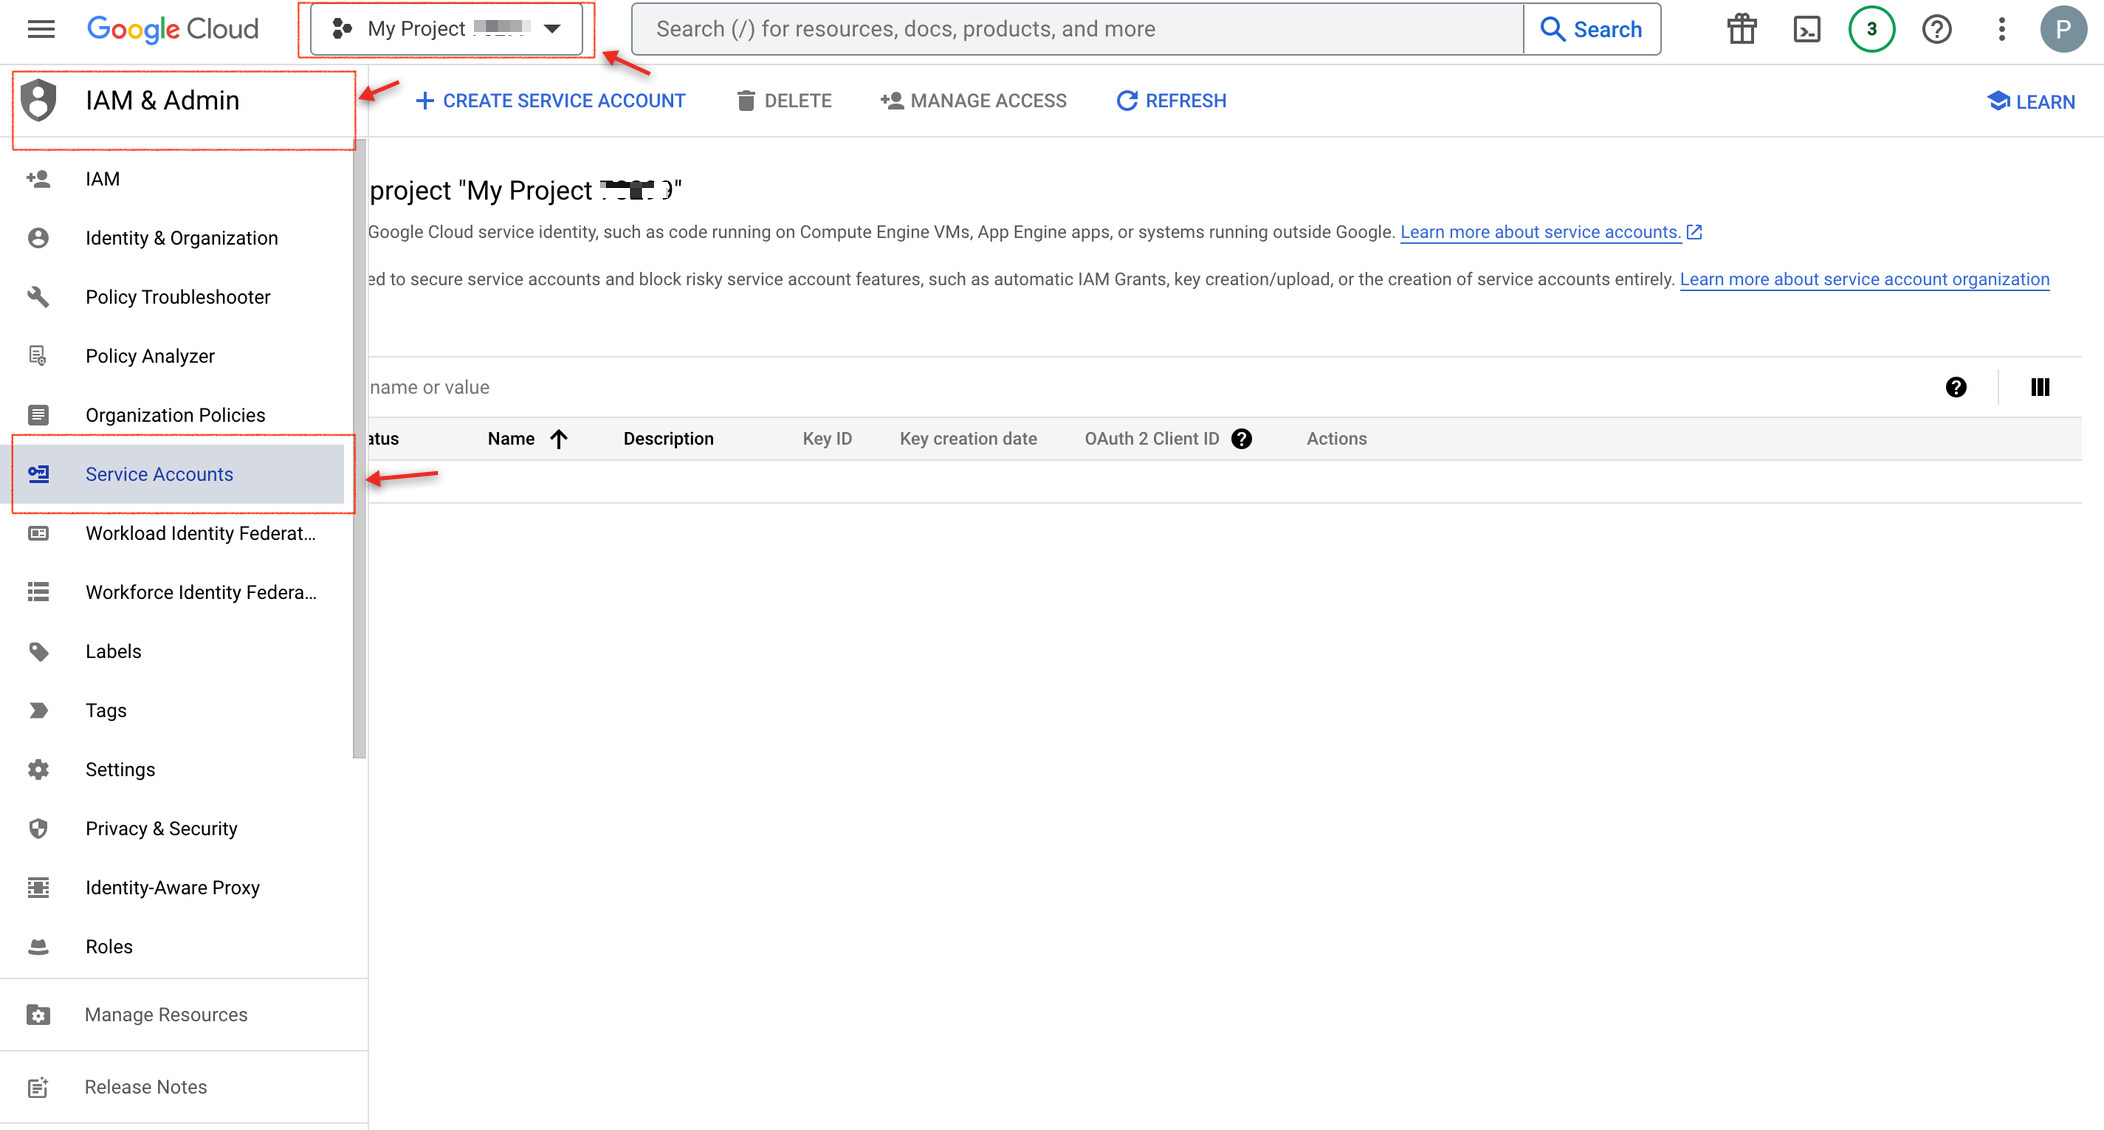
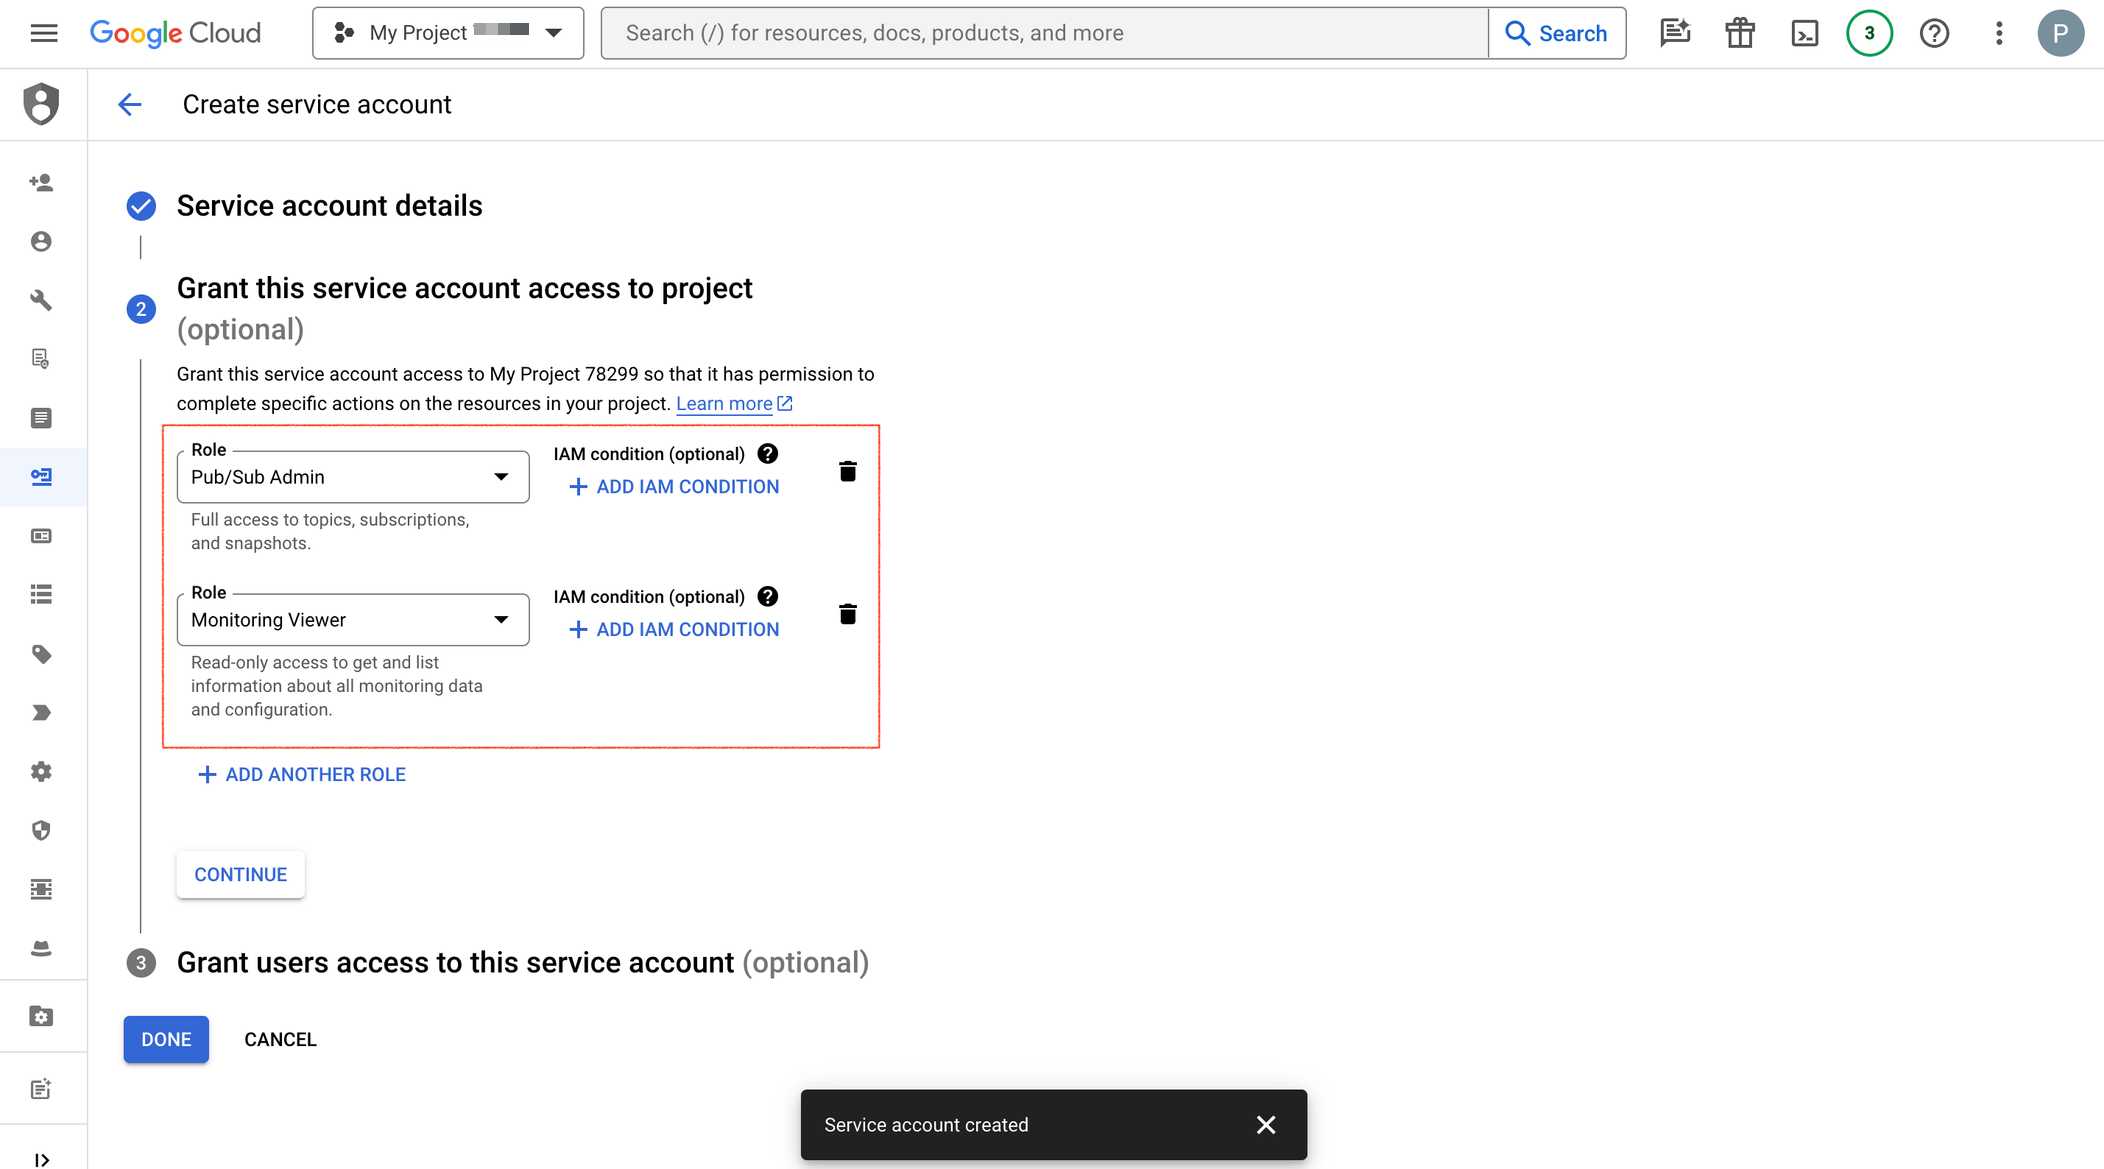
Click Create Service Account.
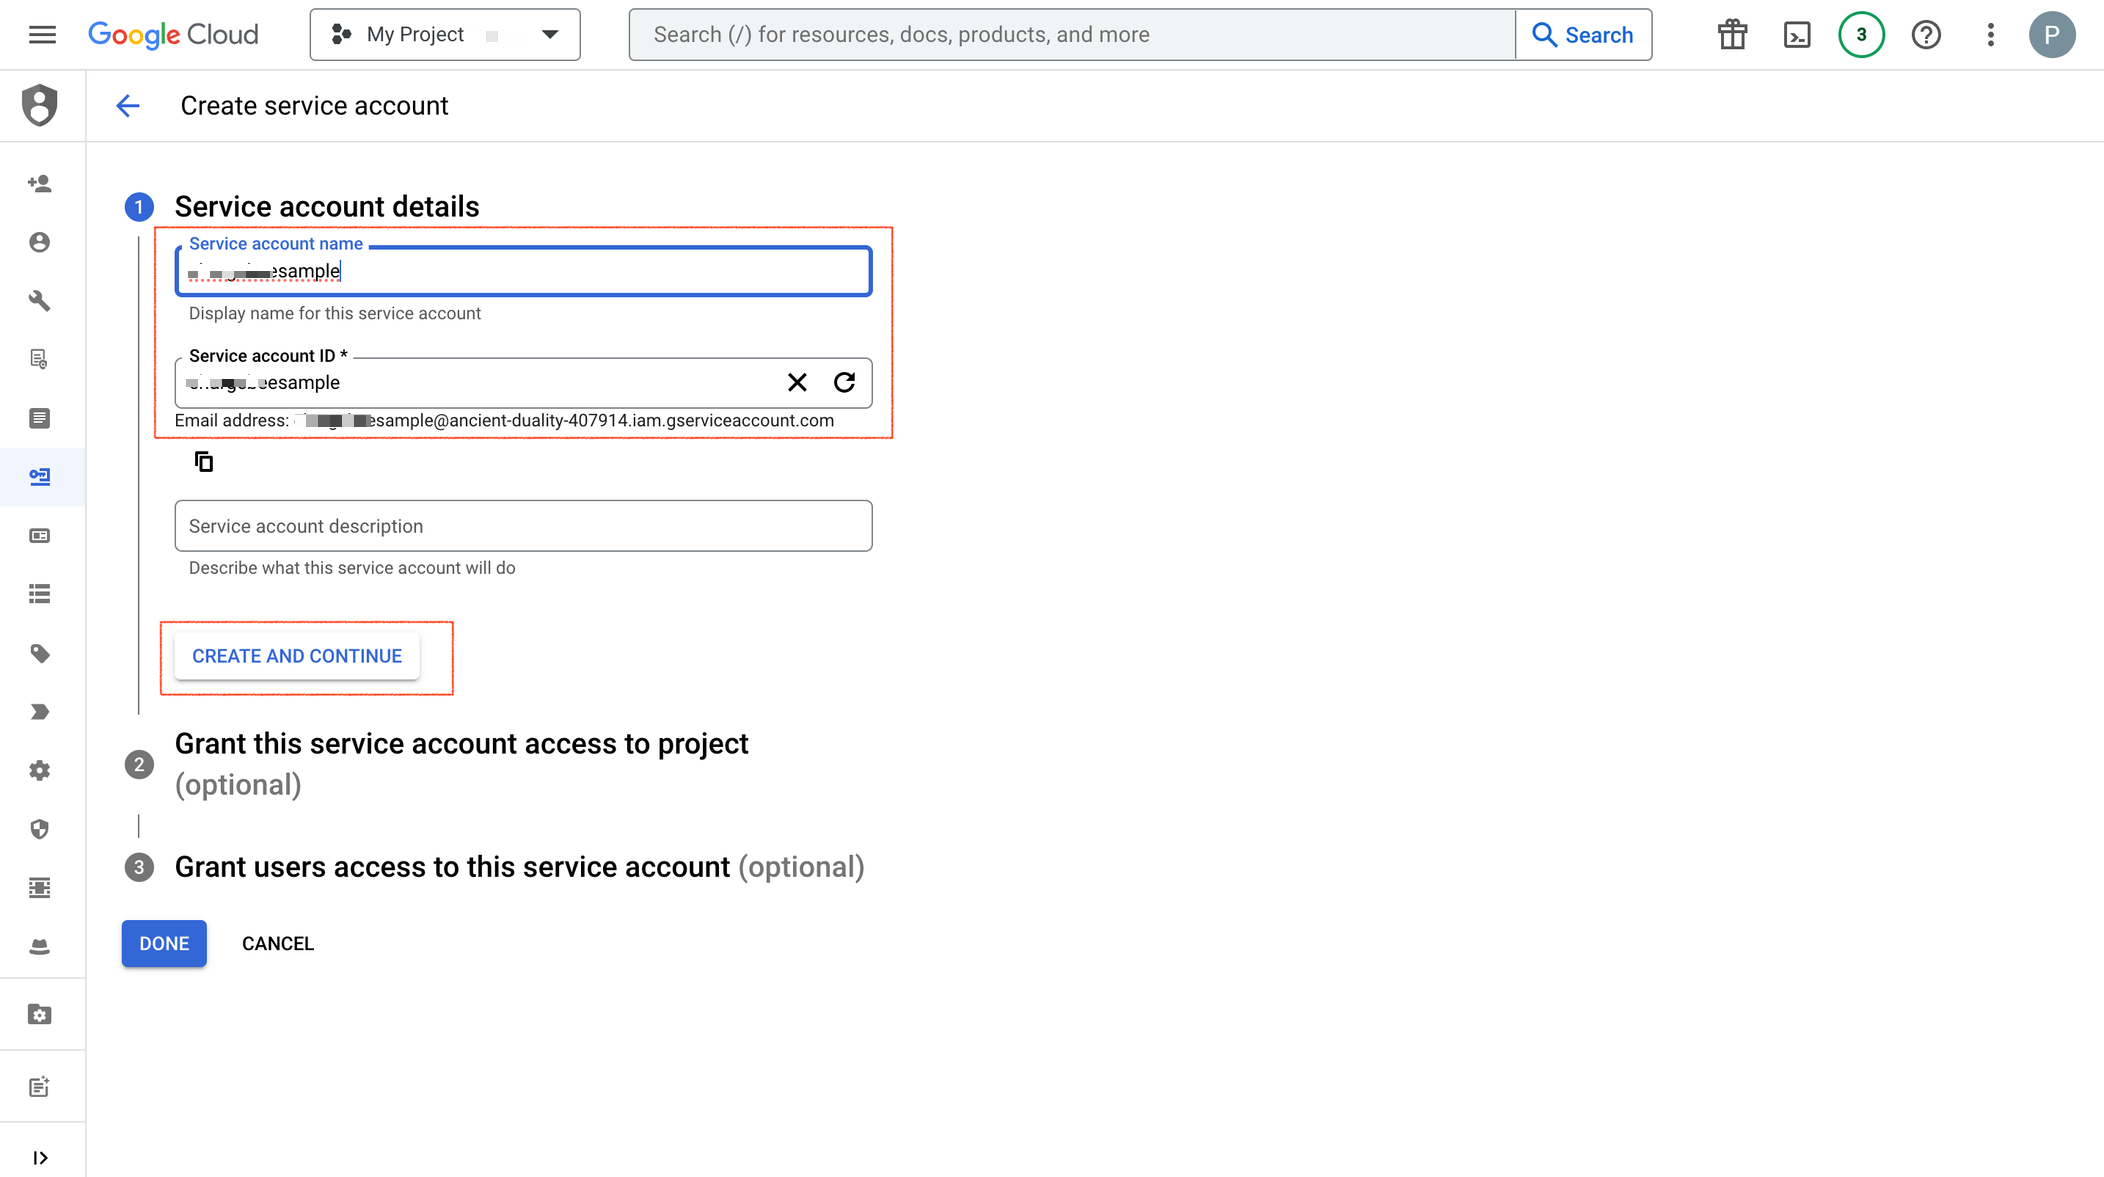
In the Service account details step, enter the Service account name, Service account ID, and Service account description, and click Create And Continue.
In the Grant this service account access to project step, select the Role as Pub/Sub Admin and Monitoring Viewer, and click Continue. These roles enable receiving Google platform server notifications and monitoring the notification queue. You can skip the third step Grant users access to this service account and click DONE.
In the Service accounts for
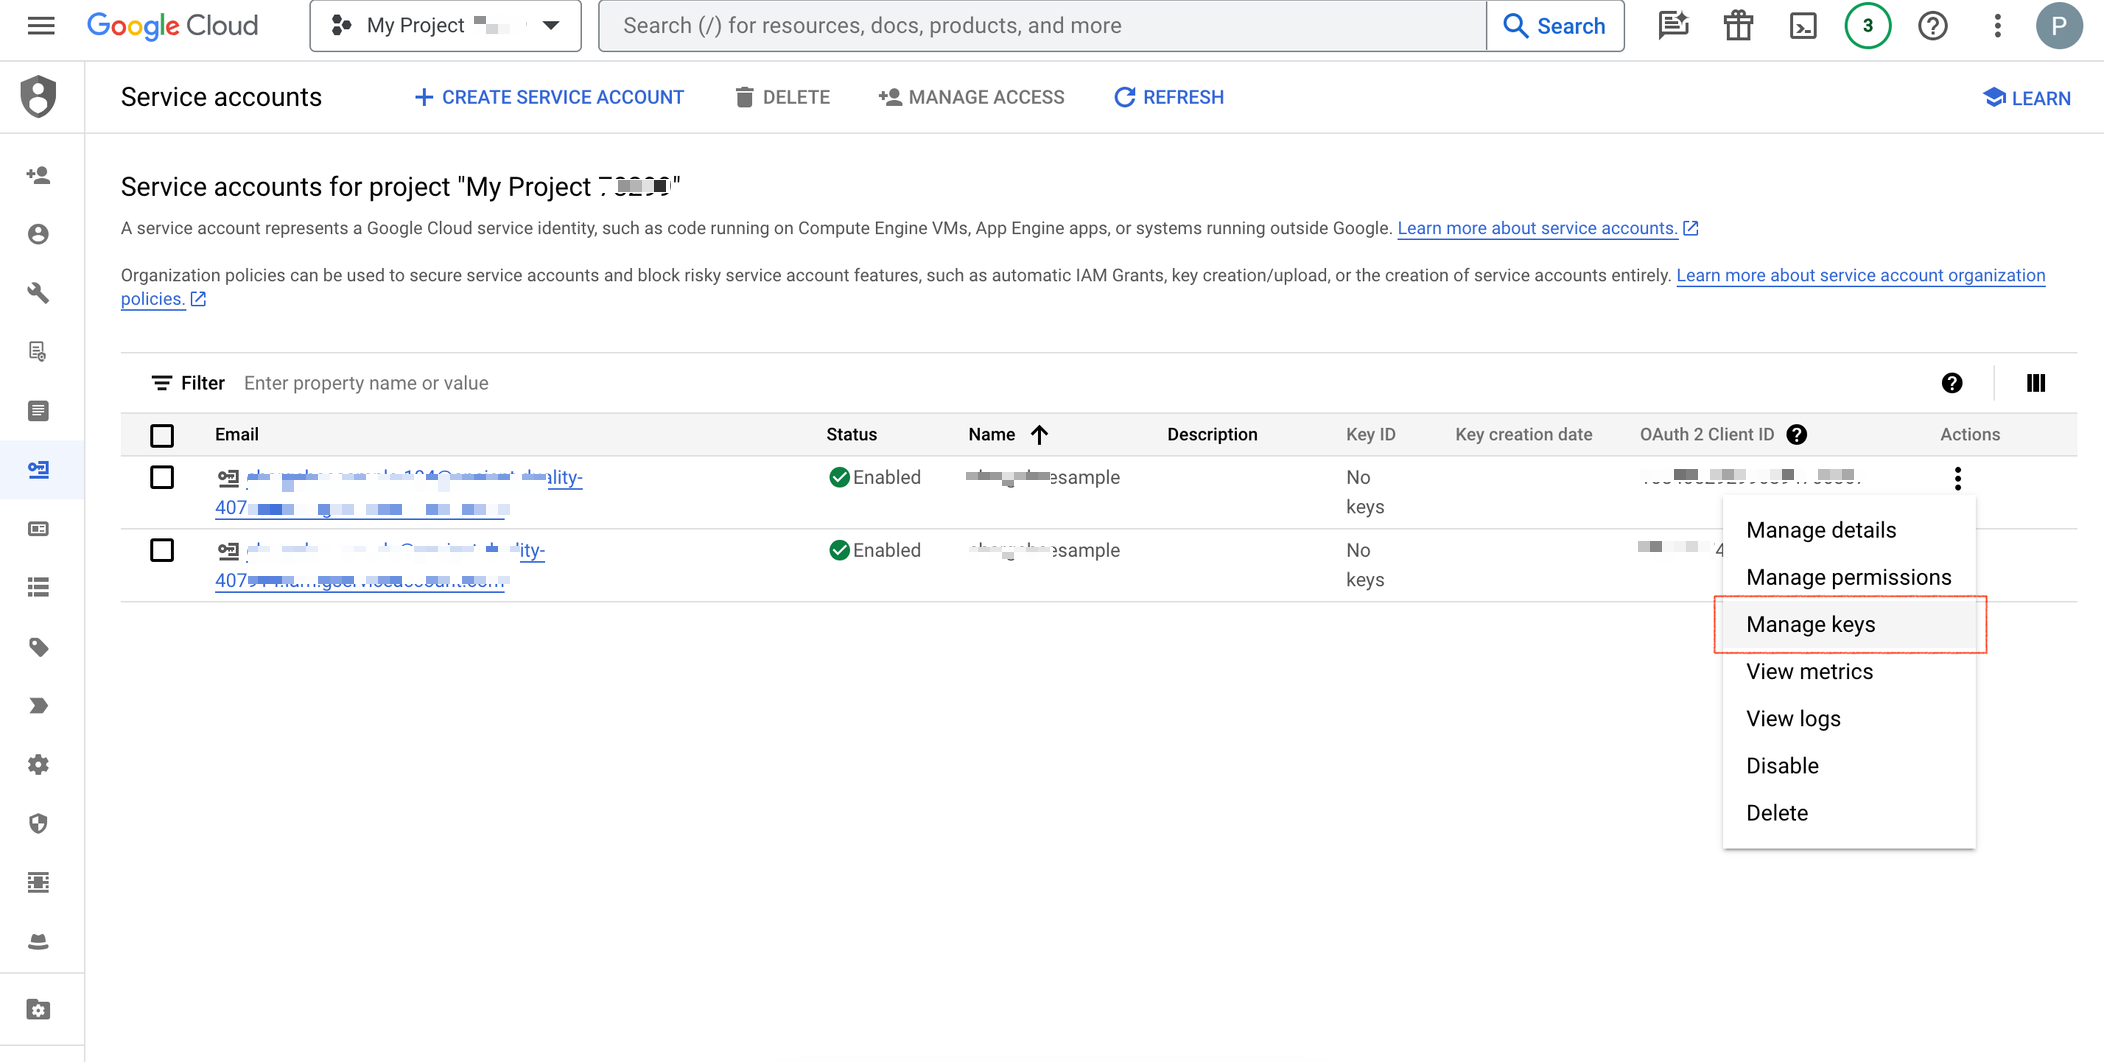
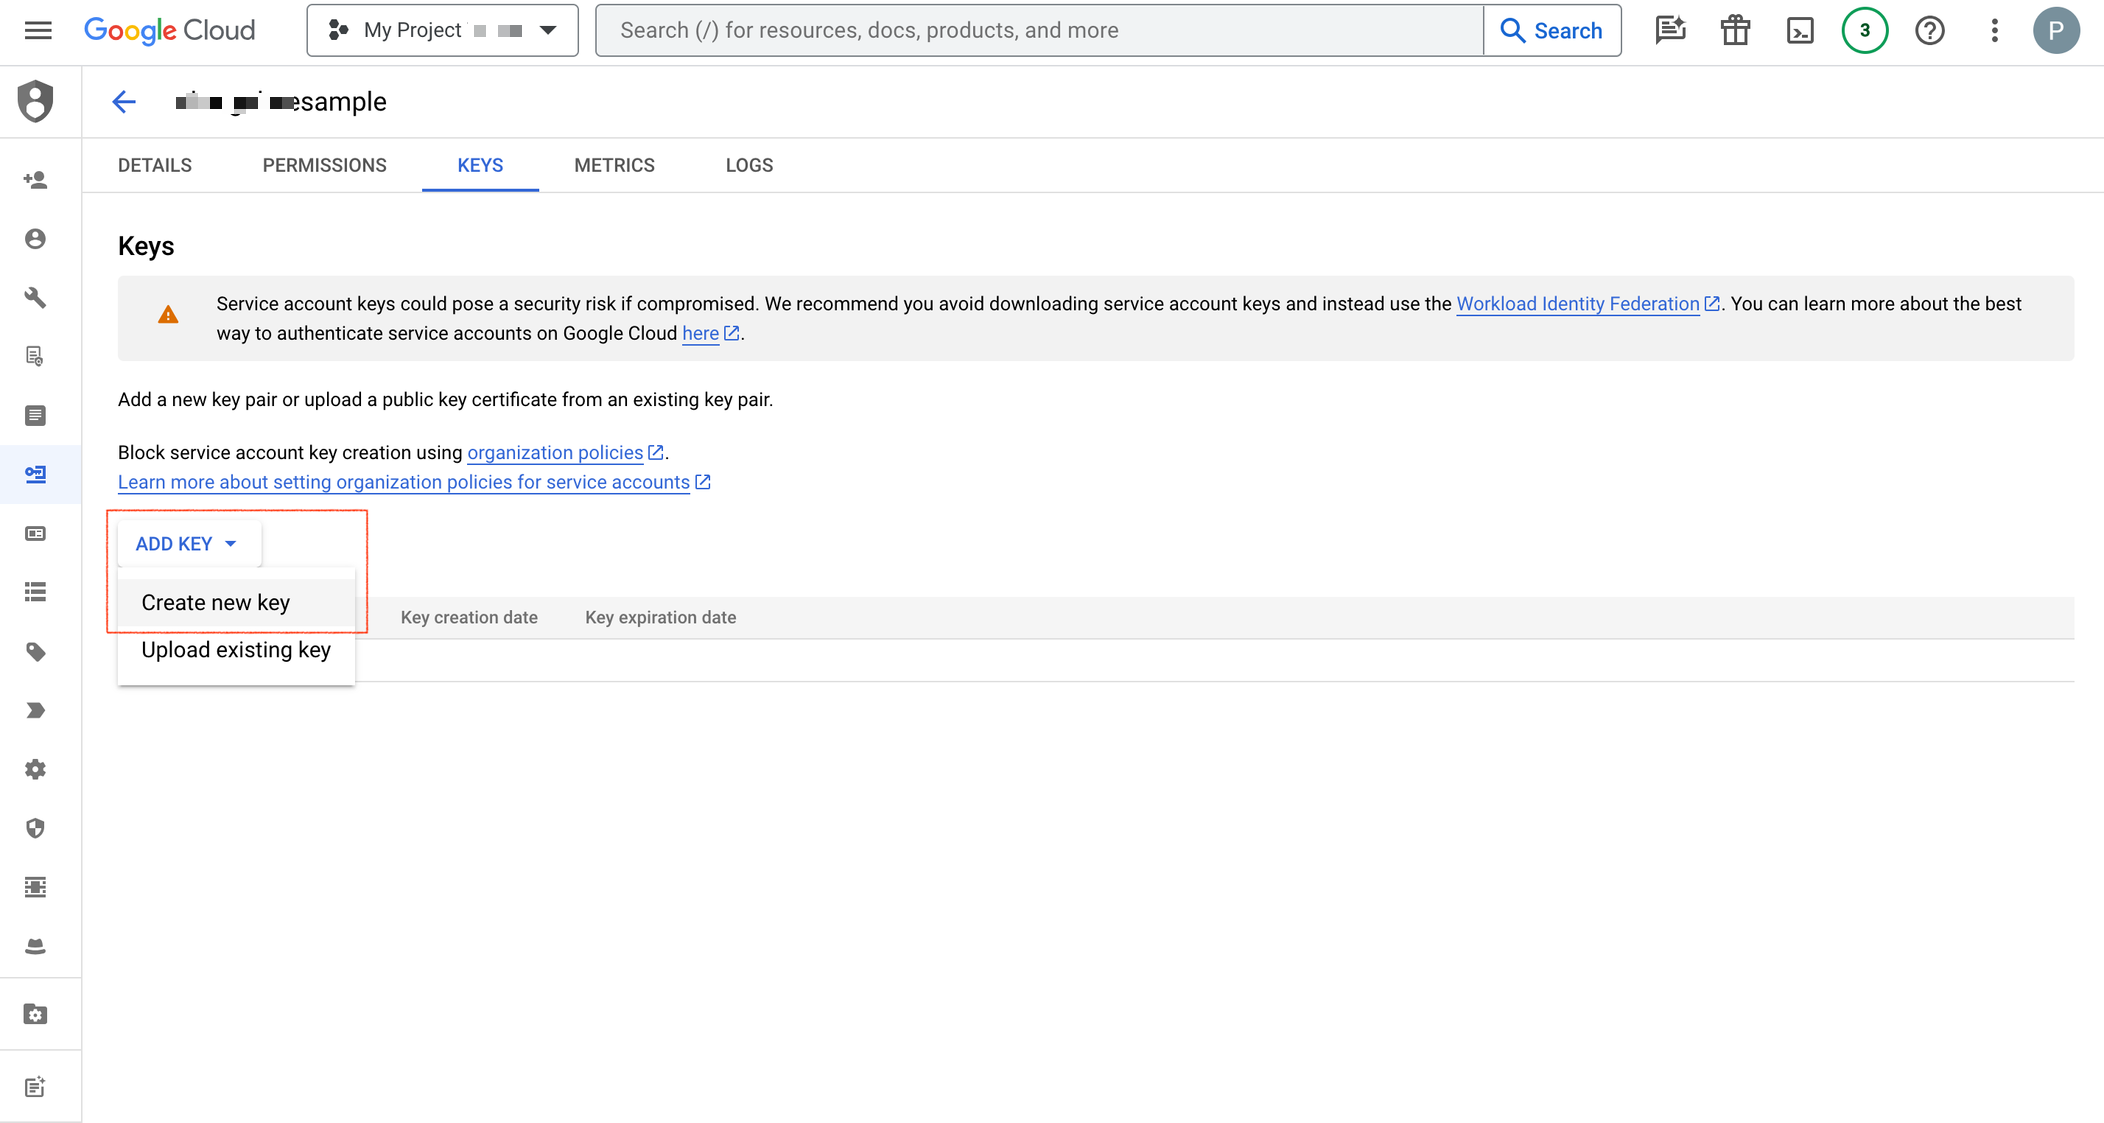
In the Keys tab, click Add Key and create a new key.
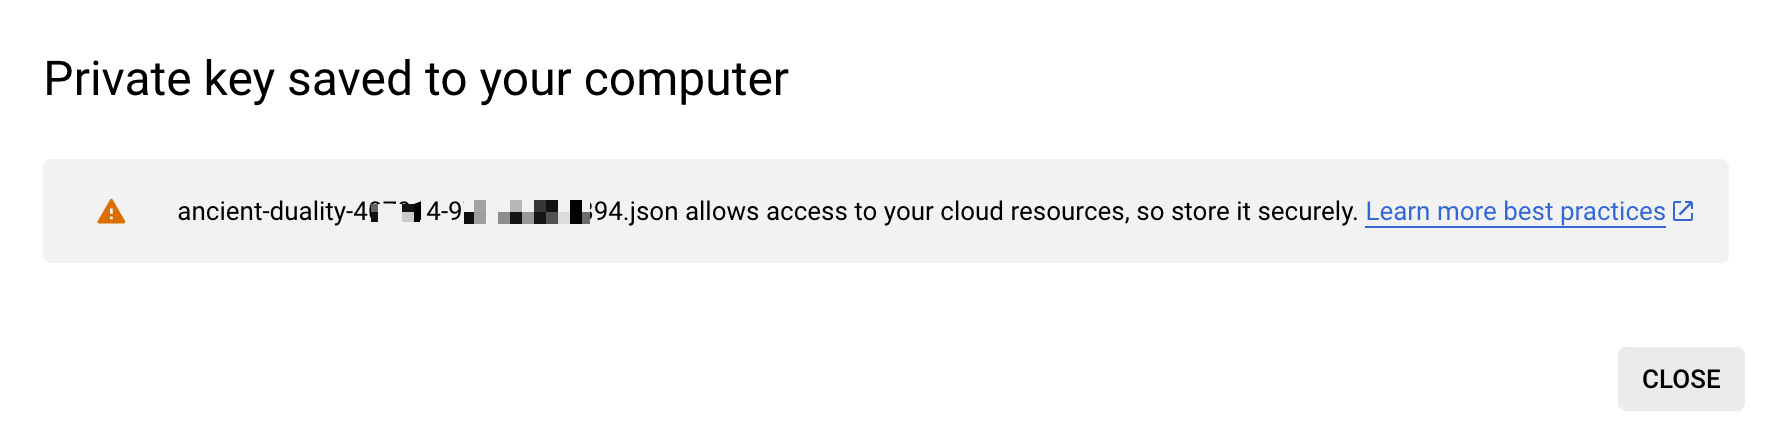
In the Key type, select JSON to create a private key for your associated service account and click CREATE to download the key.
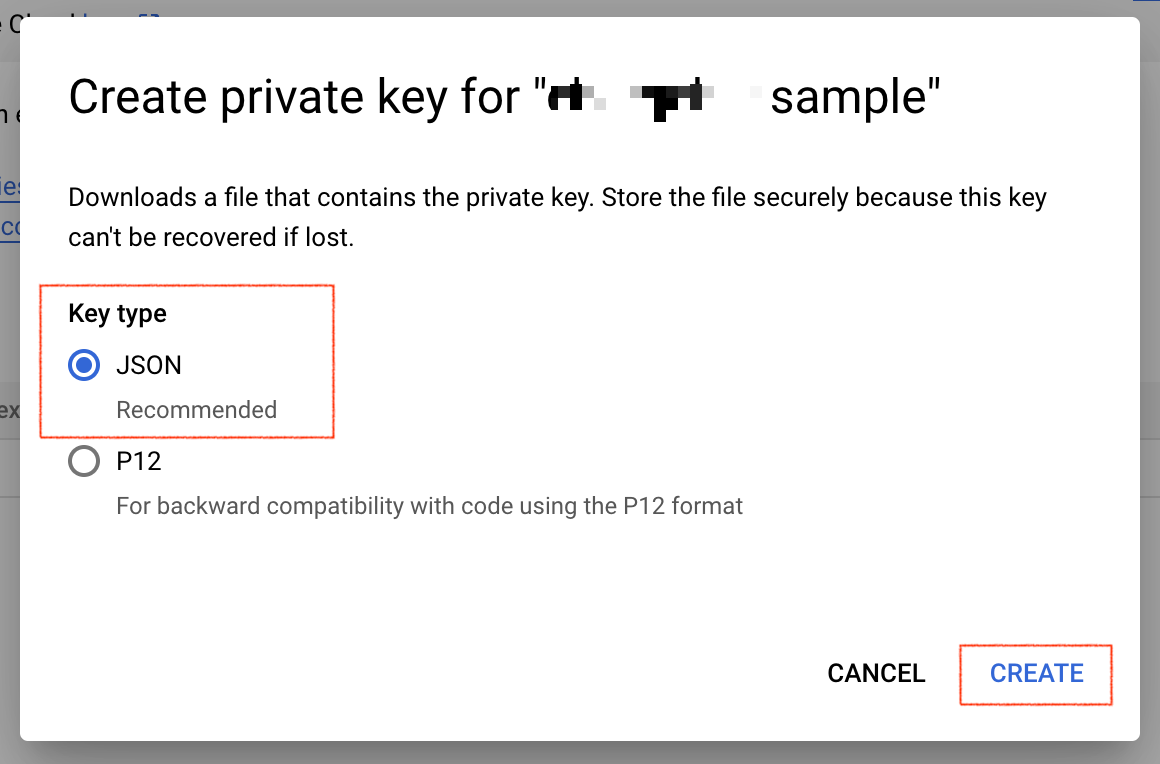
Save the downloaded key and click CLOSE.
Note: This service account credentials JSON file needs to be uploaded to Chargebee while integrating your Android App. So please make sure that it is saved securely.
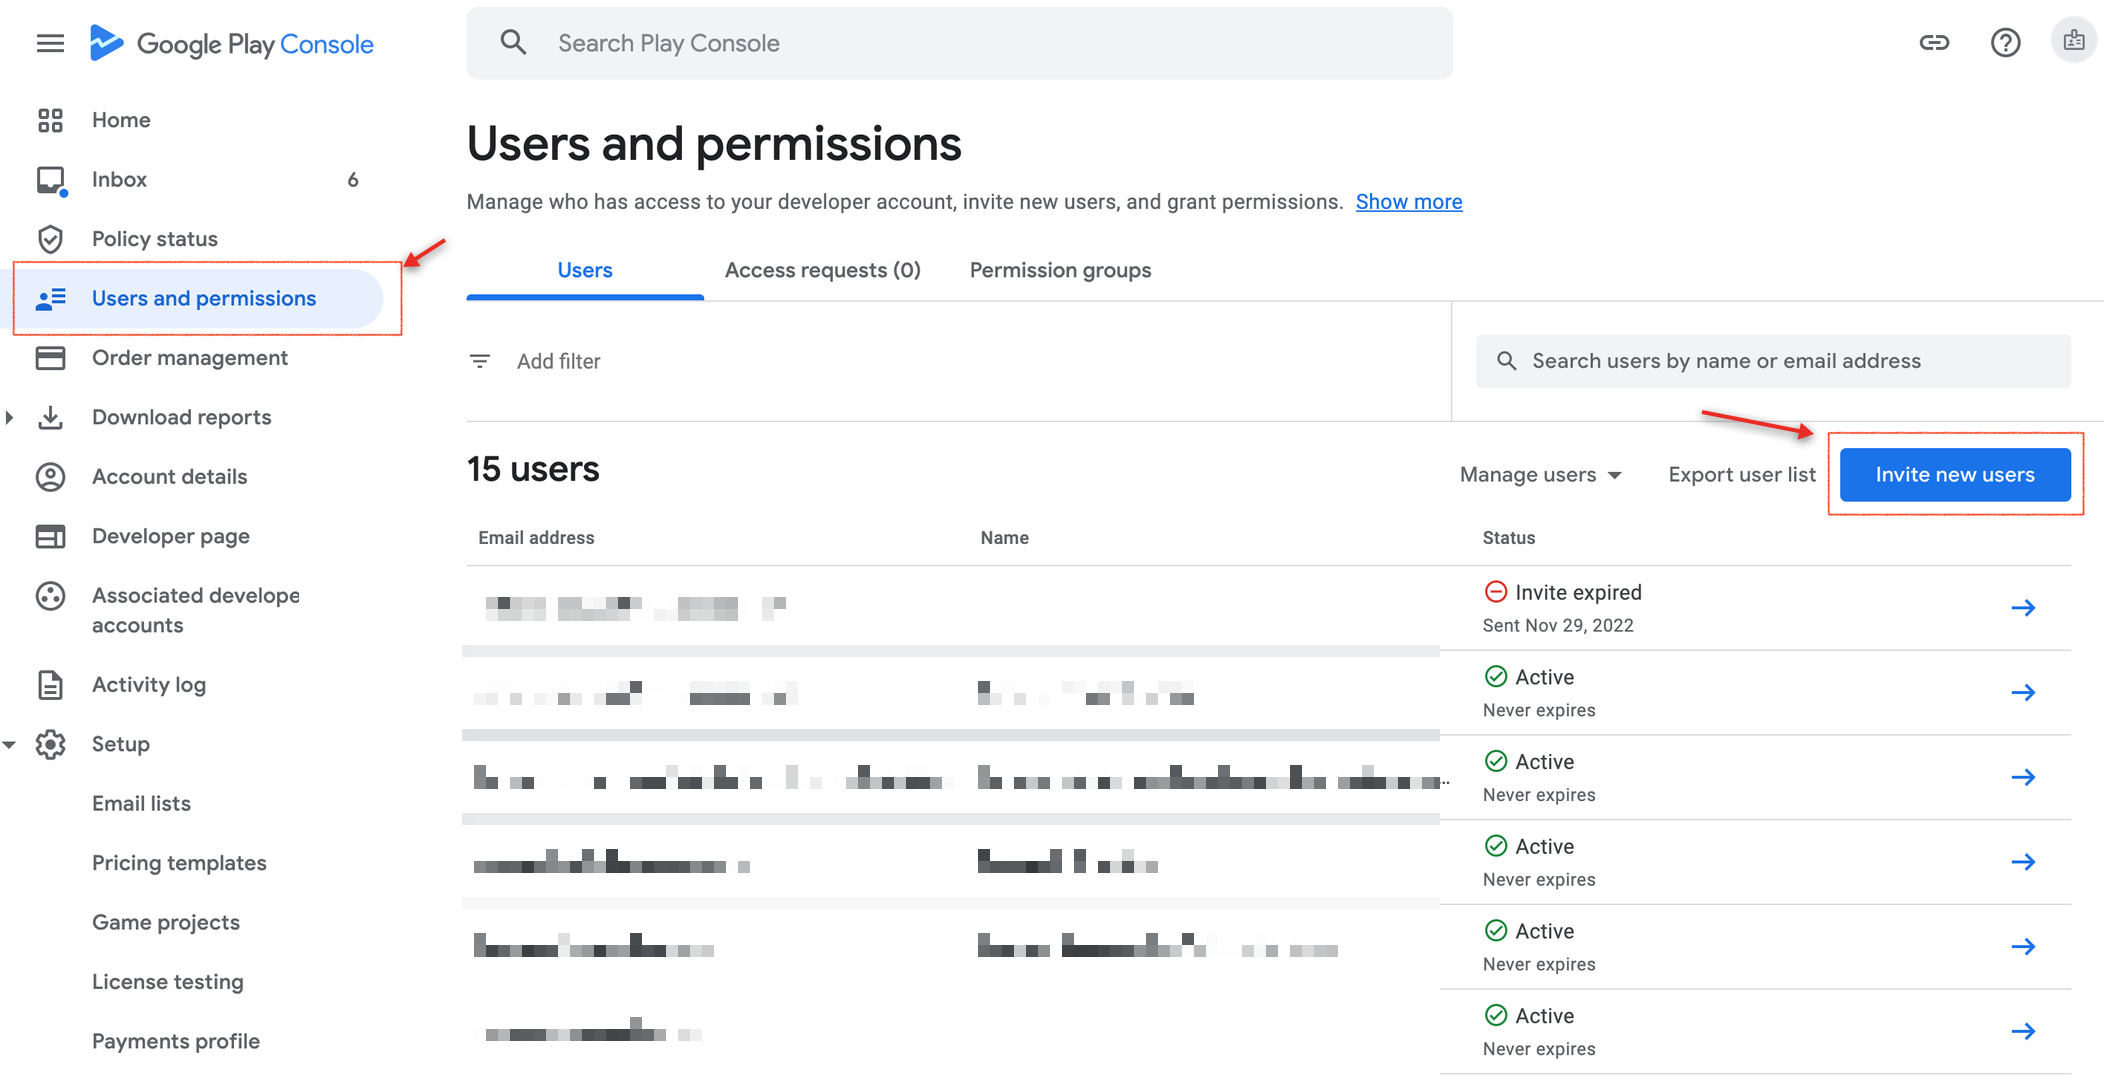
In order to manage the subscriptions with the notifications received from the Google Store and retrieve the financial data with the service account, you need to invite the service account as a user and grant the needed permissions in the Google Play Console.
To invite the service account as a user and grant the needed permissions, follow these steps:
Open Google Play Console and login using your Google developer account credentials.
Navigate to Users and permissions and click Invite new users to invite the service account created in Step 2.
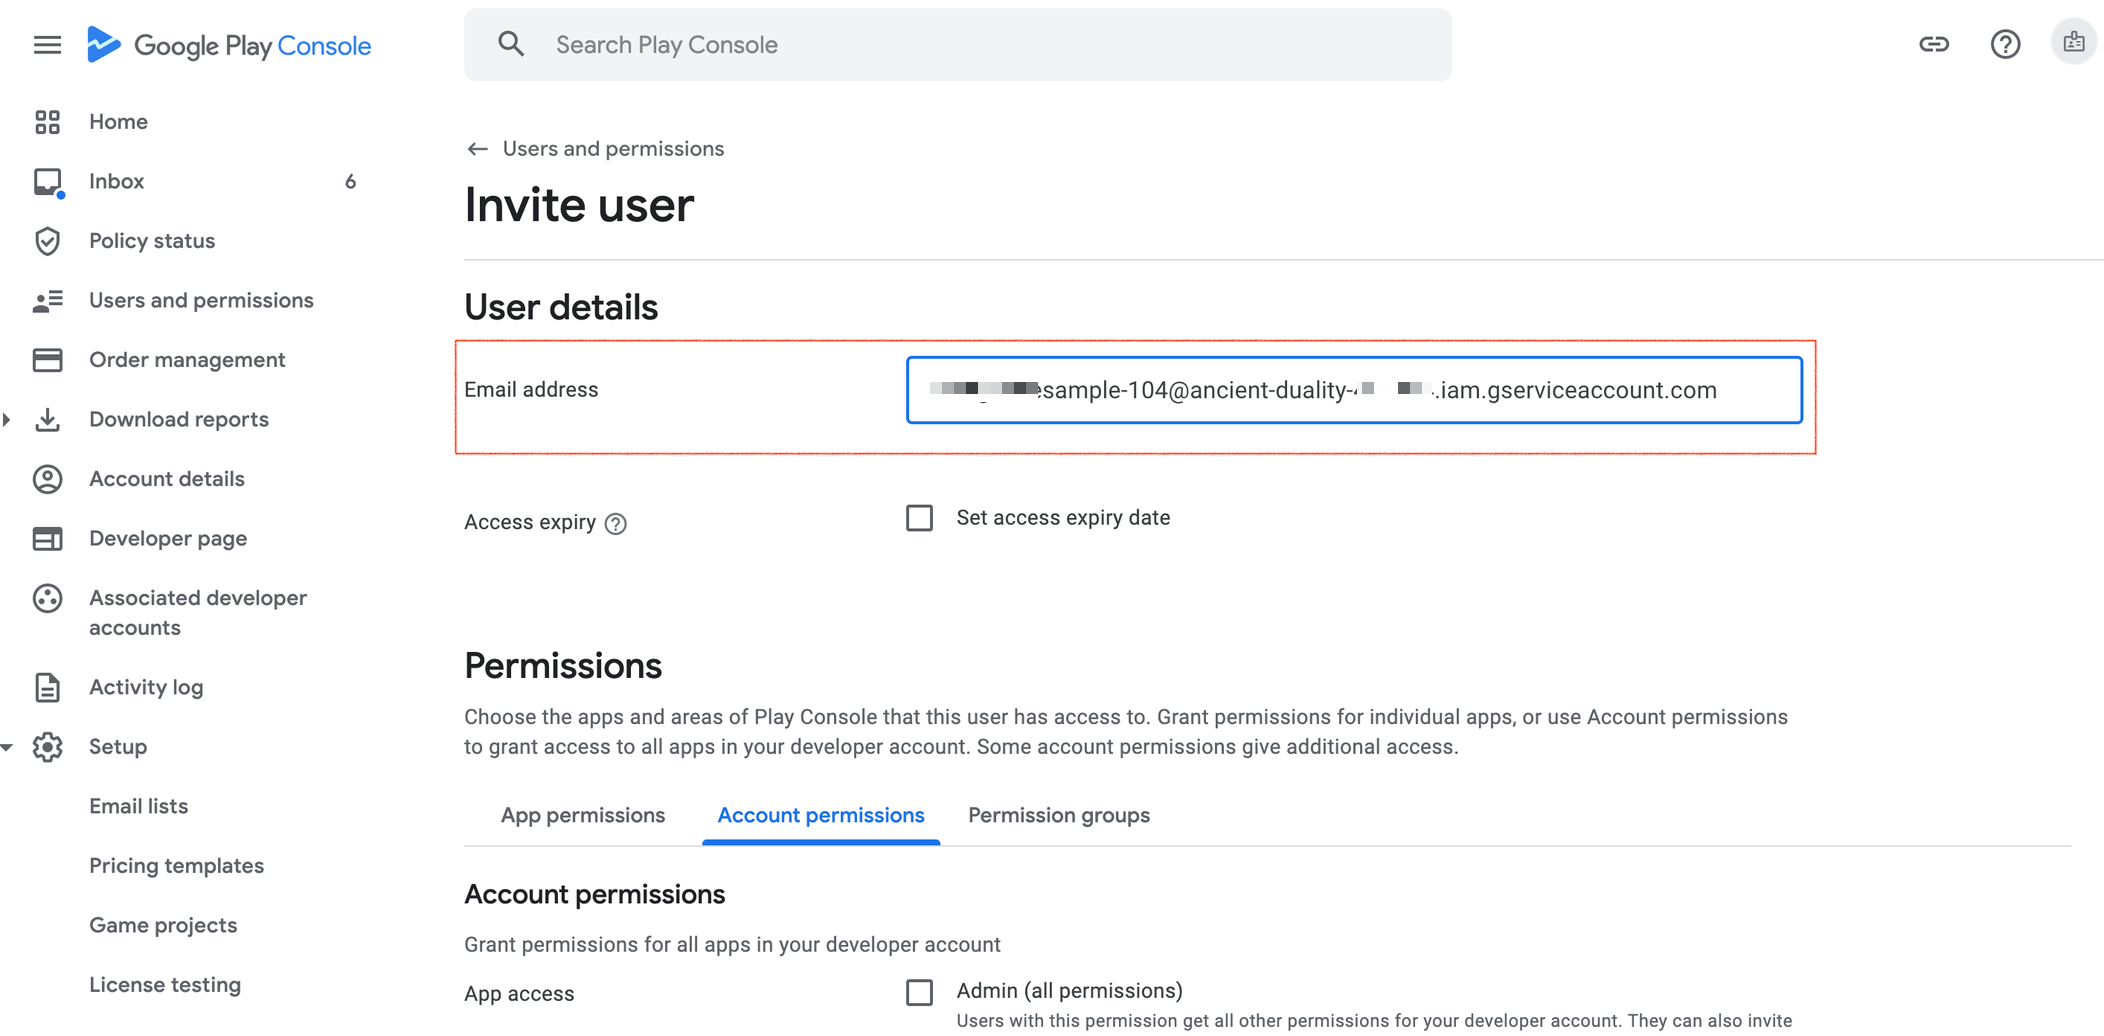
Go to the Service accounts section in the Google Cloud Console and copy the service account that was created in Step 2.

In the Invite user screen, paste this service account in the Email address field.
View app information and download bulk reports: To view apps and download the reports
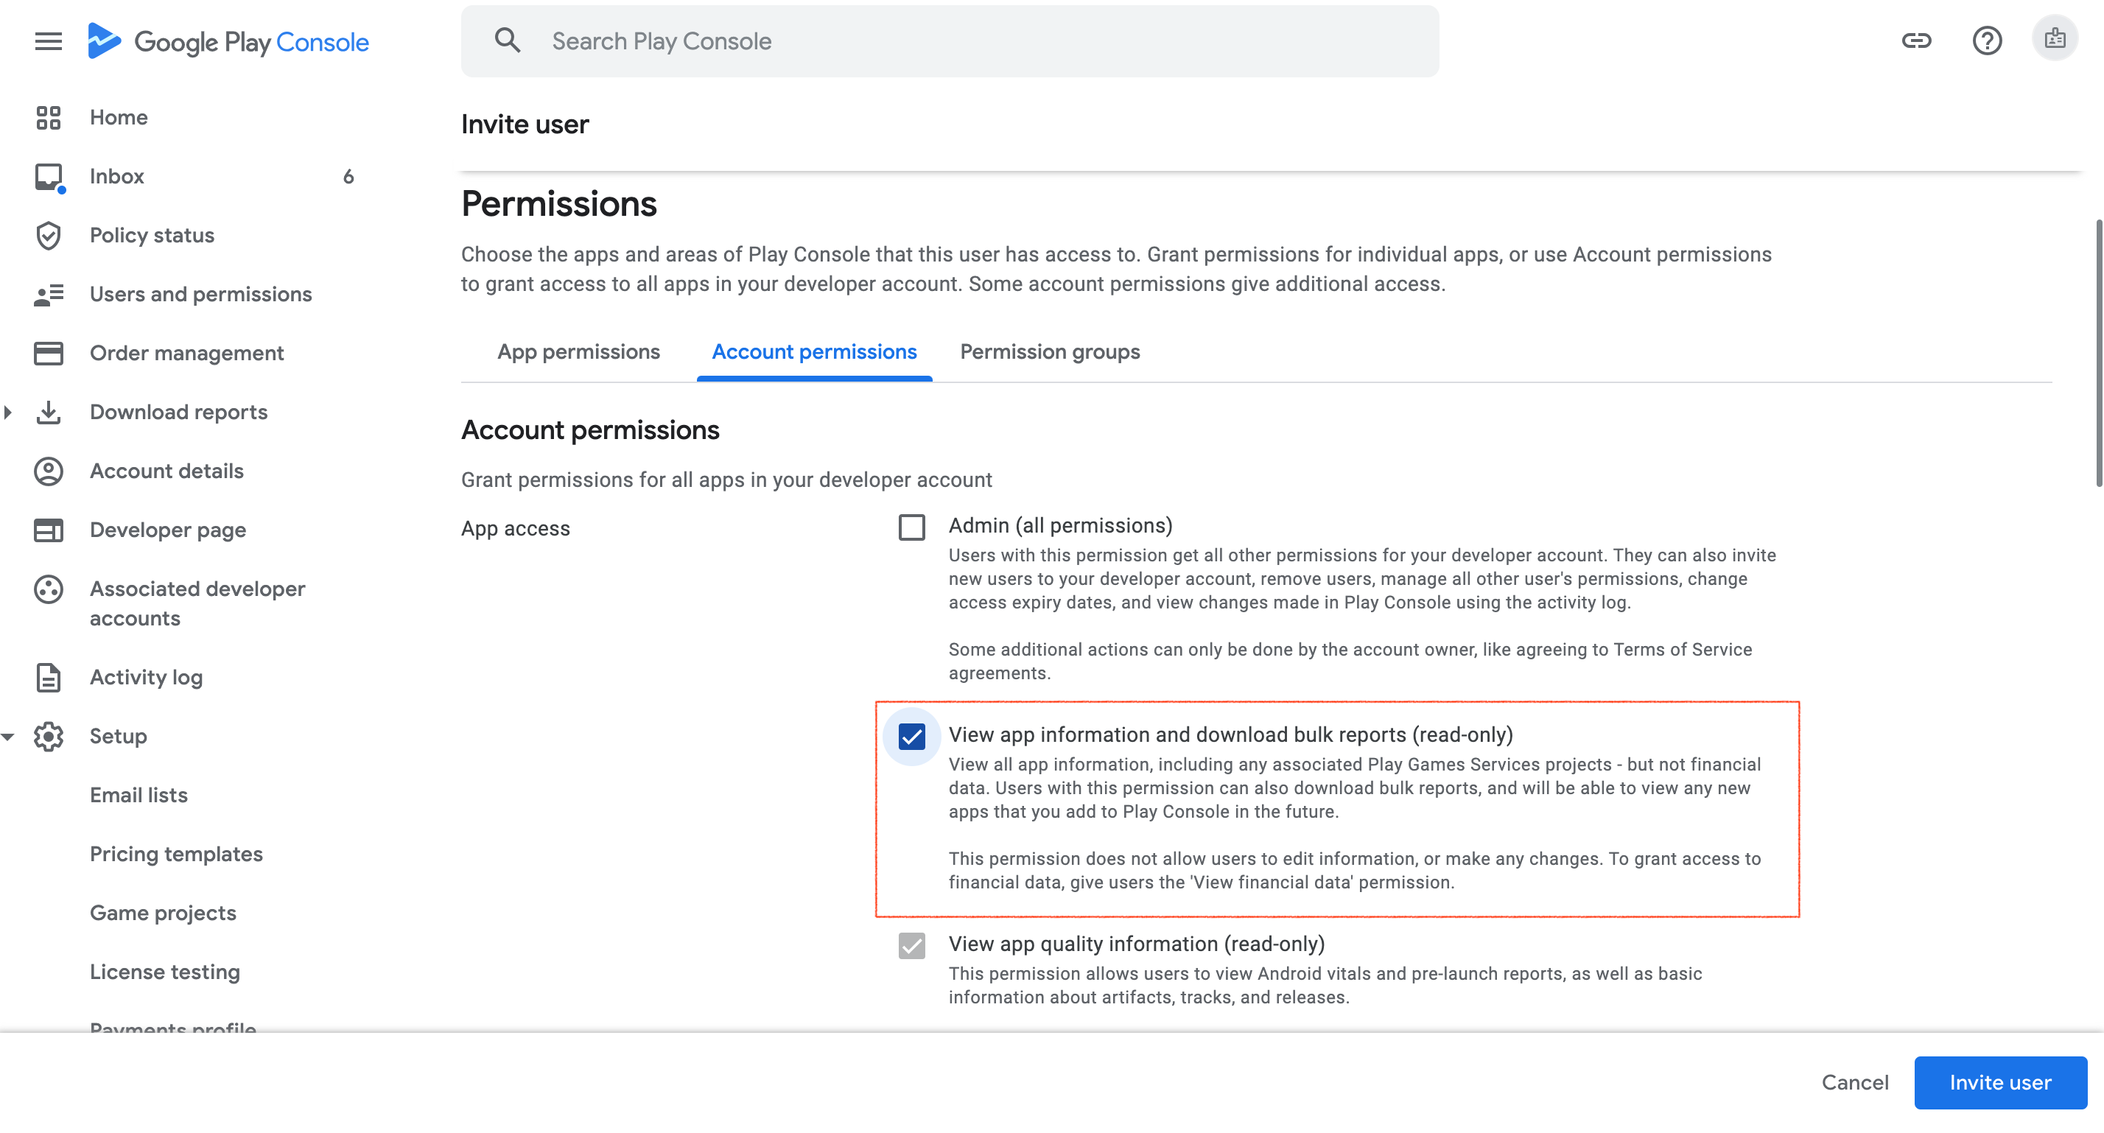
View financial data, orders, and cancellation survey responses: To view financial data related to purchases
Manage orders and subscriptions: To view and refund orders
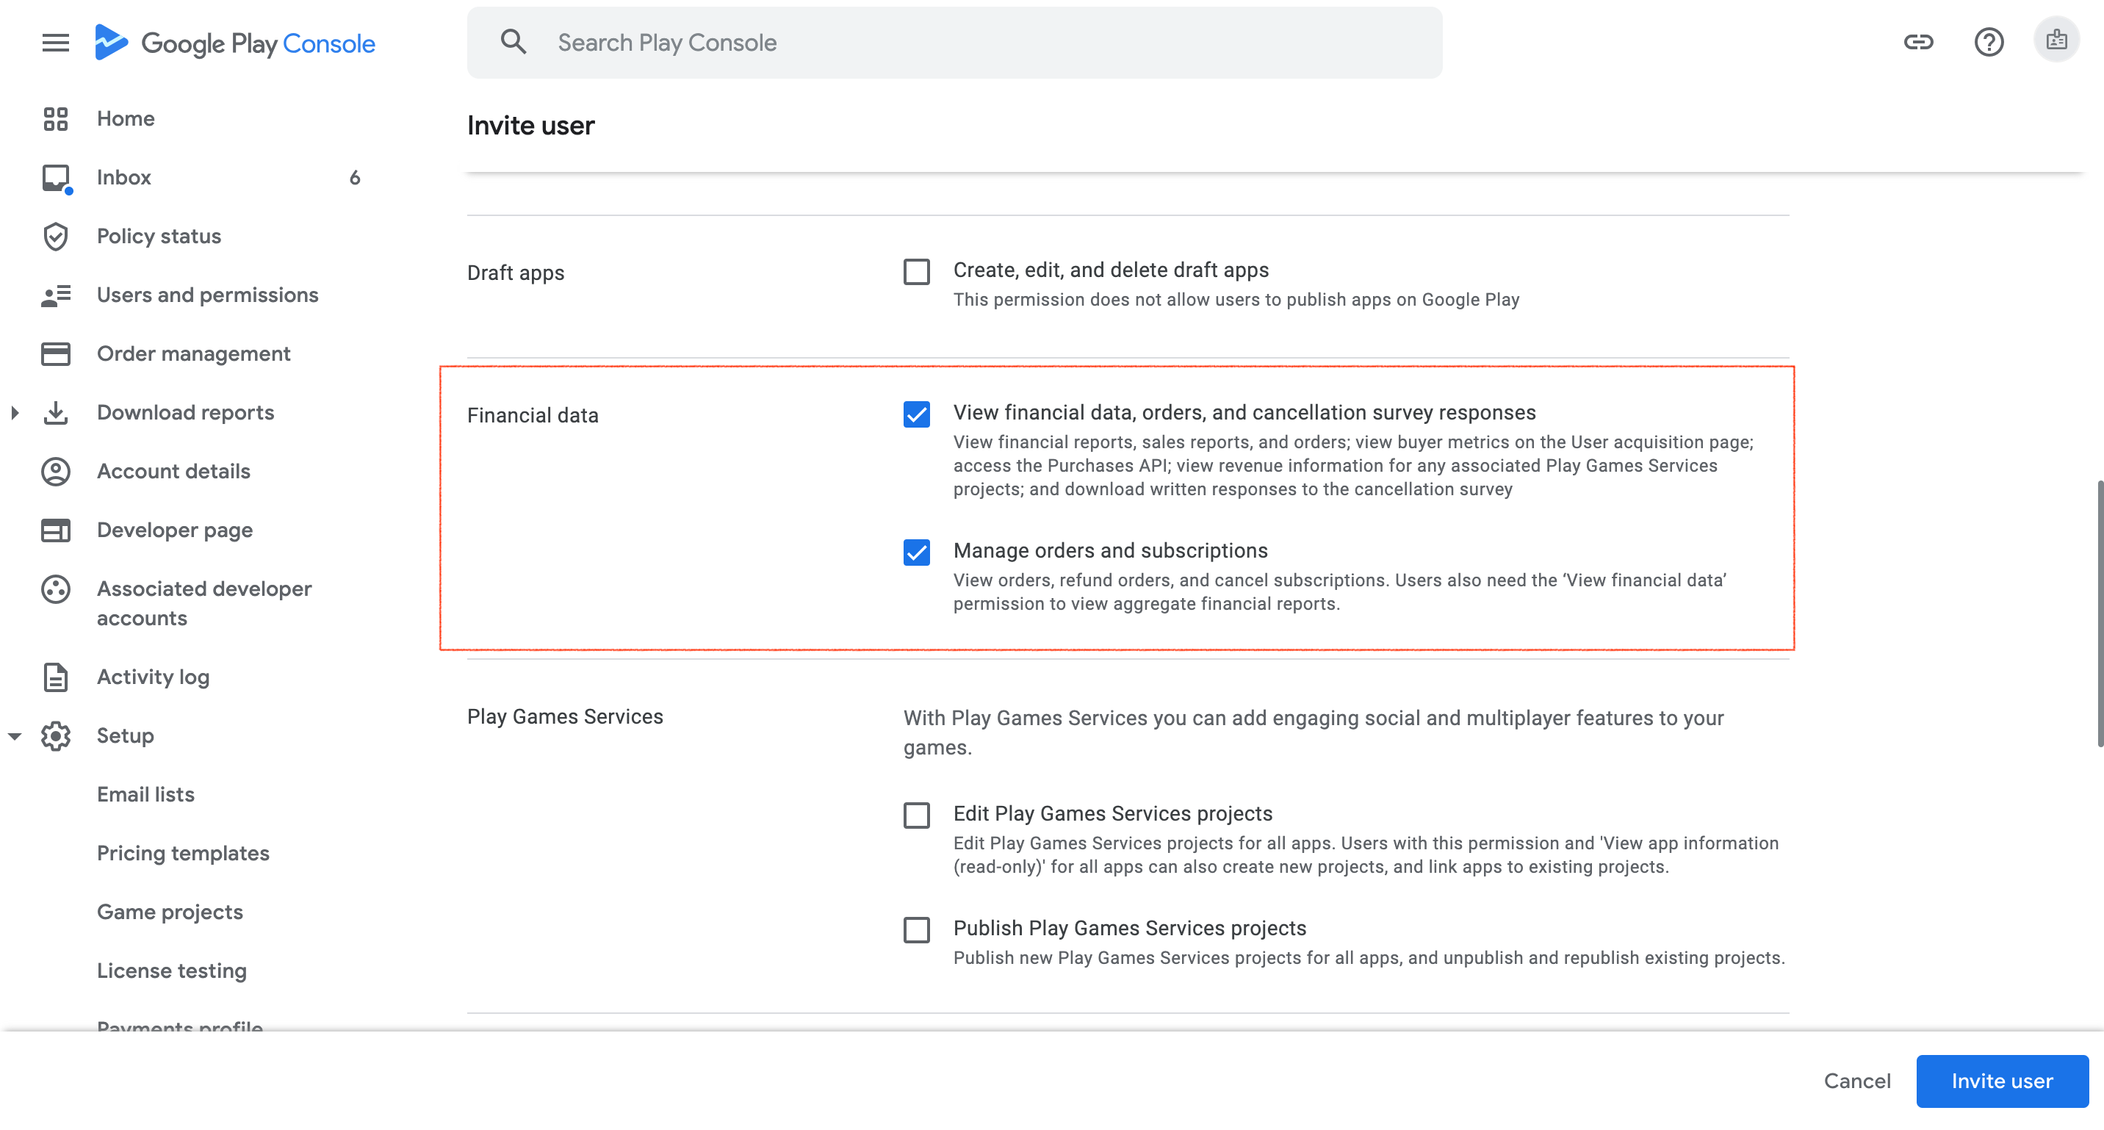
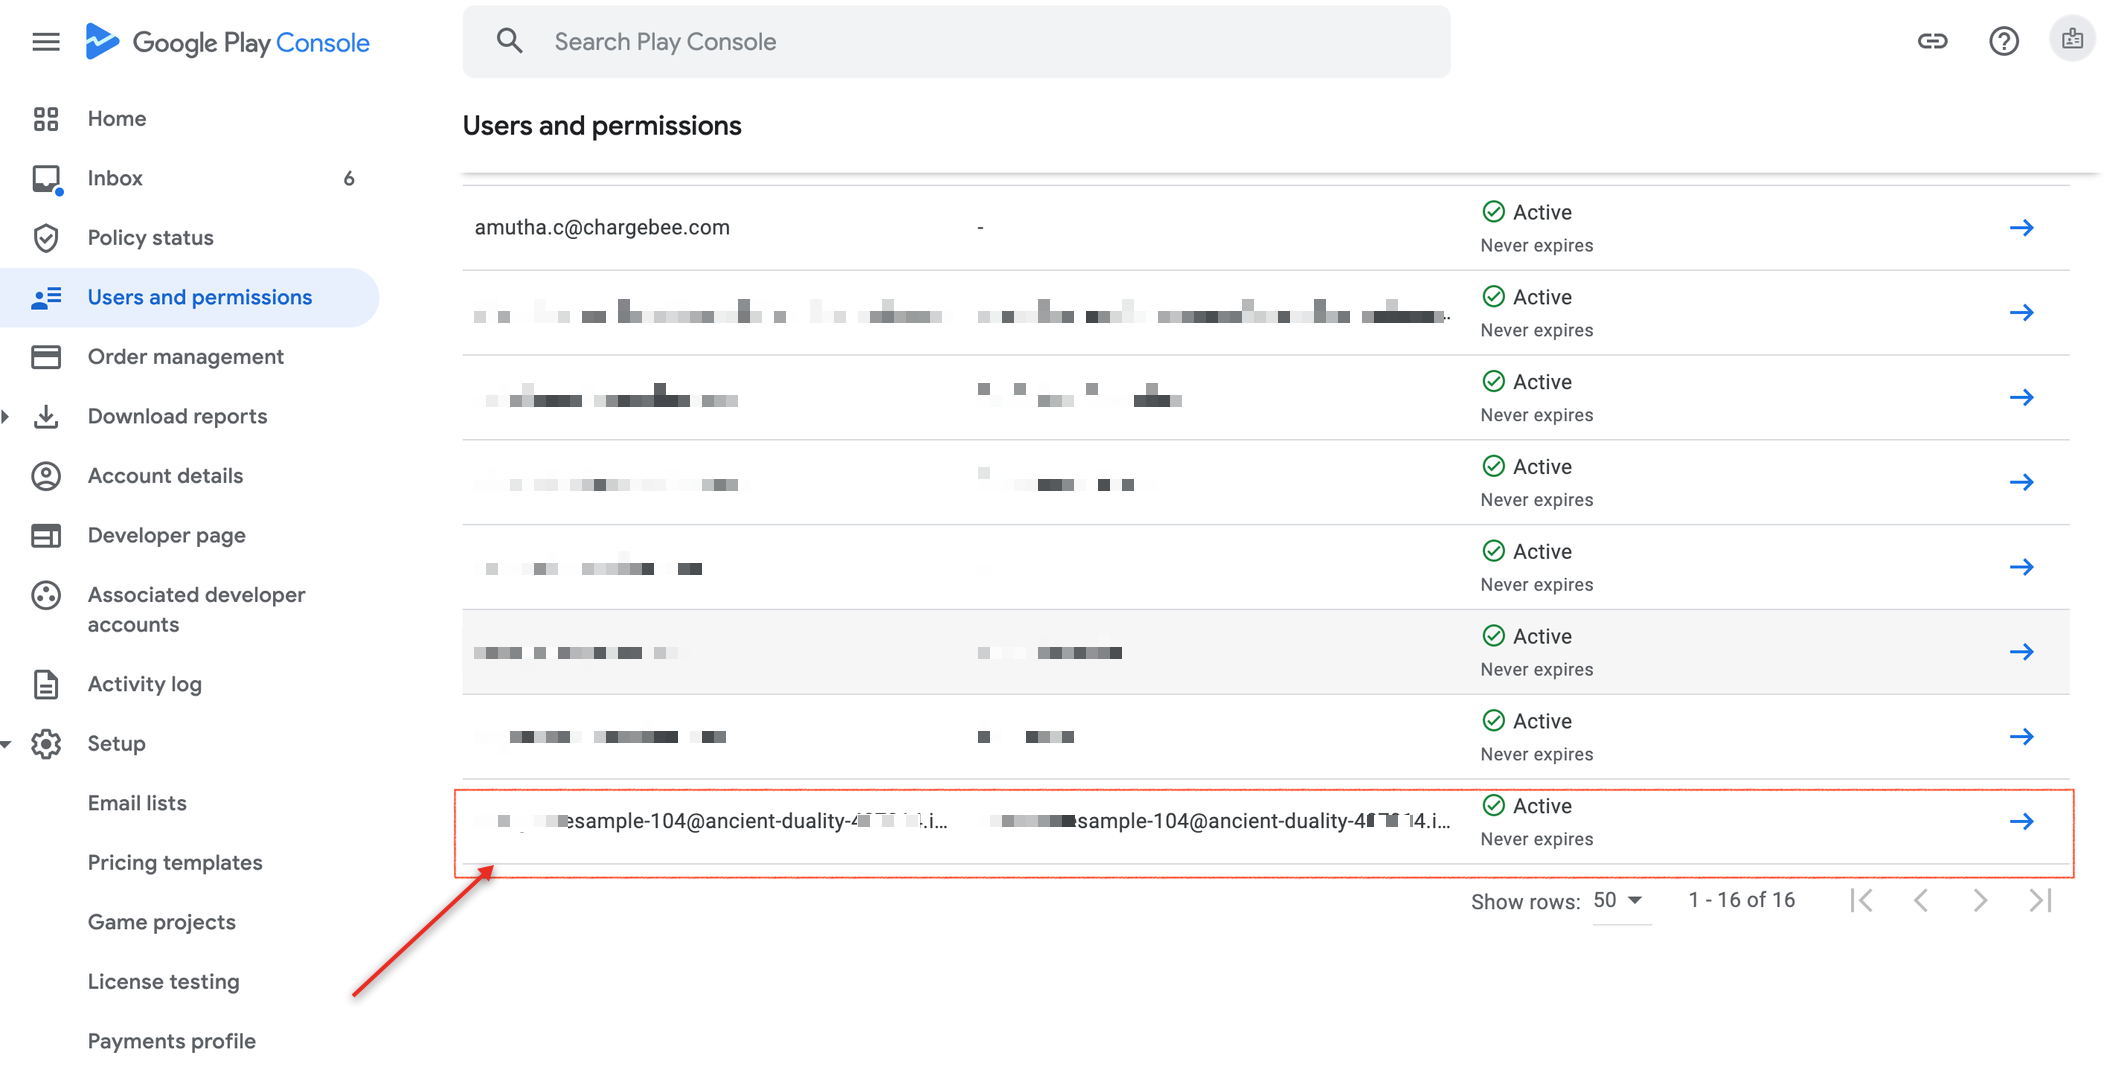
In the Users and permissions screen verify the invitation. You can see the newly created account as Active.
Note: Use the generated service account credentials JSON file to connect your app to Chargebee. Refer to this step 4.
To maintain any changes to the status of a subscription, it is important to set up Chargebee to receive notifications from Google, and to achieve this, the notification URL generated by Chargebee should be associated with the Topic ID created in Google Cloud Console. Once this configuration is done, the subscription state changes that happen in Google can be synced to Chargebee in real-time through real-time notifications via Google Real-Time Developer Notifications (RTDN).
This section will help you understand how to create a Topic ID in the Google Cloud console and configure the same in the Google Play console. Learn more about the concept of Topics.
Follow the steps below to set up the Pub/Sub access to your Google Cloud Console project:
Access Google Cloud Console and click Sign up to initiate the creation of a project if you don't have Google Cloud Access.
Specify the details required in the applicable fields and click Continue to proceed with the sign-up process.
Complete the contact number verification and create a payment profile to complete the setup of your Google Cloud account.
Review the details within the Google Cloud Dashboard.
Click Create a Project from IAM & Admin in the left nav menu.
Note: If you have already created a project, skip to Step 7.
Specify the desired name in the Project Name field and click CREATE.
Note: This project name cannot be edited or changed later.
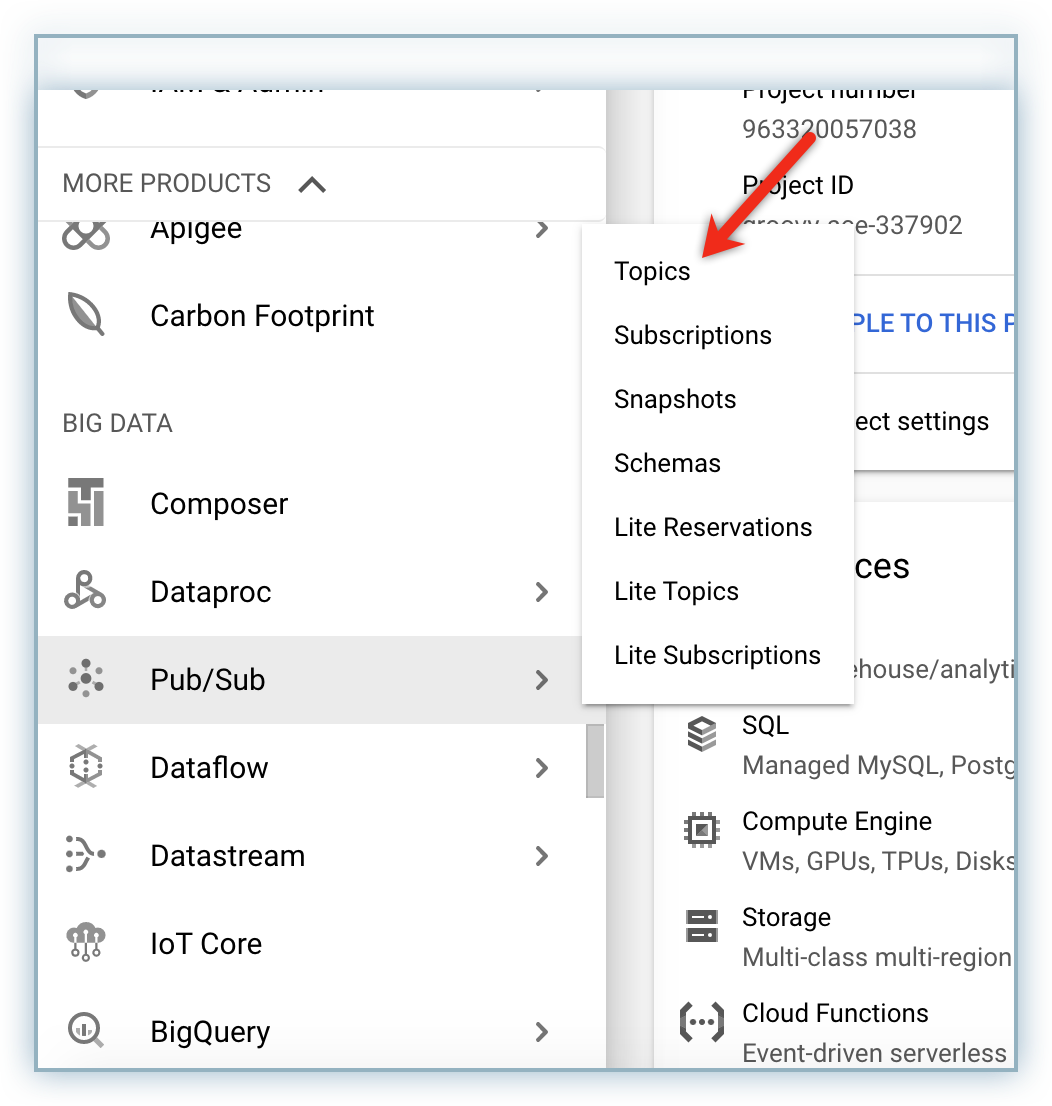
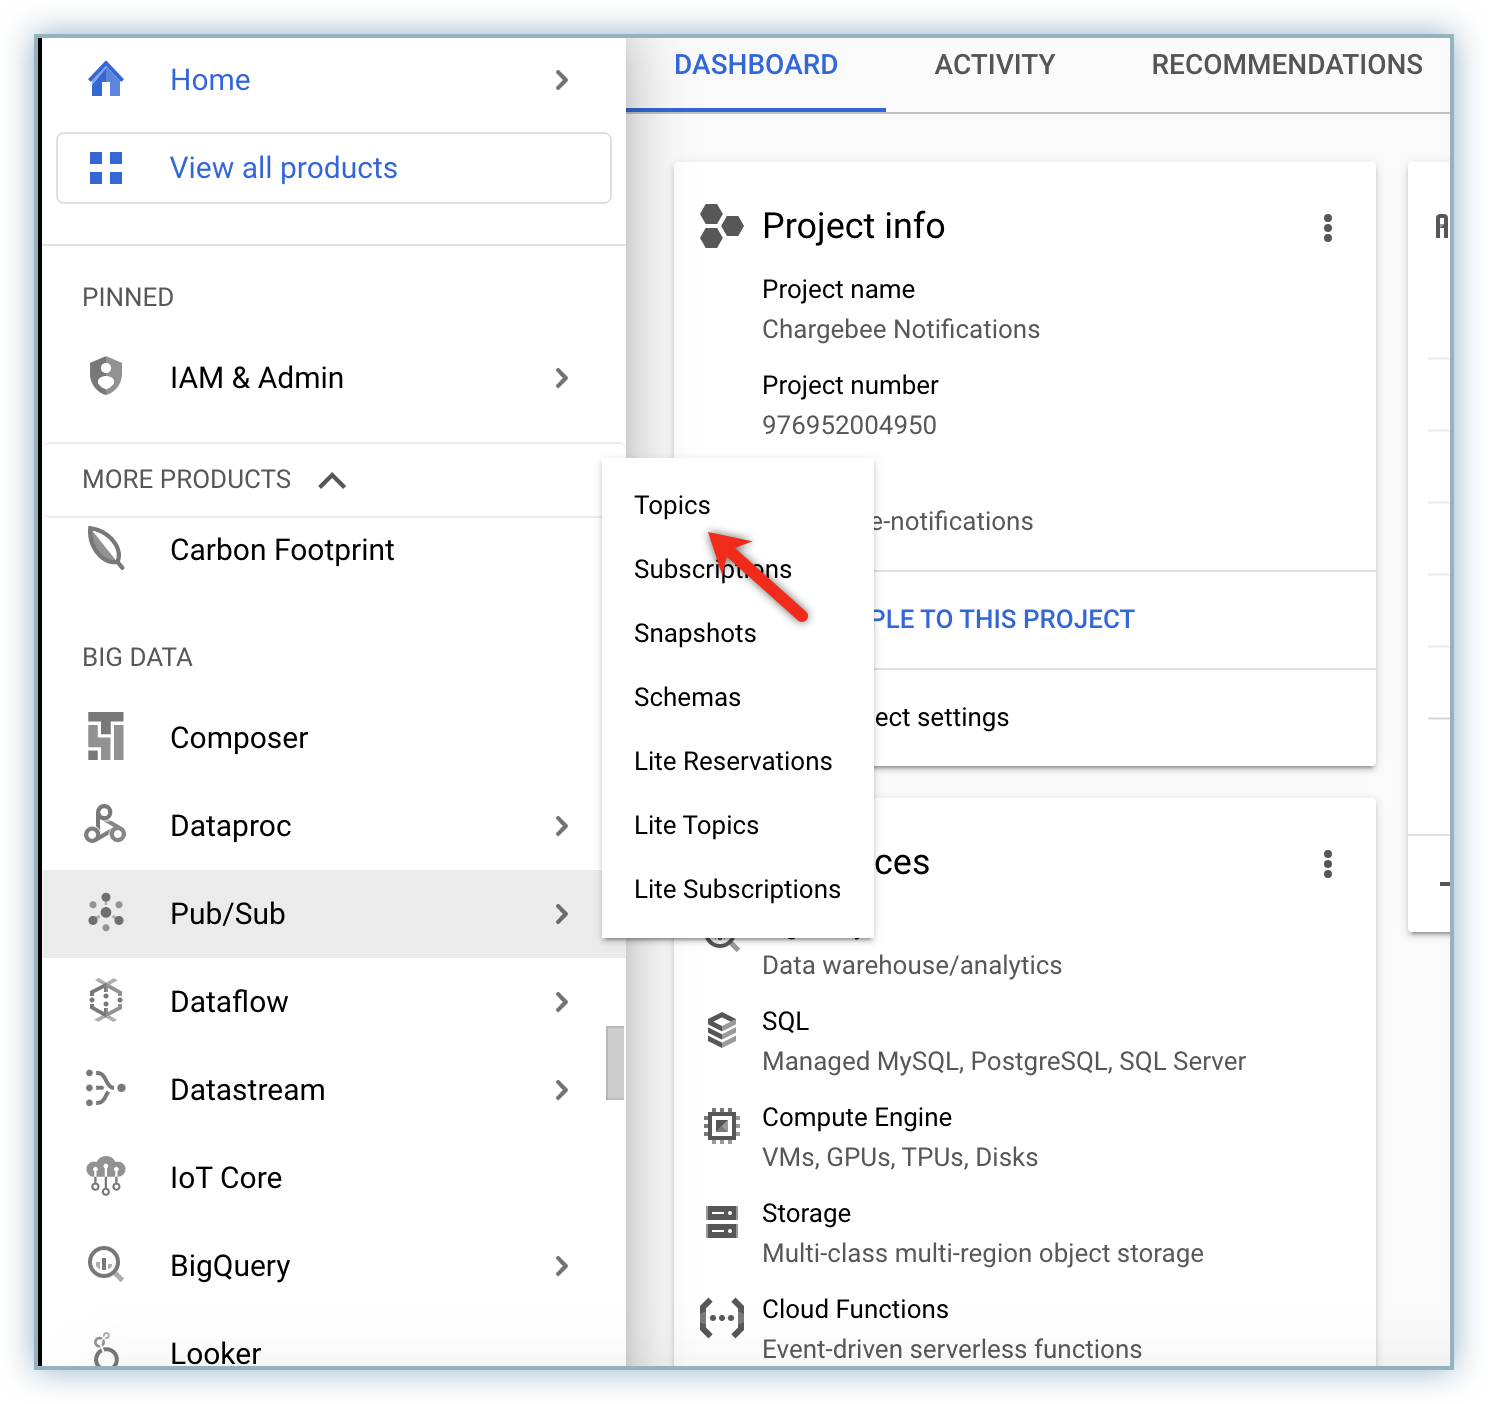
Click Topics from the Pub/Sub menu on the left nav or Search for Topic in Google Cloud Console and go to Topics.
Note: This project name cannot be edited or changed later.
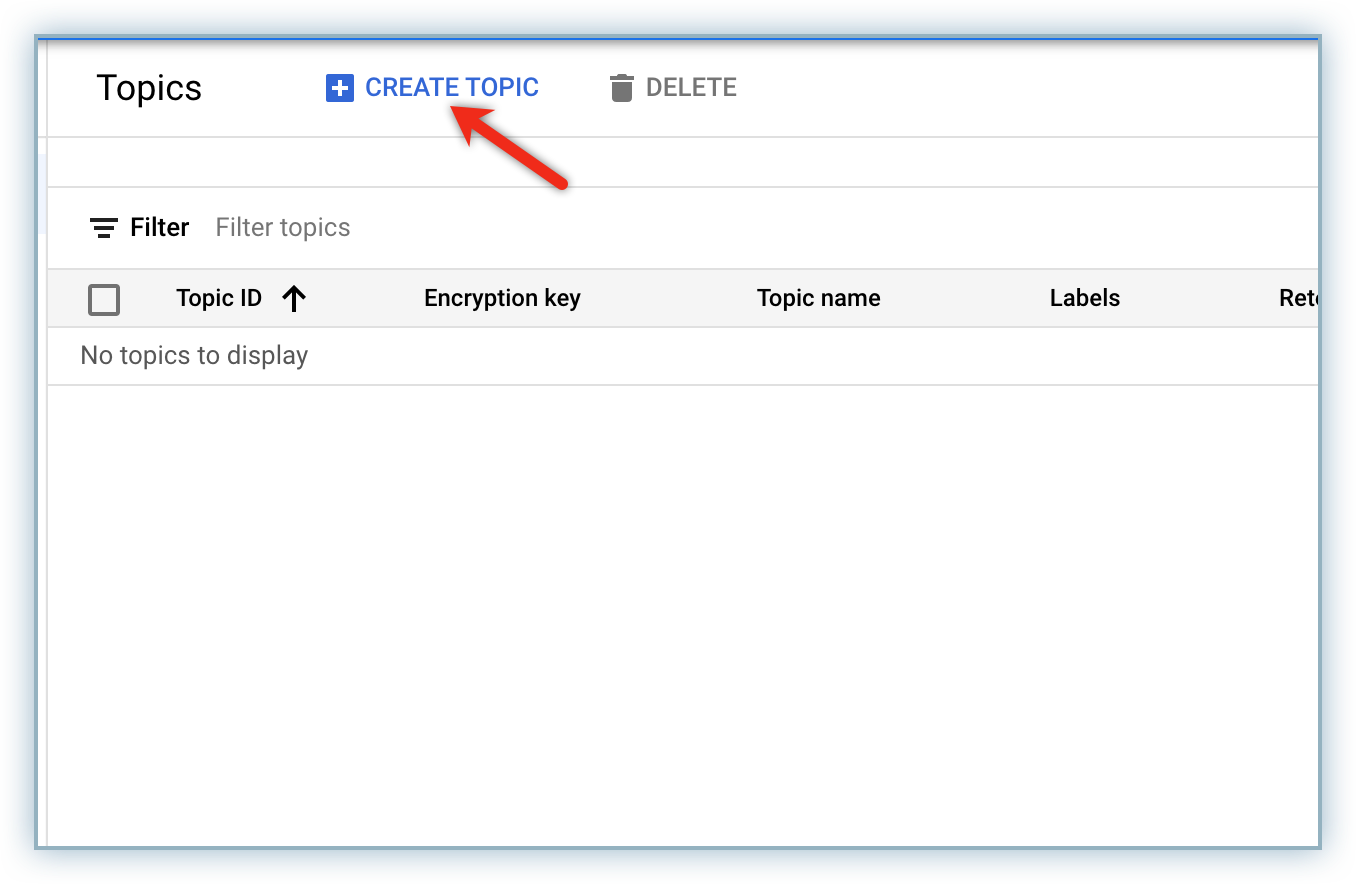
Click Create Topic.
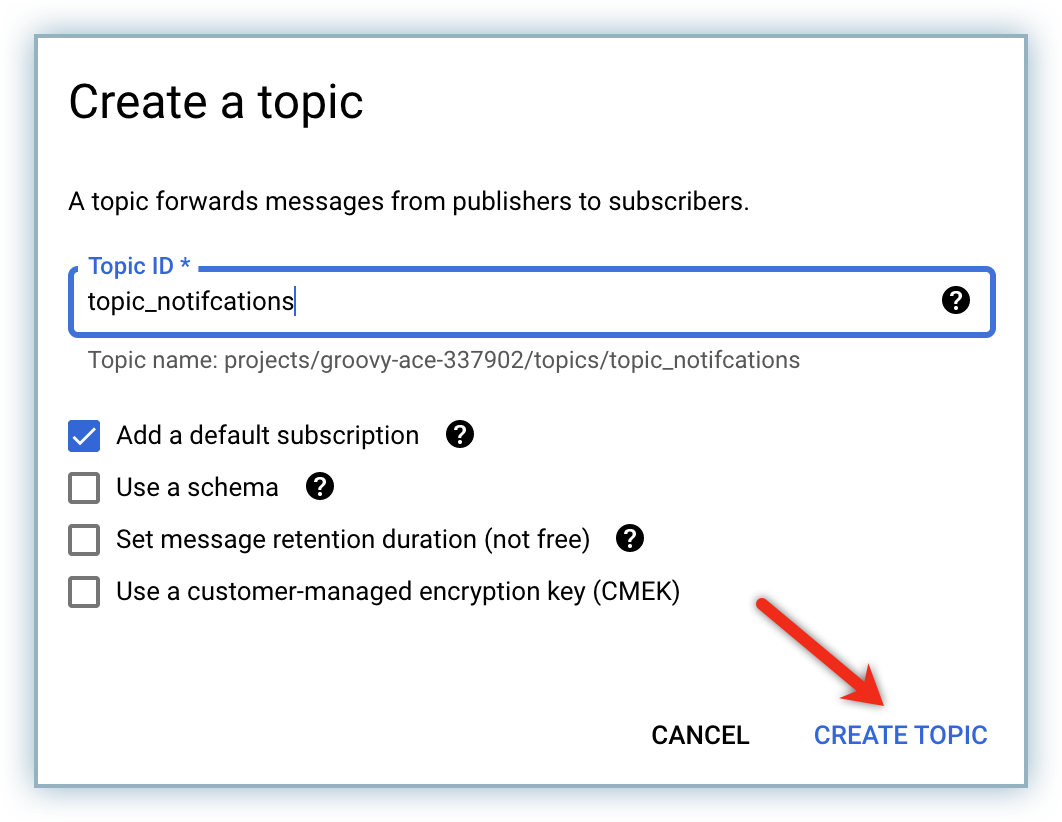
Specific an applicable name for the topic in the Topic ID field, enable the checkboxes as in the image below and click CREATE TOPIC.
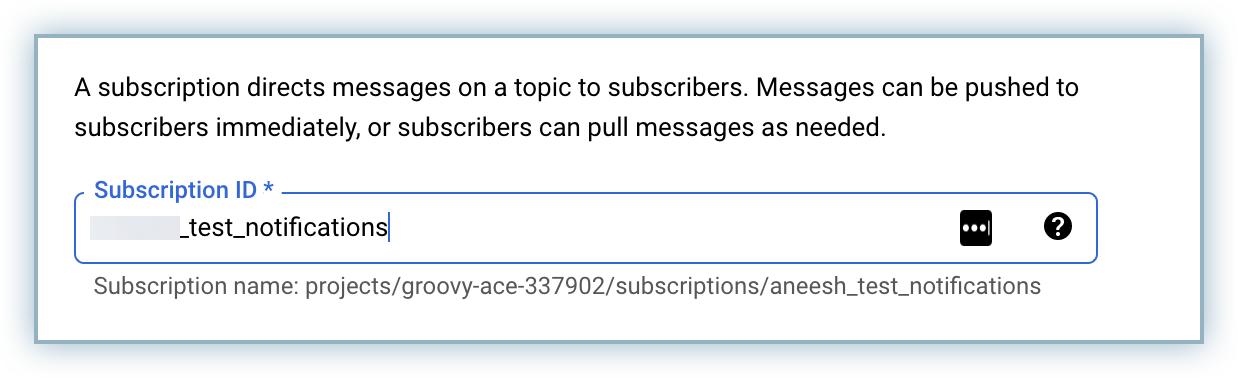
Follow the steps below to configure subscriptions to receive messages:
Click Create Subscription from the More Actions menu.
Update the following details on the Create subscription page.
Type applicable name in the Subscription ID field.
Select the Push radio button from the Delivery Type and paste the Notification URL generated by Chargebee in the End Point URL field.
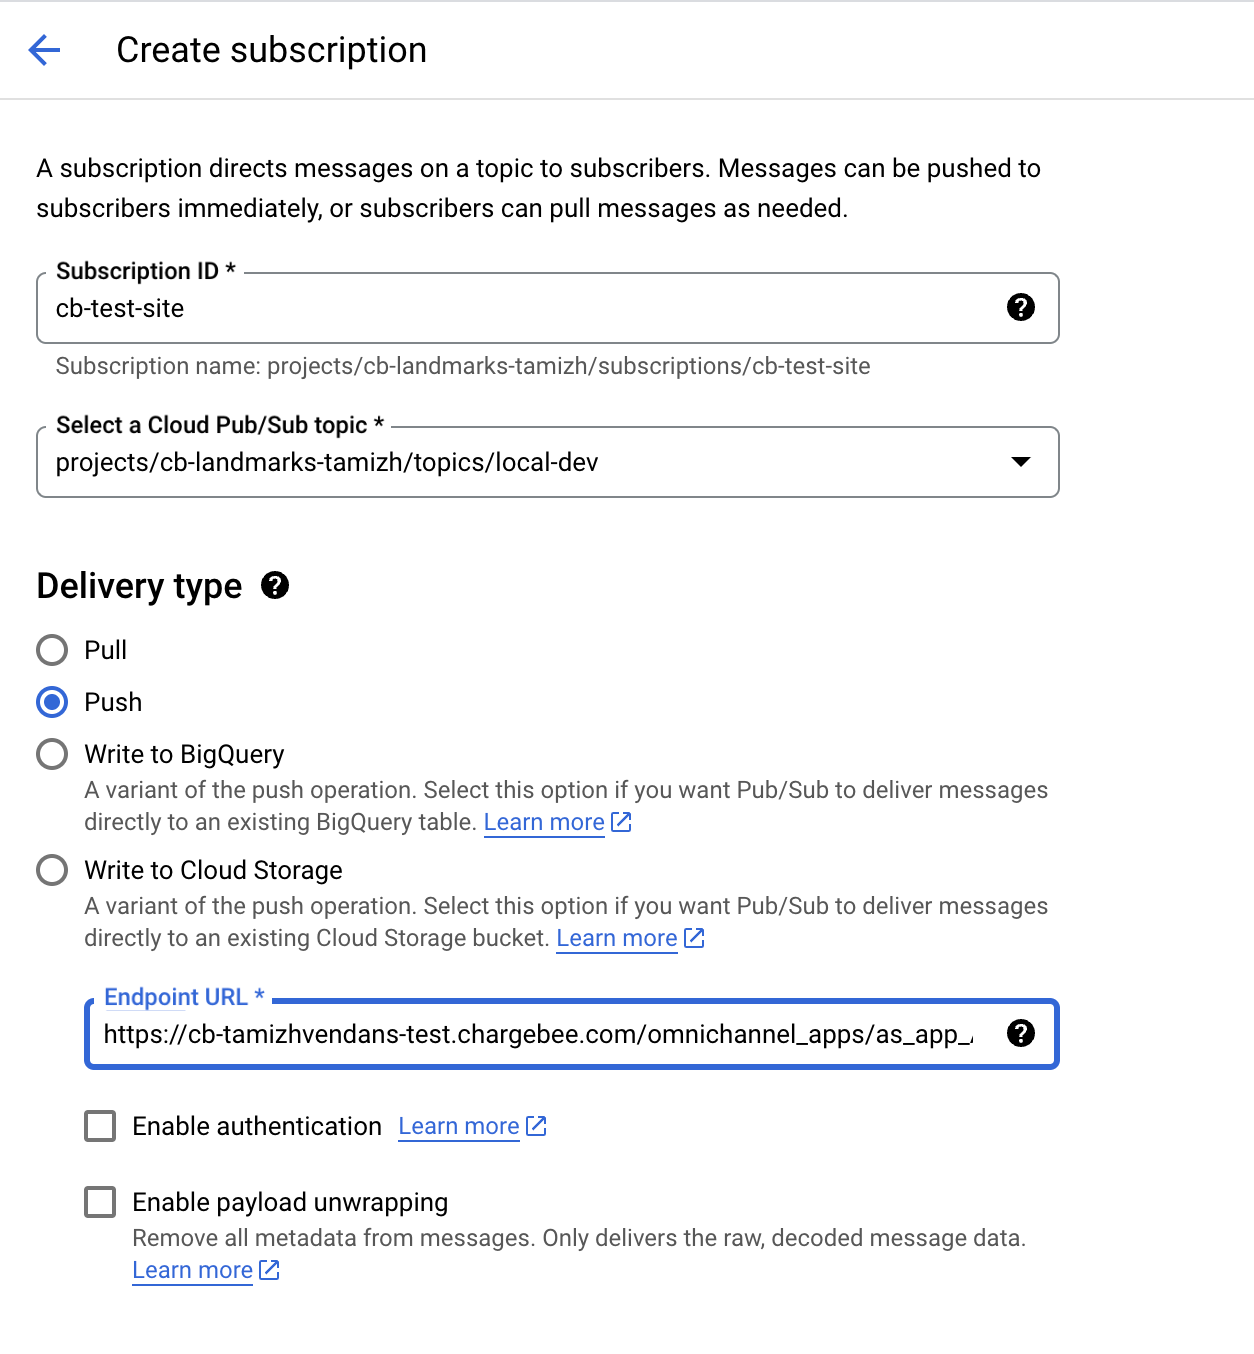
Click CREATE.
Publish a test message to the Topic id to confirm functionality.
Click Topics to return to the topic list view.
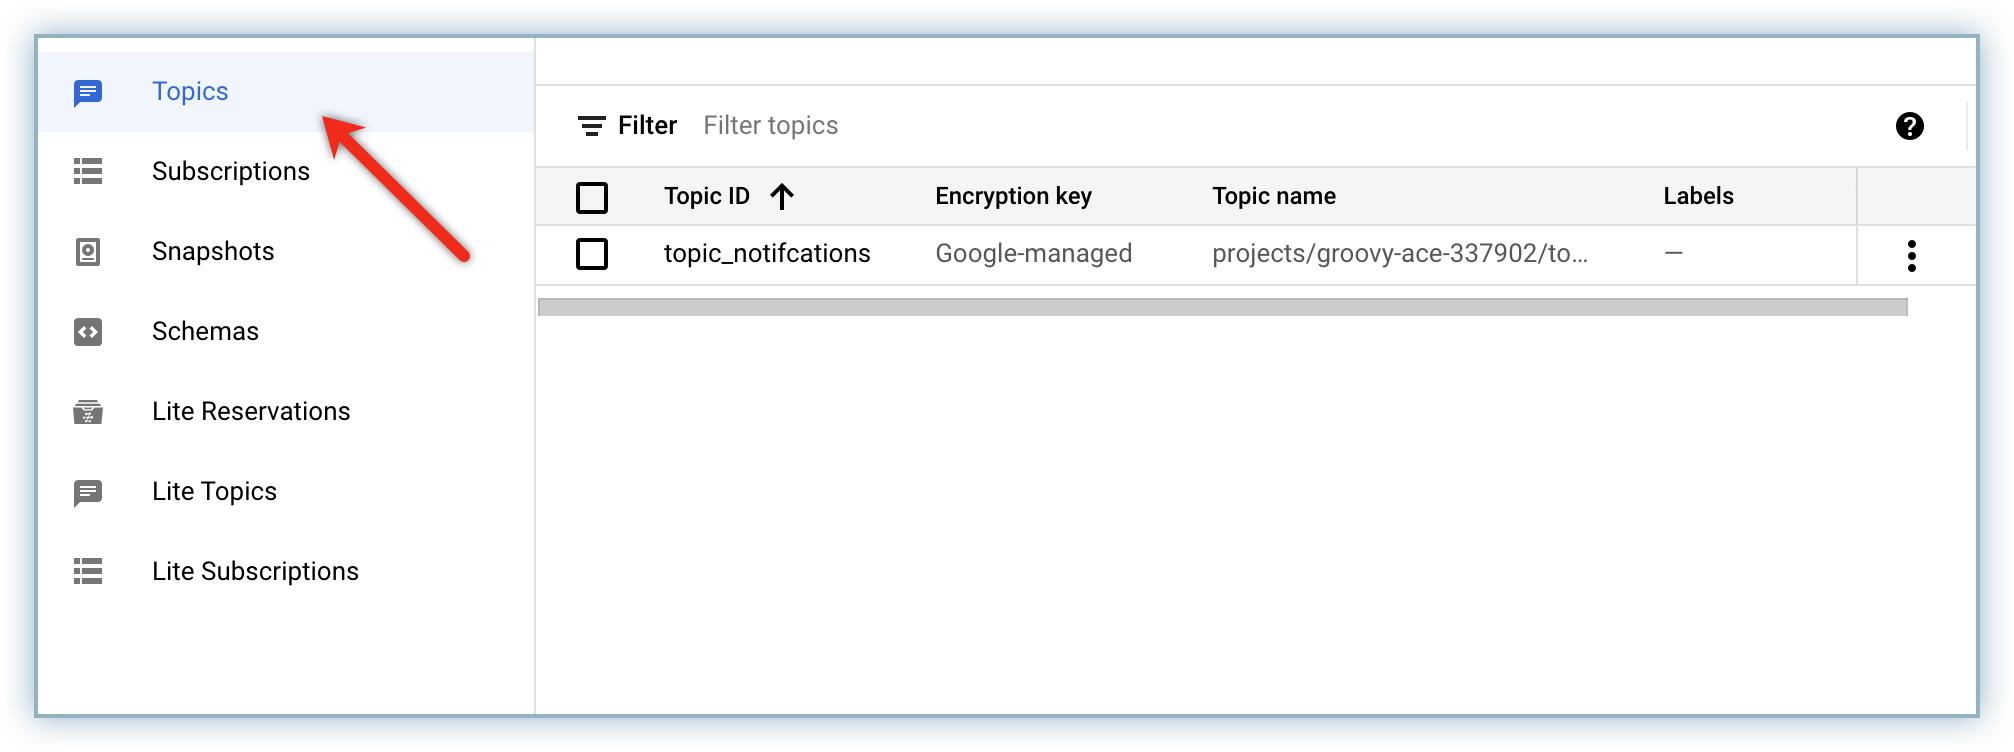
Click applicable Topic ID to view details of the topic.
Scroll to the bottom of the page and click the MESSAGES tab.
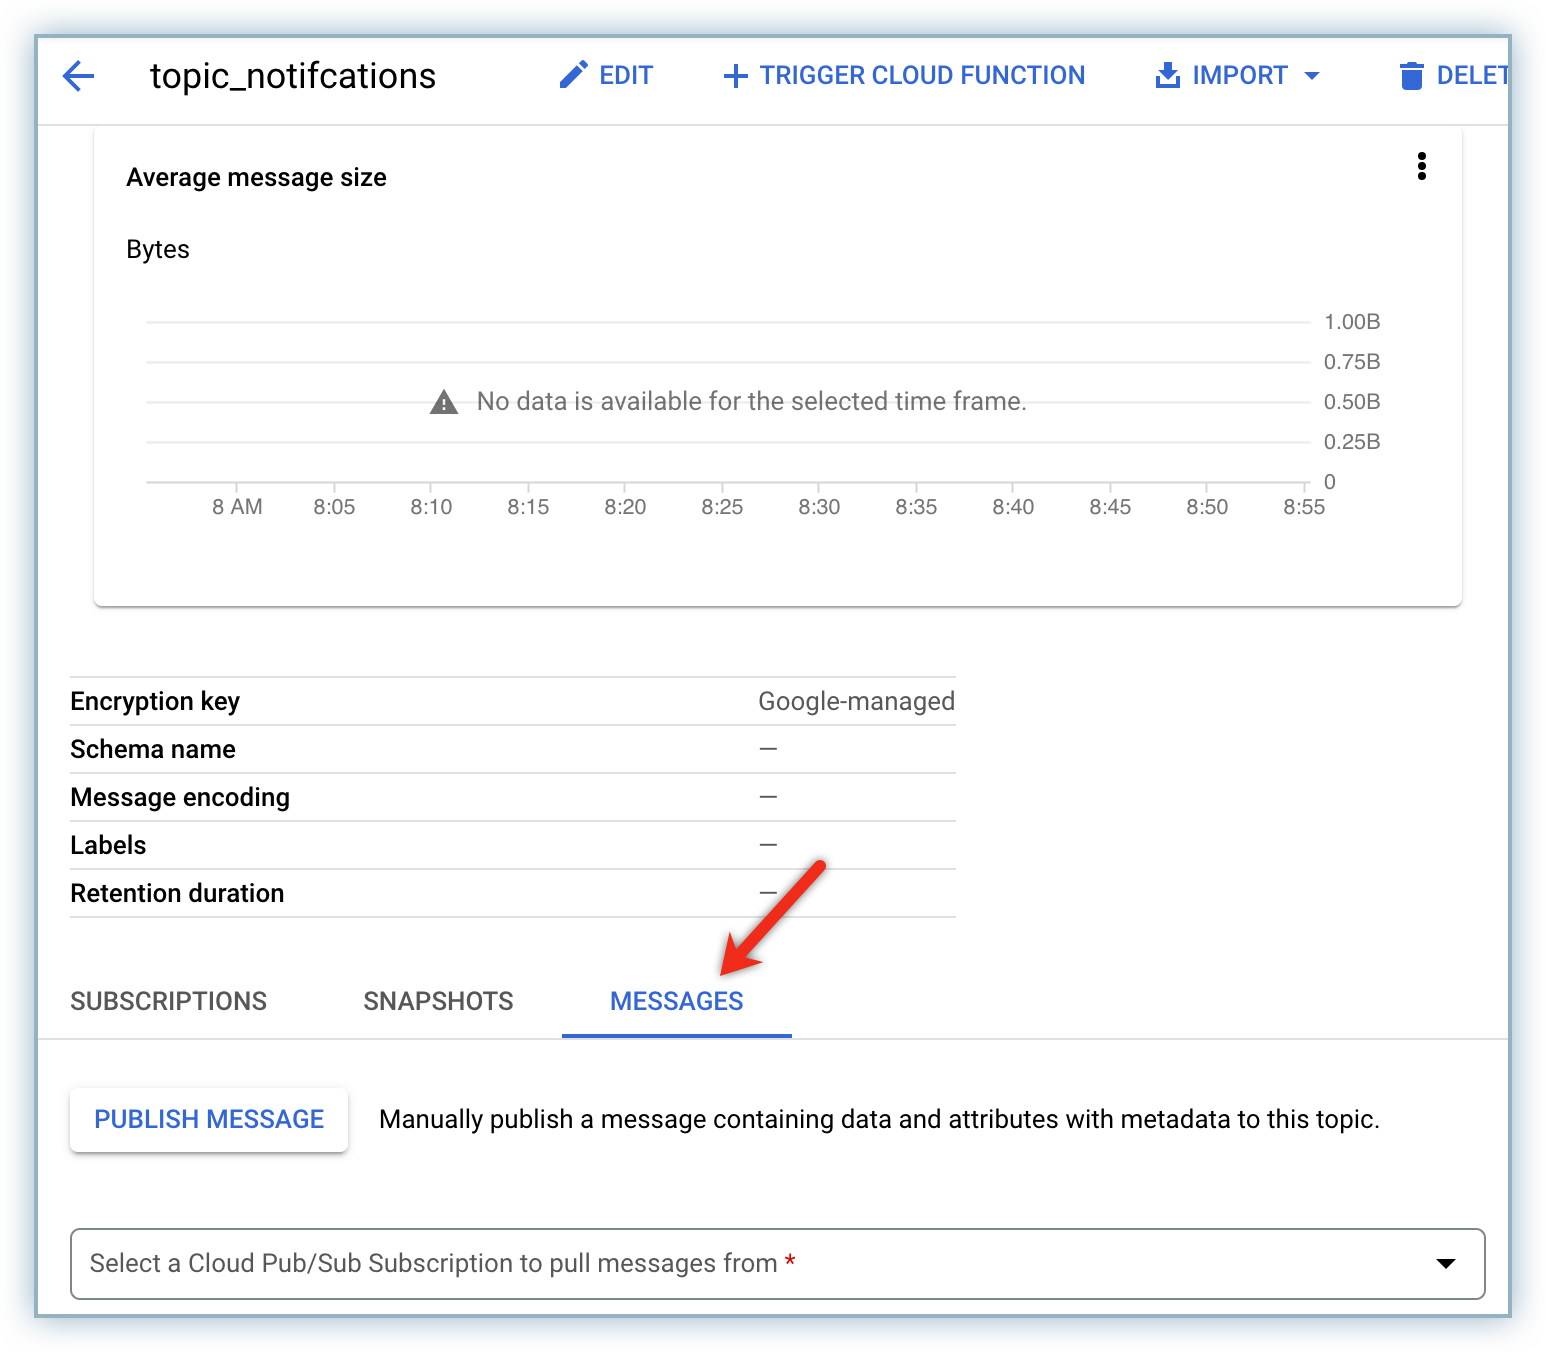
Click Publish Message
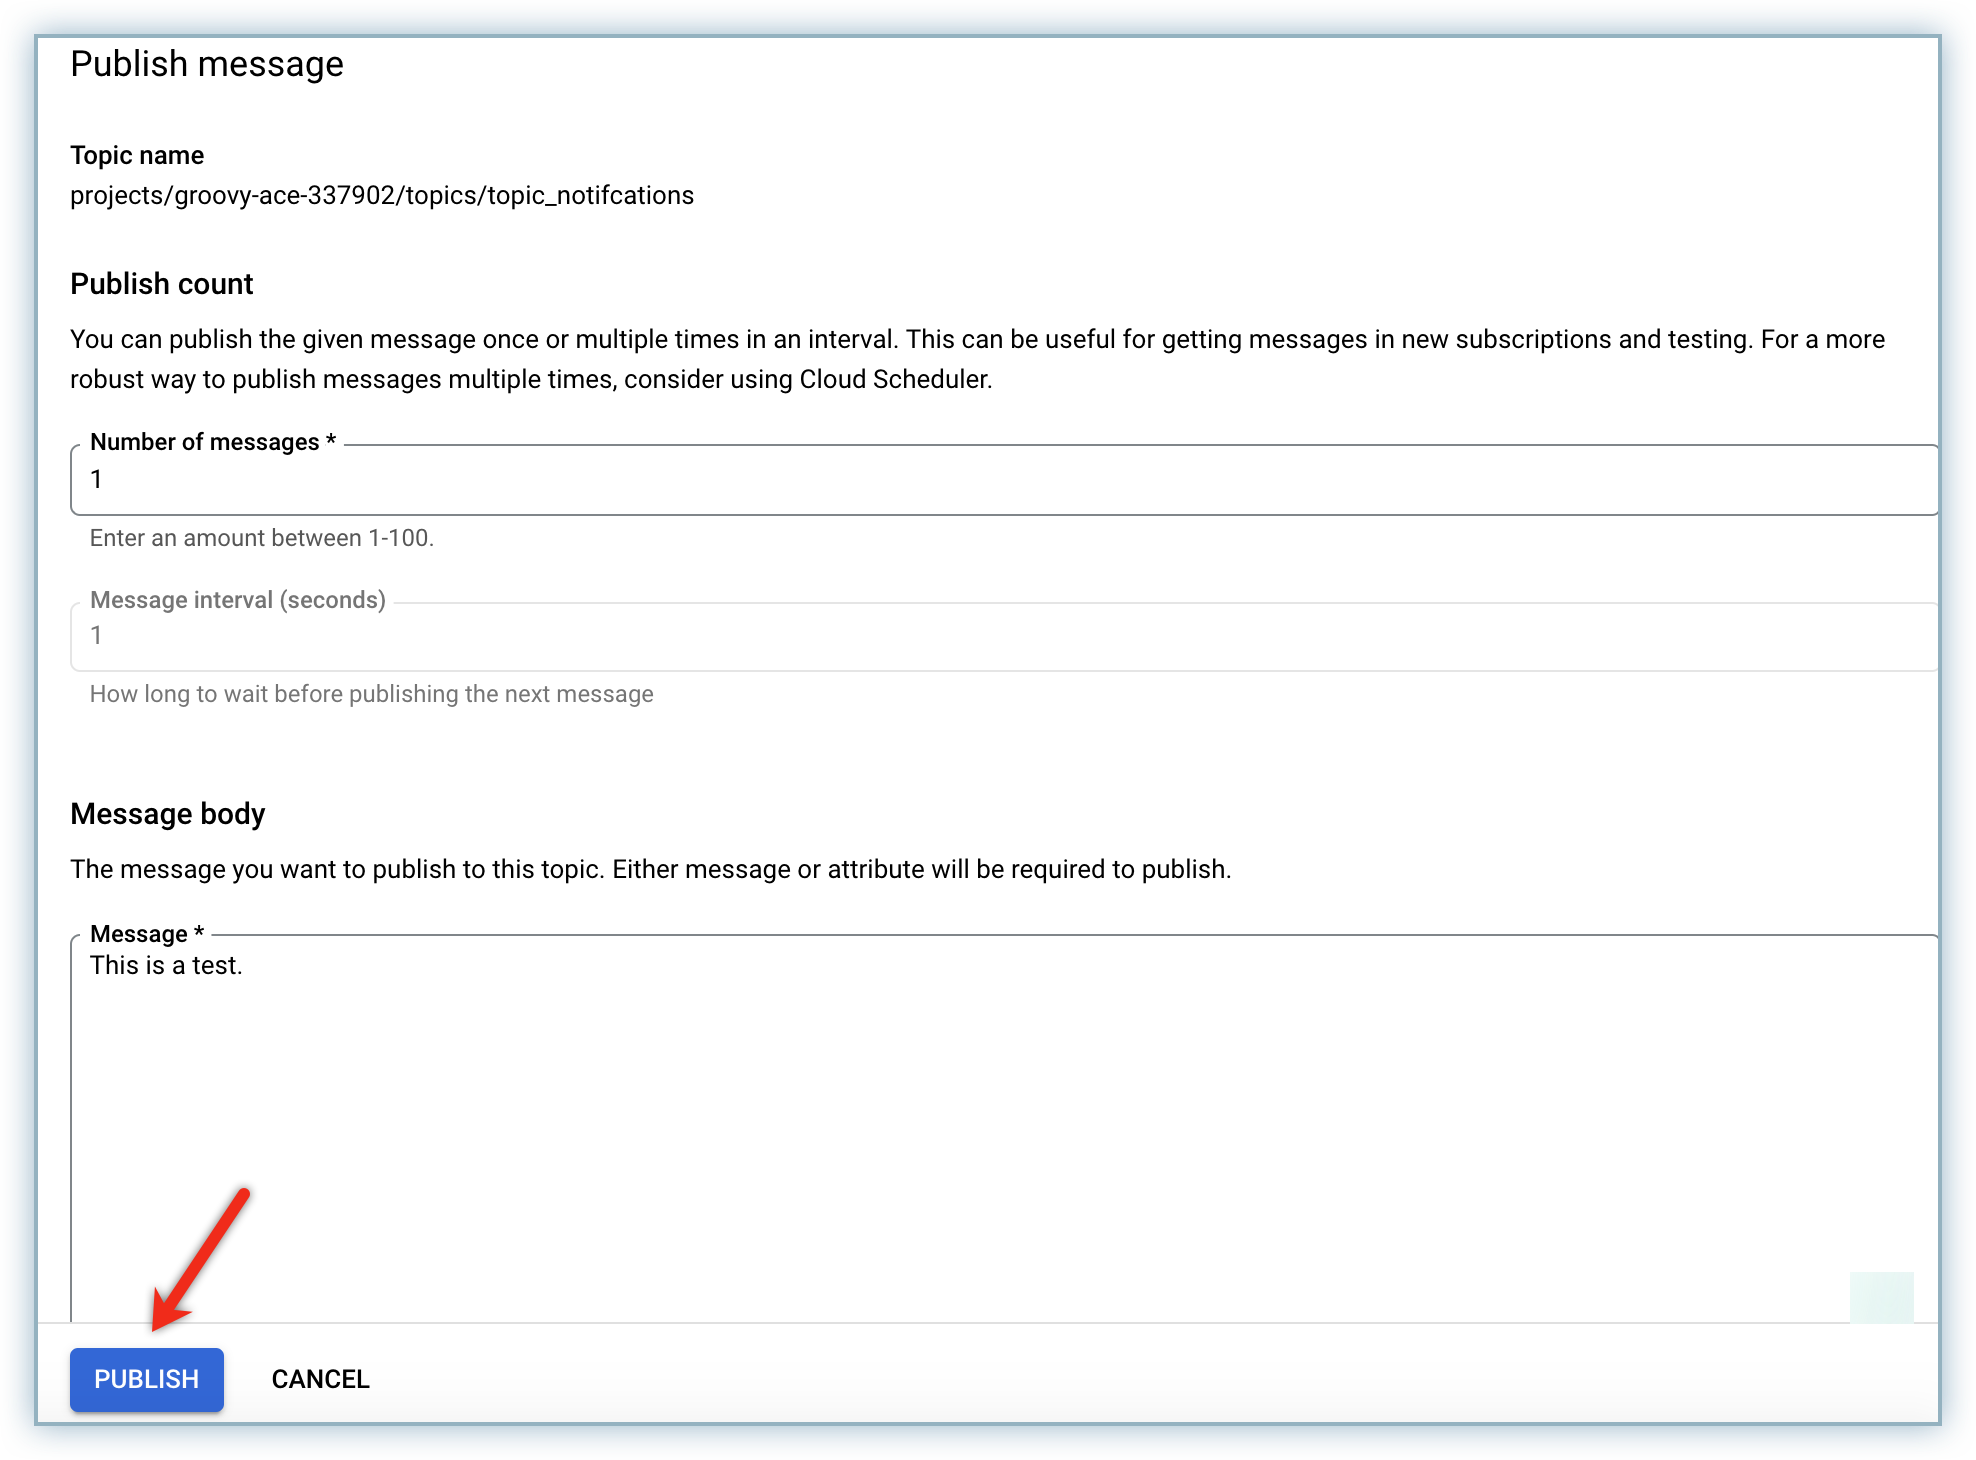
Type applicable test message in the Message text-box and click PUBLISH.
Select the subscription from the drop-down list and check the message.
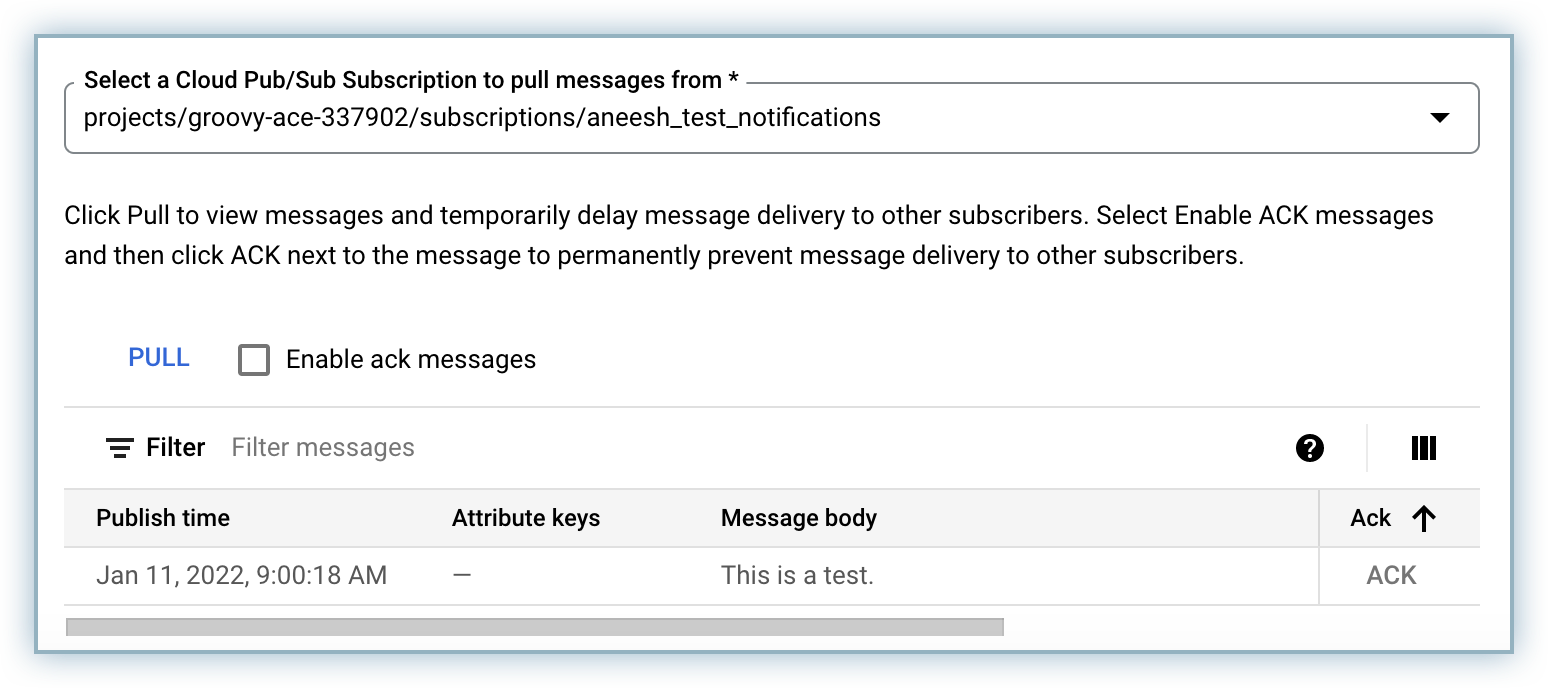
Click back to return to the topic list page.
Follow the steps below to associate your topic with a project to receive notifications from Google:
Login to Google Cloud Platform.
Click the drop-down list to select the applicable project that is linked to the Topic ID for which we want to receive notifications.
Note: Make a note of the project name as it is required to configure your app to receive notifications.
Click Topics from the Pub/Sub menu on the left nav.
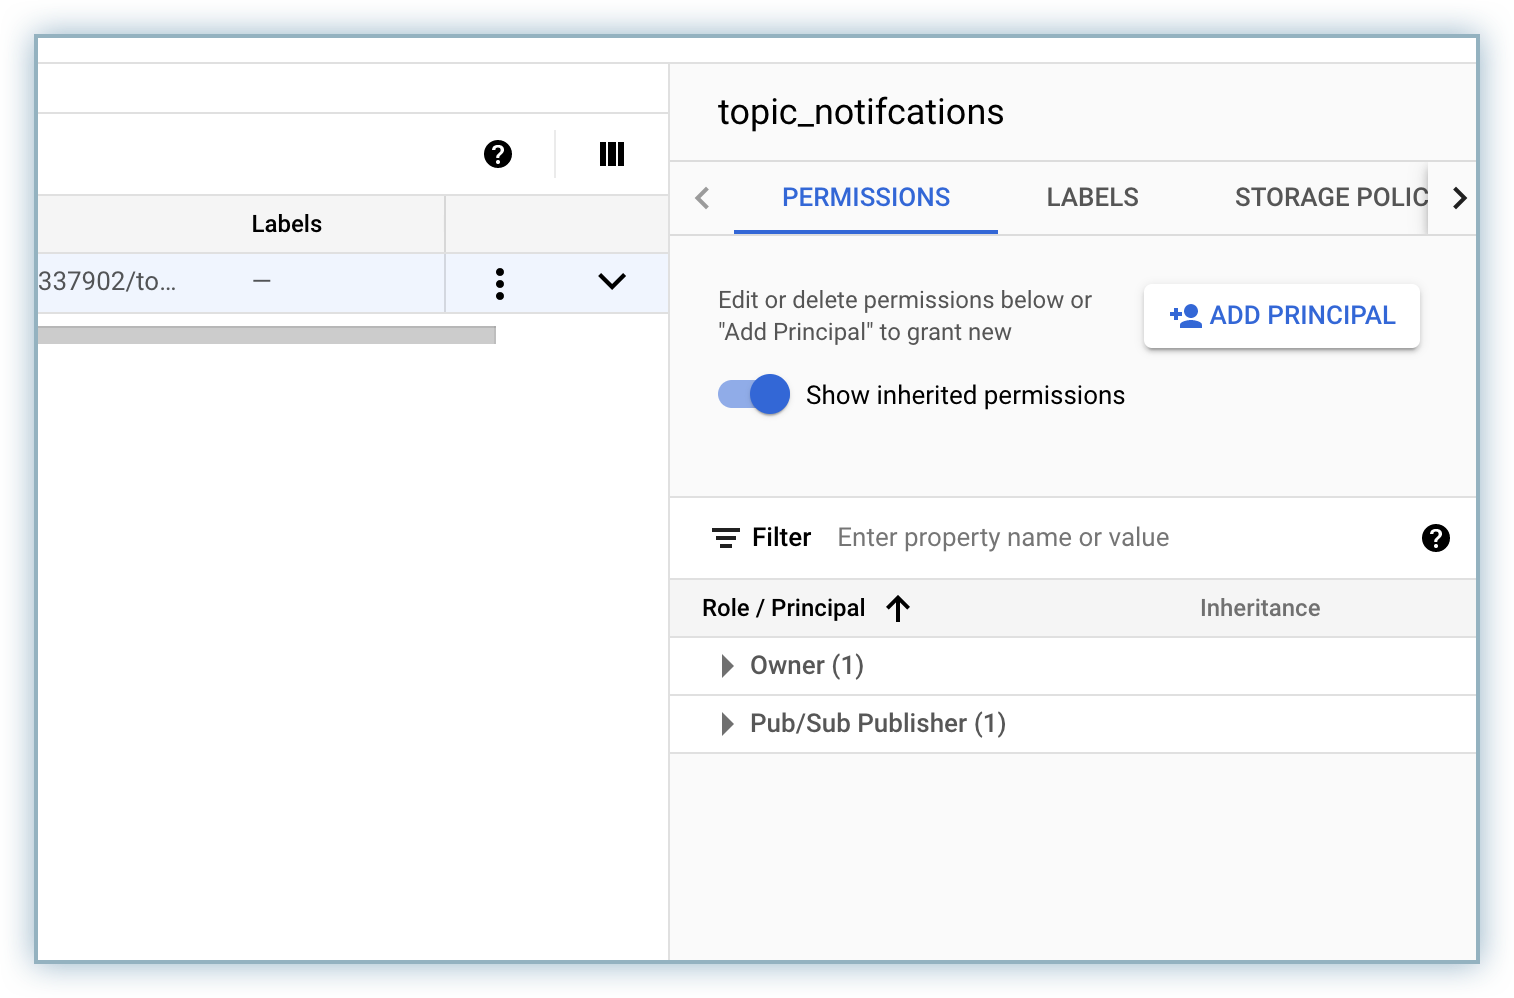
Select the applicable topic checkbox and click ADD PRINCIPAL in the PERMISSIONS tab.
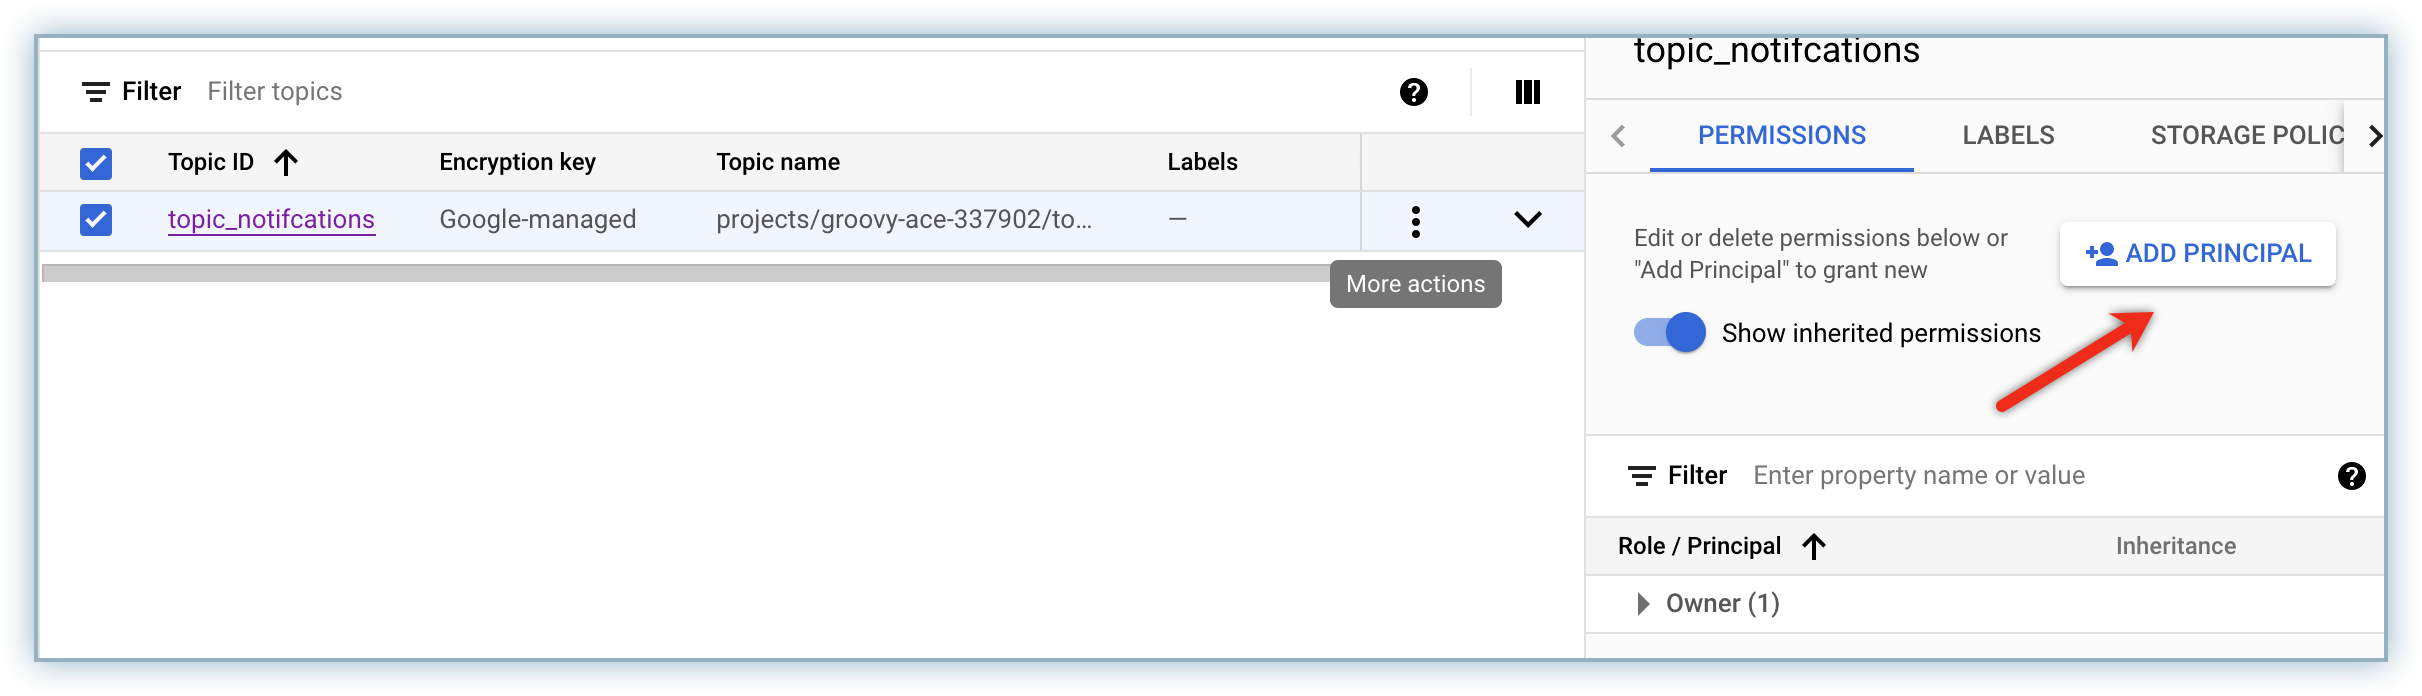
Update the following details in the Add Principals pop-up box.
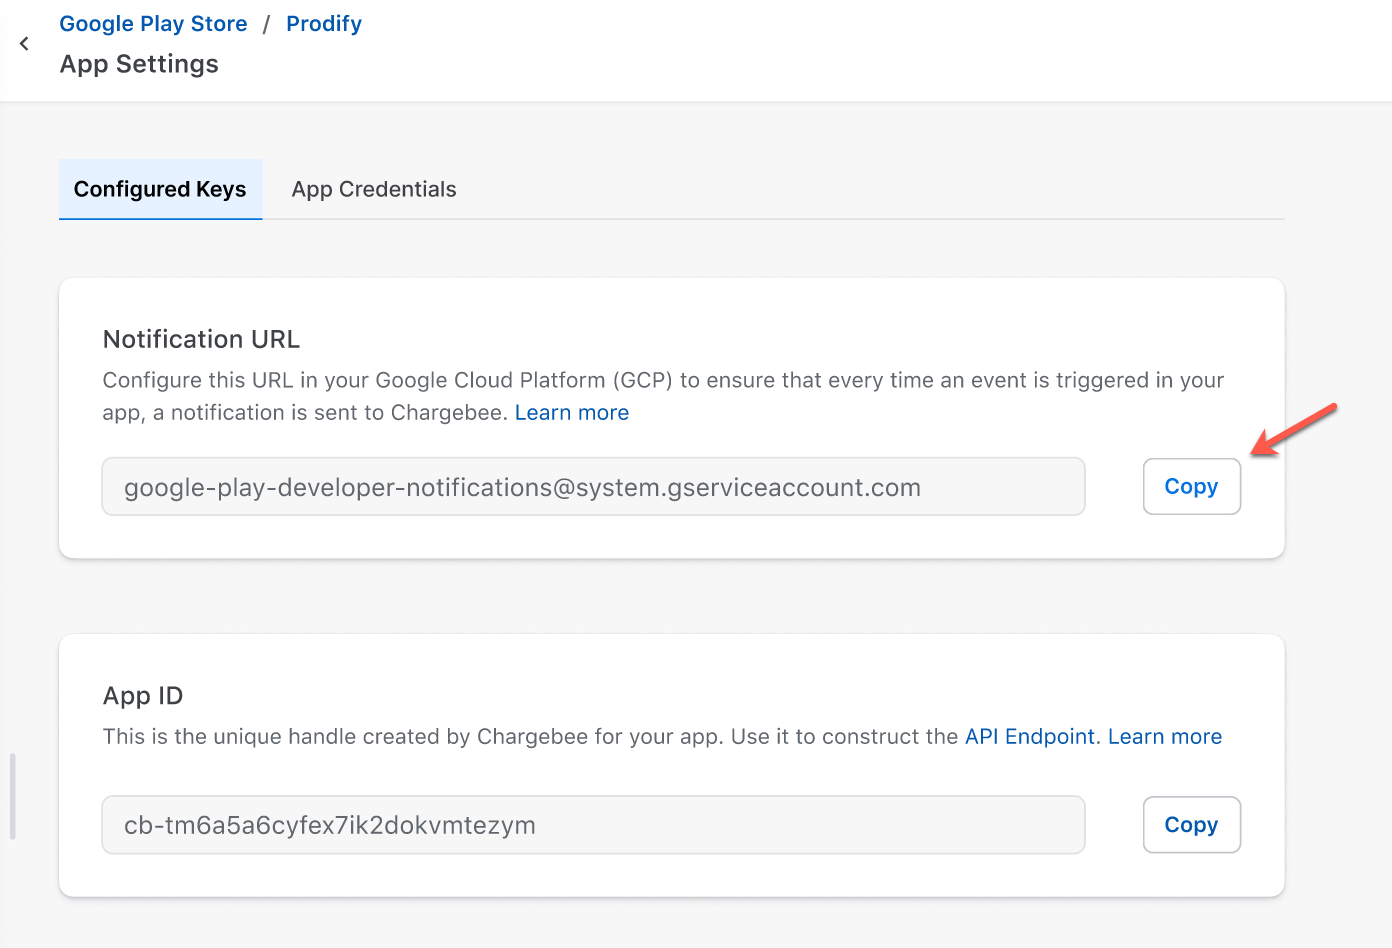
Enter google-play-developer-notifications@system.gserviceaccount.com in the New Principal field.
Select Pub/Sub > Pub/Sub Publisher from the Role drop-down list.
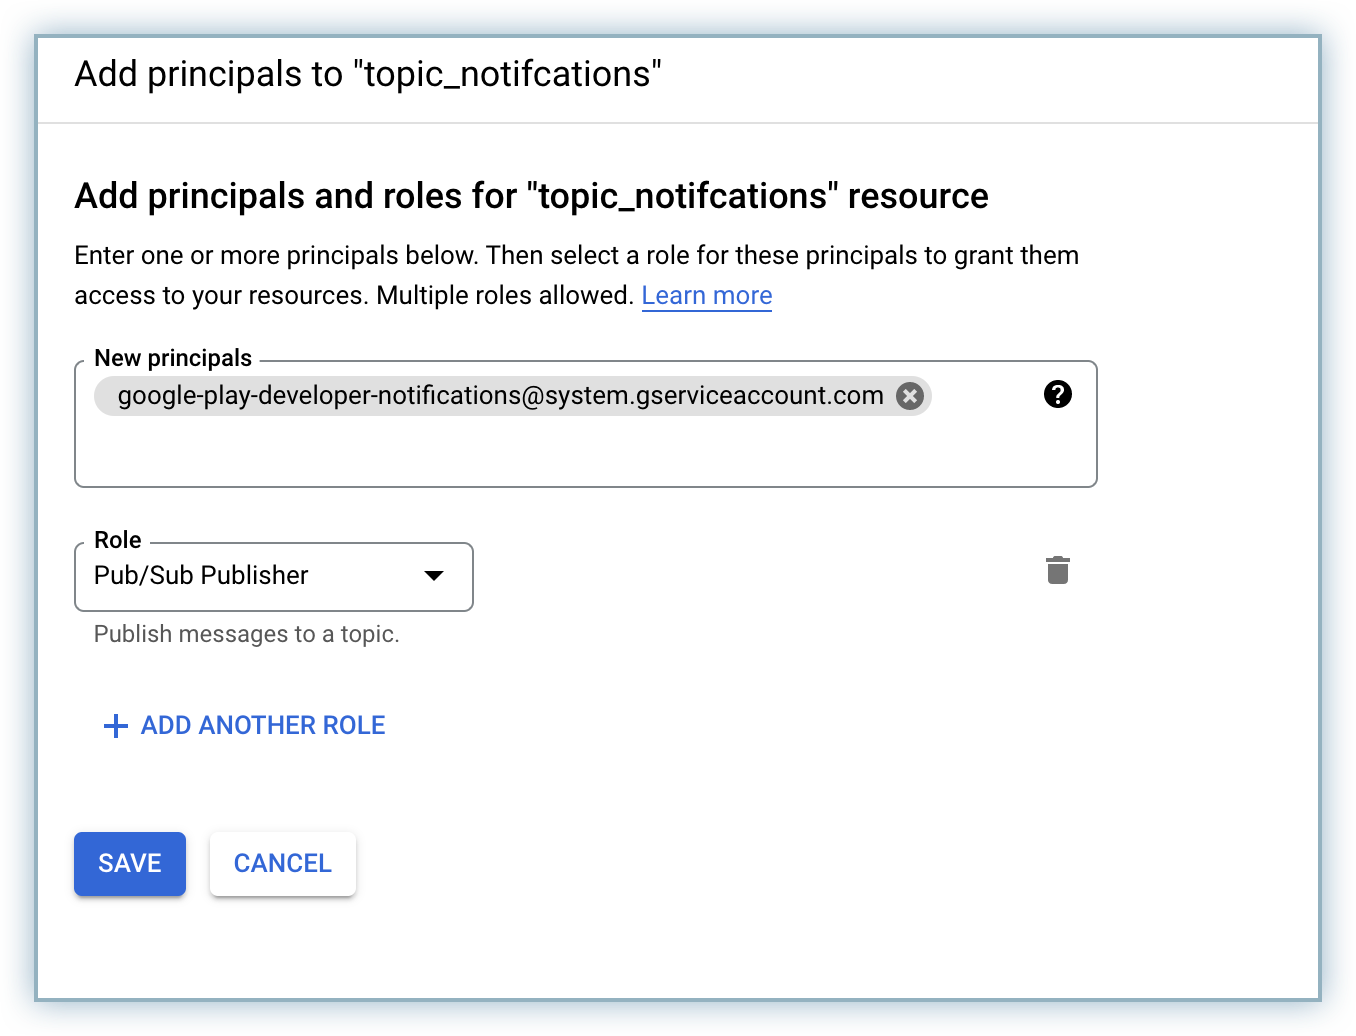
Click Save.
The new principal with Pub/Sub access is added to the PERMISSIONS list.
Follow the steps below to configure the topic in Google Play Console:
Copy the topic ID created in this step.
Access your Google Play Console and select the applicable App.
Navigate to Monetize > Monetization setup.
Paste the Topic ID in the Topic Name field in the Real-time developer notifications section.
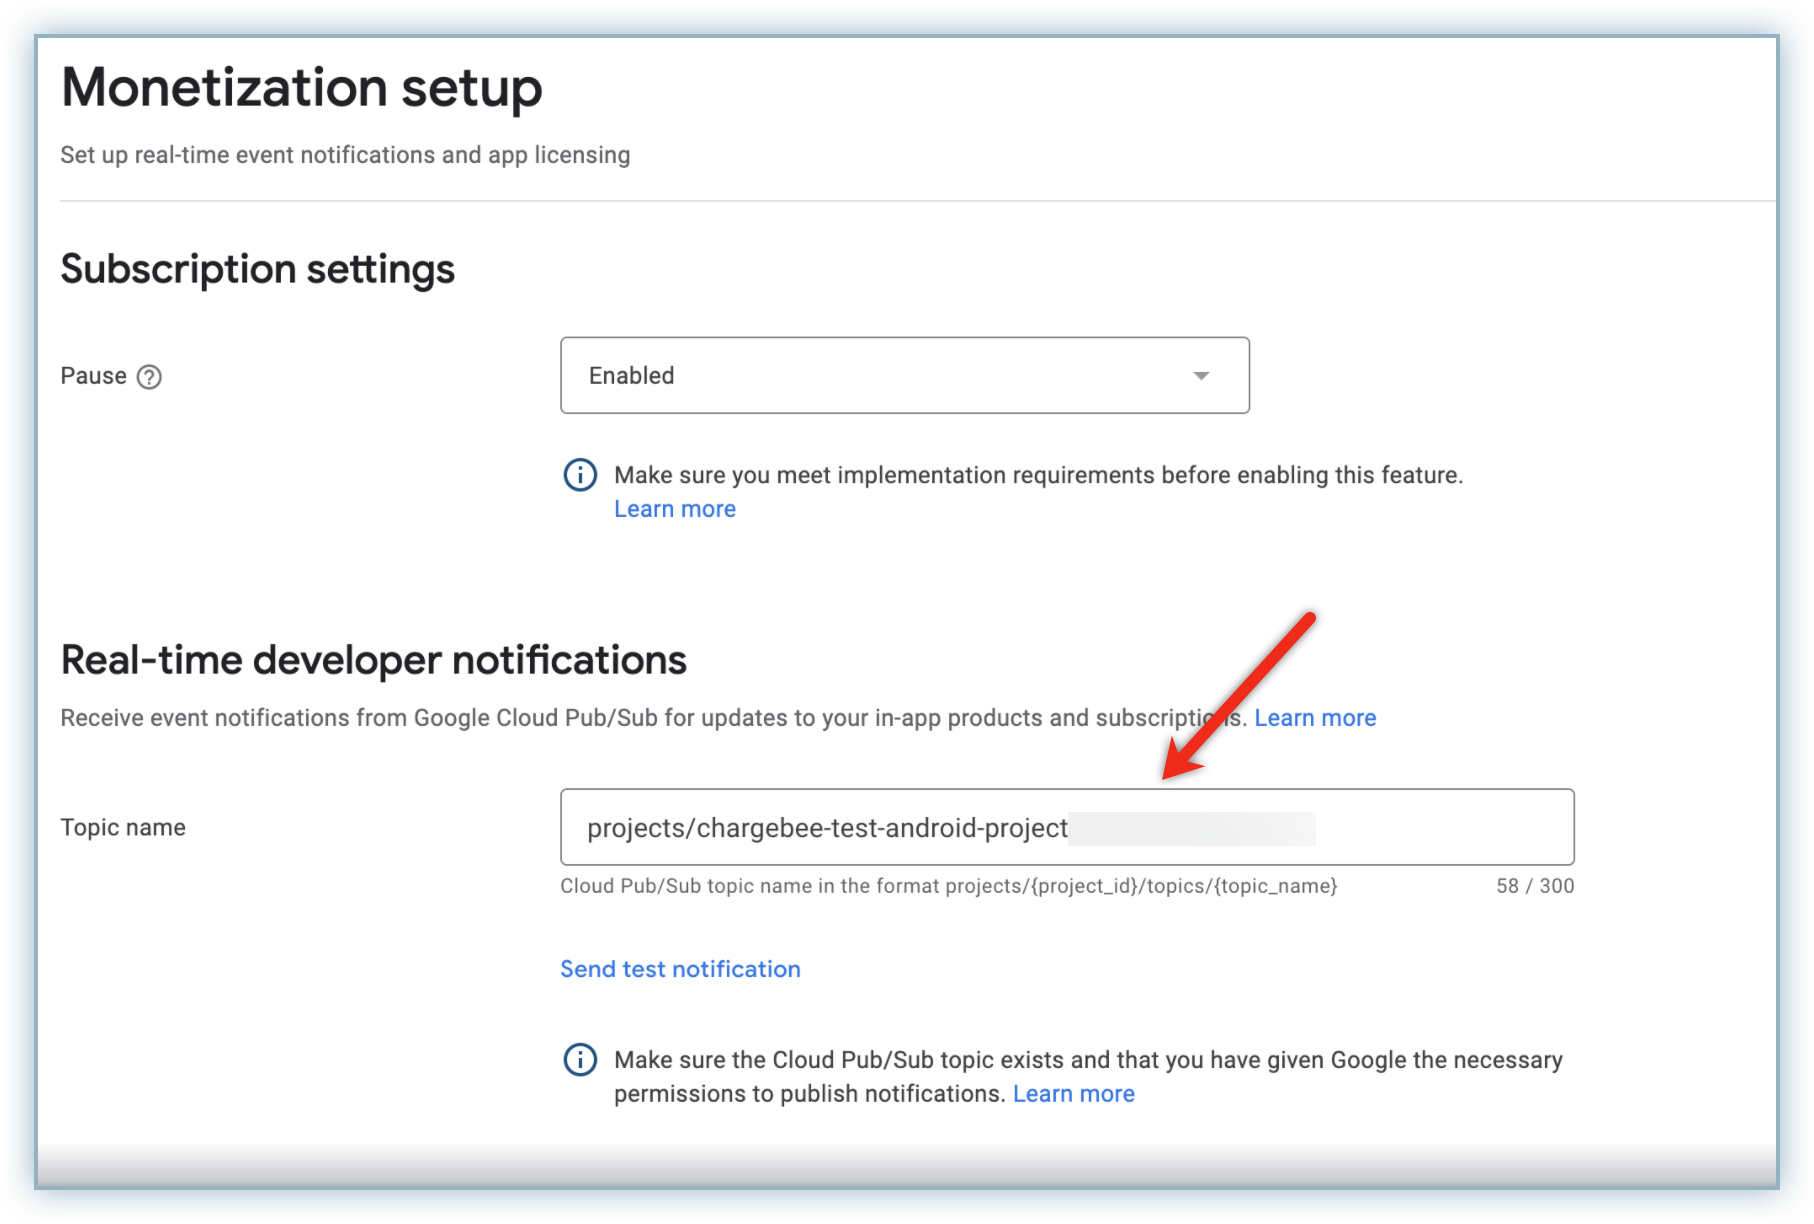
Click Save and Send test Notification.


 Articles & FAQ