Introduction
In today's digital landscape, subscriptions and recurring billing have become integral to many online businesses. Managing subscriptions efficiently and securely ensures a seamless user experience and sustains your revenue streams. Chargebee, a leading subscription billing platform, provides various tools to simplify subscription management, billing, and revenue operations.
Tutorial Scope
Seamlessly integrate Chargebee's In-app layout of Checkout into your Django application: This allows you to create a secure and customizable checkout experience for your customers without handling sensitive payment information on your server.
Set up webhooks for subscription updates.
Get your Django application ready for Chargebee's Hosted Checkout and subscription-based payments.
Let's dive in and unlock the potential of Chargebee to streamline your subscription billing and enhance your user experience.
Prerequisites
- A Chargebee account. Signup for a free trial if you don't have one.
- Configure Payment Gateway.
- Configure Smart routing.
- Familiarity with Django.
Development Workflow
In this comprehensive guide, we will take you through each of these steps, providing you with the knowledge and tools necessary to successfully set up, develop, test, and deploy your application.
- Setting up the project
- Building a Django Pricing App
- Integration with Chargebee
- Testing your Application/Checkout
- Setting up webhooks
- Show Subscription View
Setting up the project
- Activate your virtual environment
Sample Code
python3 -m venv .venv
source .venv/bin/activate
Navigate to where you want to store your Django apps and create a folder
Install Django, and Create the new project using the django-admin , and then change into the project folder.
pip3 install django
django-admin startproject honeycomics
cd honeycomics
The manage.py script creates applications, works with databases and starts the development web server.
Next, Run a database migration, which updates the database to include the models in our installed applications, and then Run the development web server to view it in your web browser and ensure everything is working perfectly.
python3 manage.py makemigrations
python3 manage.py migrate
python3 manage.py runserver
Next, We require a superuser account with Staff status to access the admin site and manage various objects, including the ability to view and create records. To create this superuser account with full site access and the necessary permissions in your Django application, you can use the manage.py command.
Run the below command and enter the prompted details.
python3 manage.py createsuperuser
Building a Comprehensive Django Pricing App
Follow these steps to create your very own fully functional and secure Django pricing app.
- Creating a Pricing App.
- Designing the models: Design database models to manage data and core business logic for your plans.
- Creating plans: You need to creats plans in Chargbeee as well as in your Application.
- Creating views and templates: Create views and templates to list and view our available Plans in detail
- Authenticate your users.
- Authorize your users.
Creating a Pricing App
Let's create a new app called pricing. This app will contain the model of the plans we will be selling, the views, and the URL configurations that are related to it.
python3 manage.py startapp pricing
Next, Register the app by adding it to INSTALLED_APPS list in the project settings ../honeycomics/settings.py
# Application definition

INSTALLED_APPS = [
    'django.contrib.admin',
    'django.contrib.auth',
    'django.contrib.contenttypes',
    'django.contrib.sessions',
    'django.contrib.messages',
    'django.contrib.staticfiles',

    # Local apps
    'pricing.apps.PricingConfig'
]
Designing the models
Now, we must design models to manage data and core business logic for the plans. We will keep this simple. Create a model Plan with a name and description and another model to track the pricing for the plans, PlanPrice.
Update your models.py file in the pricing app.
# pricing/models.py

from django.db import models
from django.conf import settings

User = settings.AUTH_USER_MODEL


class Plan(models.Model):
    name = models.CharField(max_length=255)
    description = models.TextField(blank=True)

    created_at = models.DateTimeField(auto_now_add=True)
    updated_at = models.DateTimeField(auto_now=True)

    class Meta:
        ordering = ("-created_at",)

    def __str__(self):
        return self.name


class PlanPrice(models.Model):
    price_id = models.CharField(max_length=255, primary_key=True)
    plan = models.ForeignKey(Plan, on_delete=models.CASCADE)
    price = models.IntegerField()
    currency = models.CharField(max_length=255, default="USD")
    period = models.CharField(max_length=255)

    created_at = models.DateTimeField(auto_now_add=True)
    updated_at = models.DateTimeField(auto_now=True)

    def __str__(self) -> str:
        return f"{self.period} {self.plan.name} {self.currency} plan"
We are using custom price_id as the primary key. We will fill this with the Pricing Point ID from your Chargebee Account.
Now, re-run your database migrations to add them to your database.
python3 manage.py makemigrations
python3 manage.py migrate
Next, Register the models to your admin panel to manage them, to create Plans and Pricing plans through the admin panel.
Open ../pricing/admin.py and add the following code
# pricing/admin.py

from django.contrib import admin
from .models import Plan, PlanPrice

admin.site.register(Plan)
admin.site.register(PlanPrice)
Creating plans
We will Create plans and Price points in your Chargebee account and then use the price point ID to Create plans in our application.
In Chargebee Account
Login to your Chargebee Account. Sign up for a free trial if you don't have one.
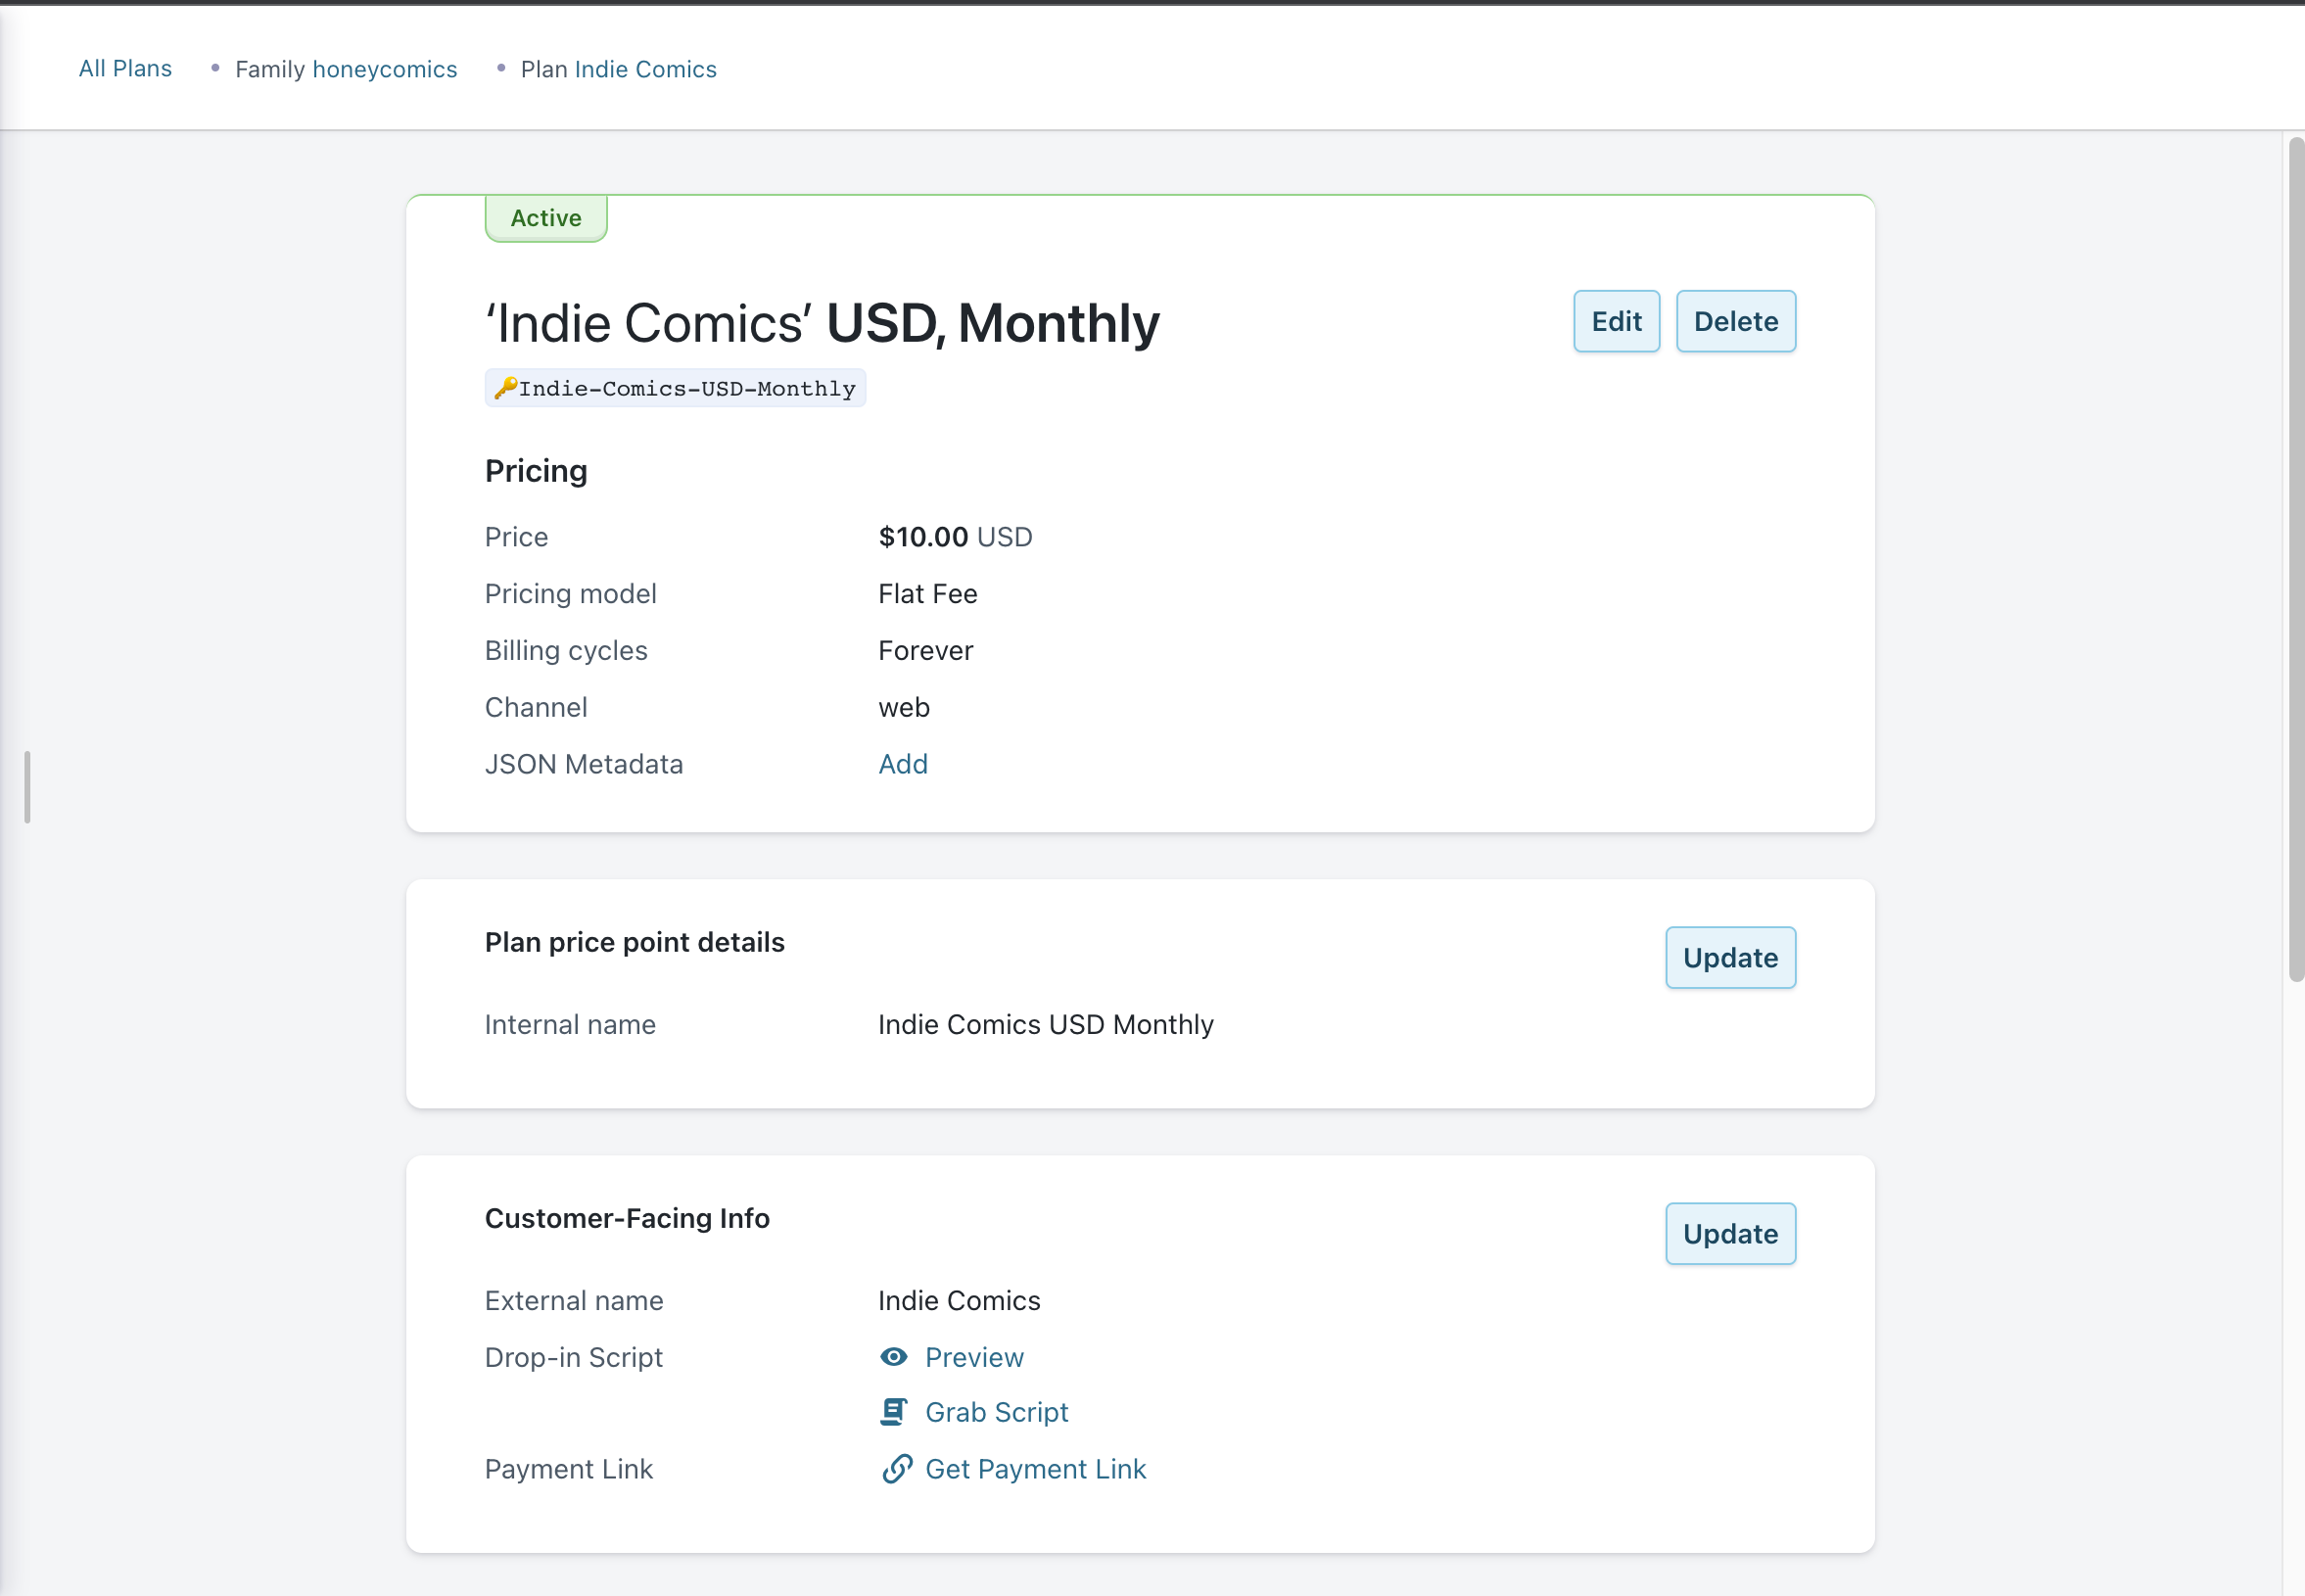
Create Plans and Price point for each plans. Here, we will use Flat fee as our pricing model.
Learn more about pricing model.

In Your Application
Log in to your admin site ( http://127.0.0.1:8000/admin ) using your superuser credentials.
Create Plans by filling in the name and description, same as we did in the Chargebee account
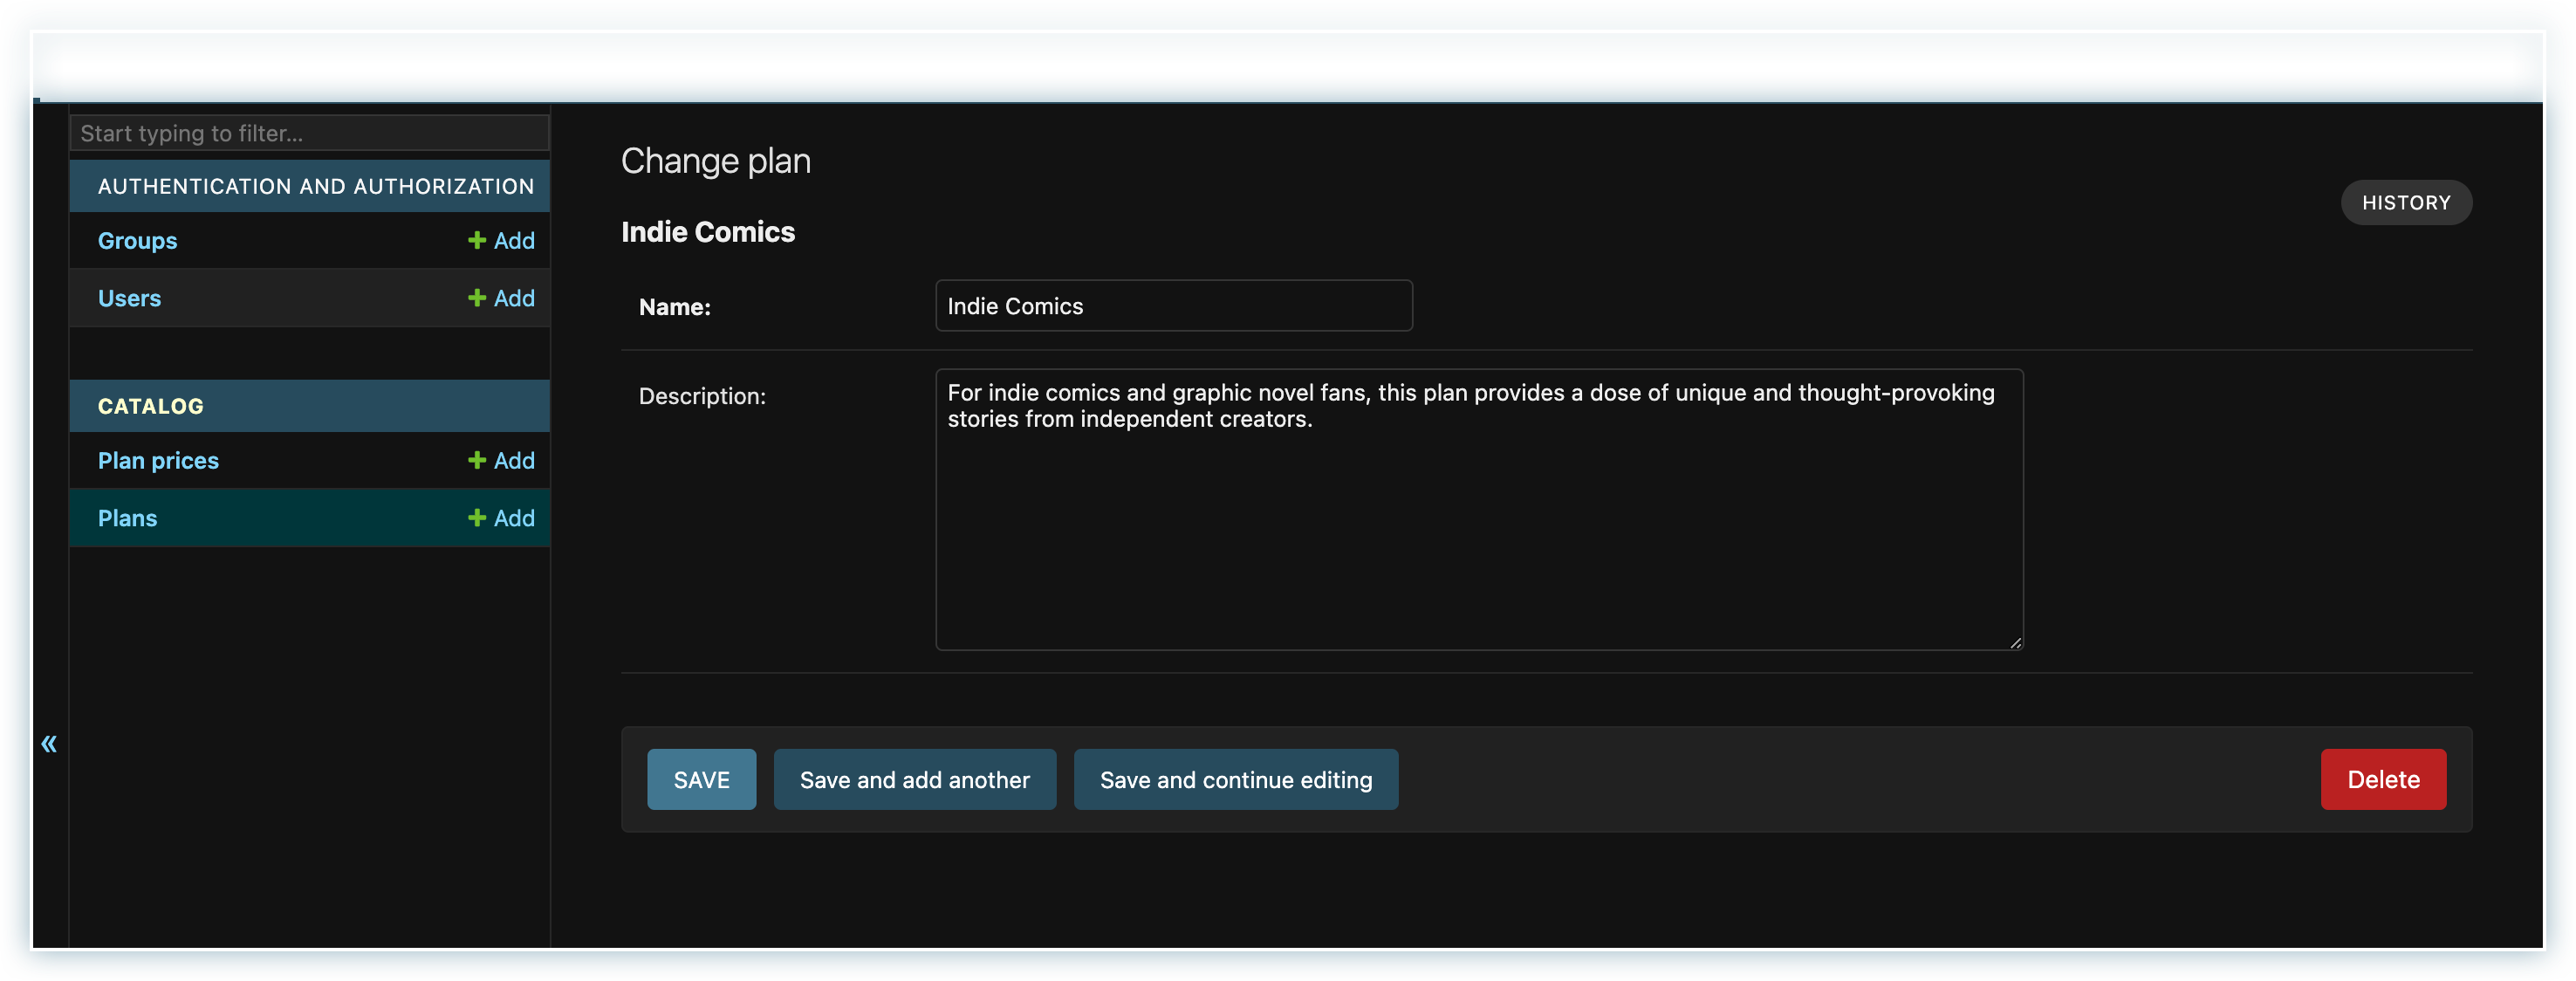
Create plan admin in Django Create respective Pricing for the plans.
Copy the price ID (It will be like Indie-Comics-USD-Monthly ) from the Chargebee Plan price page and add it to the price_id of the PlanPrices table.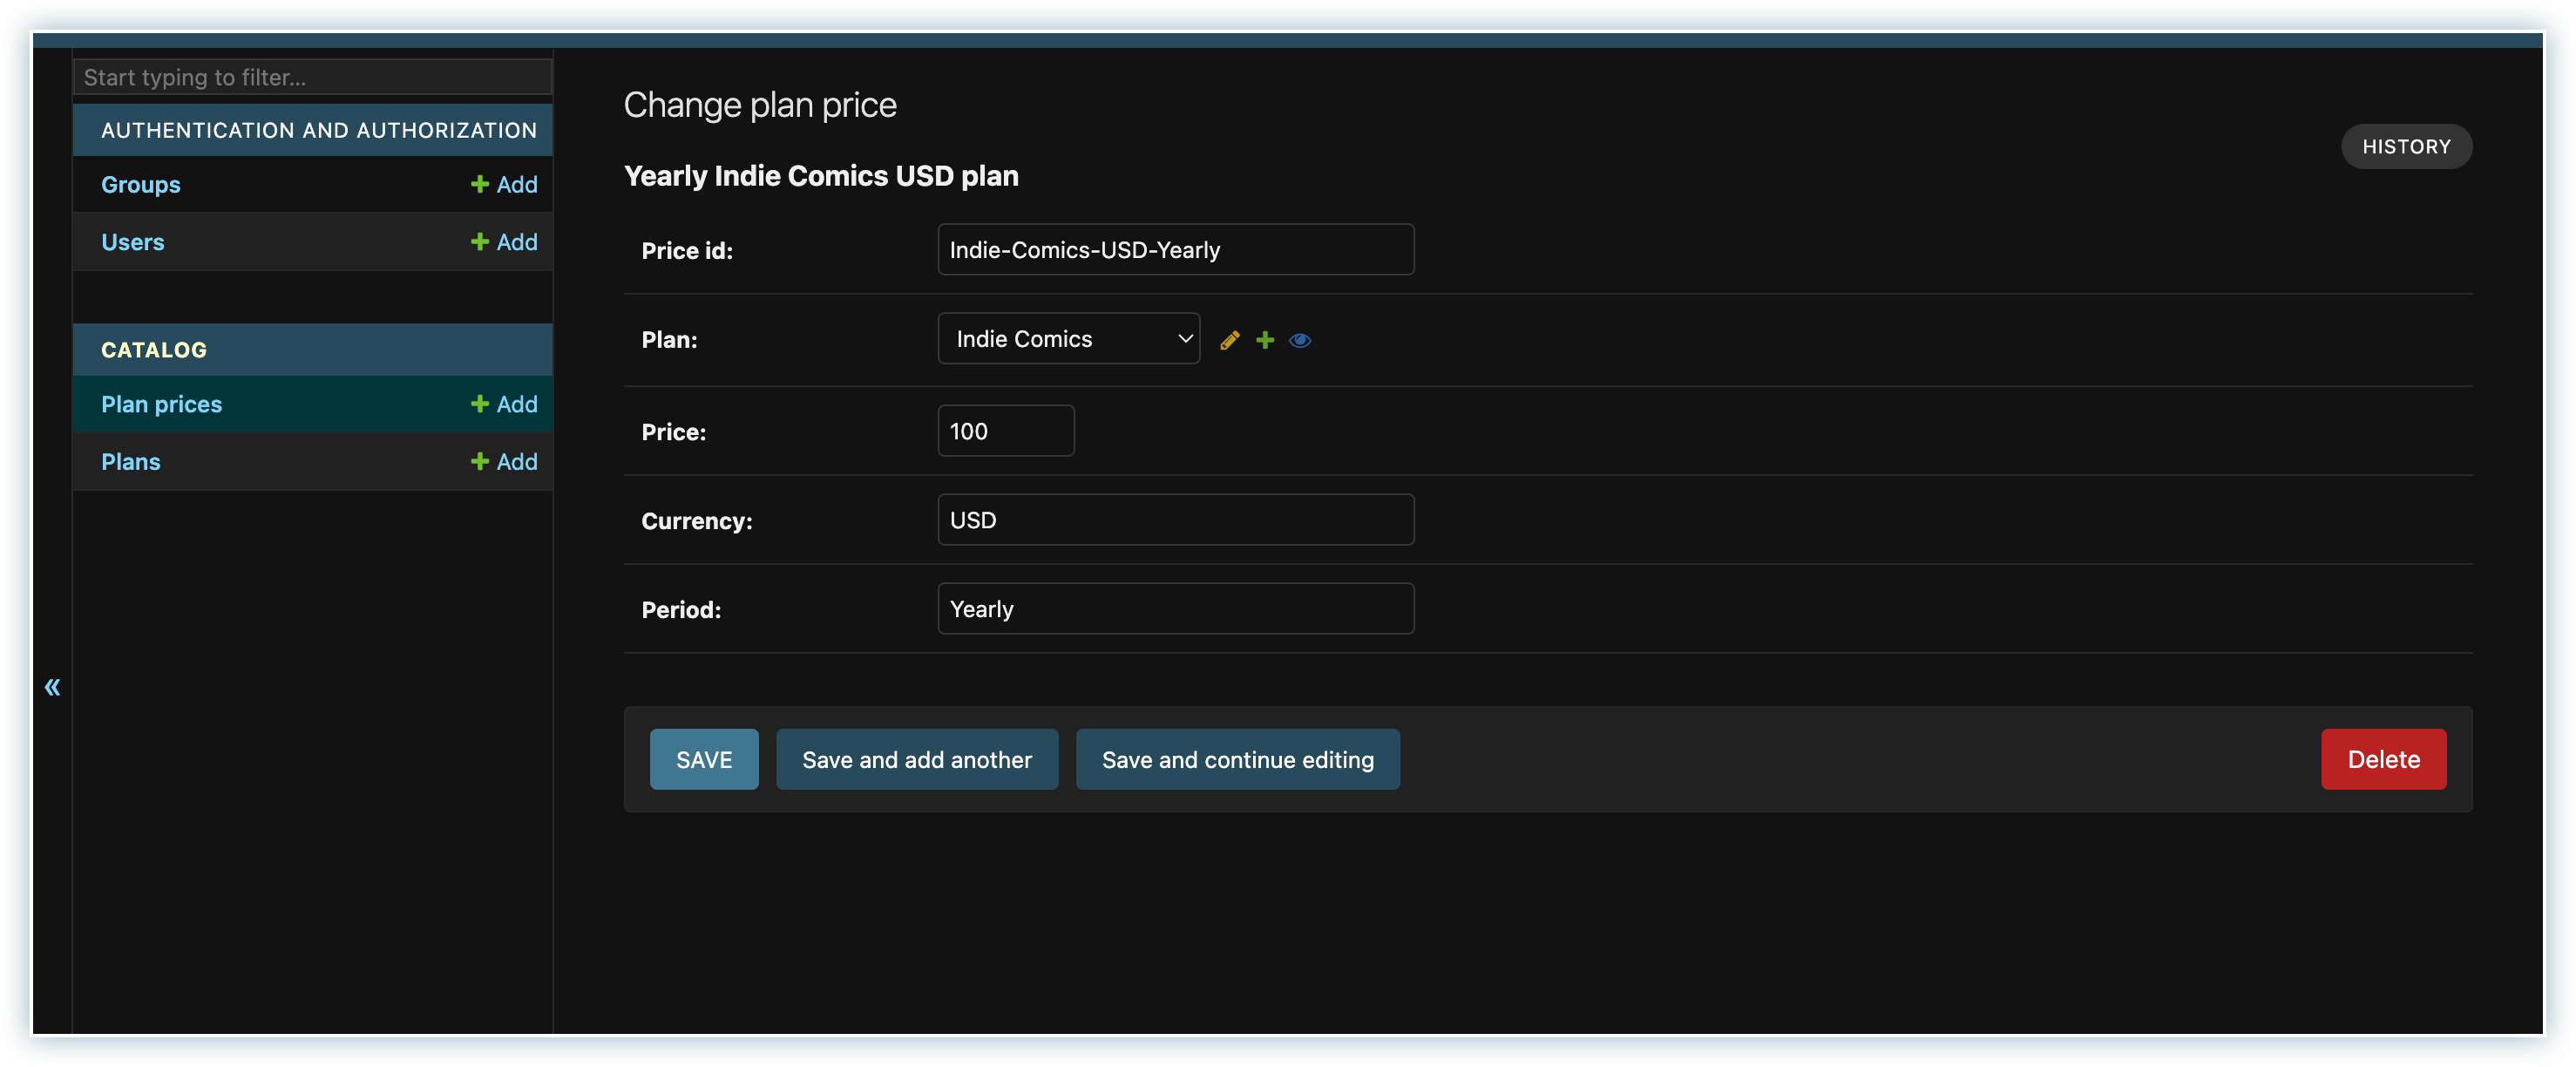
django create plan price admin
Creating Views
Let’s now create views and templates to list and view our available Plans in detail. Add below code to pricing/views.py.
# pricing/views.py

from .models import Plan, PlanPrice
from django.views.generic import DetailView, ListView


class PlanView(ListView):
    model = Plan
    context_object_name = "plans"
    template_name = "pricing/plans.html"


class PlanDetailView(DetailView):
    model = Plan
    context_object_name = "plan"
    template_name = "pricing/plan_detail.html"

    def get_context_data(self, **kwargs):
        context = super(PlanDetailView, self).get_context_data()
        context["plan_prices"] = PlanPrice.objects.filter(plan=self.get_object())
        return context
Now, Update the honeycomics/urls.py to include the pricing app urls
# honeycomics/urls.py

from django.contrib import admin
from django.urls import path, include

urlpatterns = [
    path('admin/', admin.site.urls),
    path("", include("pricing.urls"), name="pricing")  # new
]
Create urls.py under the pricing app and map the view we created.
# pricing/urls.py

from django.urls import path
from .views import PlanView, PlanDetailView

app_name = "pricing"

urlpatterns = [
    path("plans", PlanView.as_view(), name="plans"),
    path("plan/<int:pk>/", PlanDetailView.as_view(), name="plan-detail")
]
Creating Templates
Create a “templates” folder at the project’s root and add it to settings file.
# honeycomics/settings.py

TEMPLATES = [
    {
        "DIRS": [BASE_DIR / "templates"],  # new
    }
]
Inside the directory, create a base.html, which we will extend to use in other HTML.
We are using bootstrap for quick styling
<!-- base.html -->

<!DOCTYPE html>
<html lang="en">
  <head>
    <meta charset="utf-8" />
    <meta name="viewport" content="width=device-width, initial-scale=1, shrink-to-fit=no" />
    {% load static %}
    <!-- Bootstrap CSS -->
    <link
      href="https://cdn.jsdelivr.net/npm/bootstrap@5.3.1/dist/css/bootstrap.min.css"
      rel="stylesheet"
      integrity="sha384-4bw+/aepP/YC94hEpVNVgiZdgIC5+VKNBQNGCHeKRQN+PtmoHDEXuppvnDJzQIu9"
      crossorigin="anonymous"
    />
    <title>{% block title %} {% endblock %}</title>

    <!-- jQuery -->
    <script src="https://code.jquery.com/jquery-3.6.0.min.js"></script>
    <!-- Bootstrap JS -->
    <script
      src="https://cdn.jsdelivr.net/npm/bootstrap@5.3.1/dist/js/bootstrap.bundle.min.js"
      integrity="sha384-HwwvtgBNo3bZJJLYd8oVXjrBZt8cqVSpeBNS5n7C8IVInixGAoxmnlMuBnhbgrkm"
      crossorigin="anonymous"
    ></script>
  </head>

  <body>
    <div class="container my-5">
      <div class="d-flex justify-content-between flex-row">
        <h1>
          <a style="text-decoration:none; " class="text-dark" href="{% url 'pricing:plans' %}"
            >Honey Comics</a
          >
        </h1>
      </div>
      {% block content %}{% endblock %}
    </div>
  </body>
</html>
Inside views.py, we are using plans.html to list all the plans and plan_detail.html to show the details for particular plans. Let's create those.
Create a directory called "templates" inside the pricing app, and inside that, create a directory called "pricing" and create the two HTML files there.
So the directory will look like
.../pricing/templates/pricing/plans.html
.../pricing/templates/pricing/plan_detail.html
Add the below code to plans.html and plan_detail.html
<!-- pricing/templates/pricing/plans.html -->

{% extends "base.html" %} {% block title %} Plans {% endblock title%} {% block content %}
<div class="row my-5">
  {% for plan in plans %}
  <div class="col card m-3 p-3">
    <div>
      <h5>{{plan.name}}</h5>
      <p>{{plan.description}}</p>
      <a href="{% url 'pricing:plan-detail' plan.id %}" class="btn btn-primary">View Detail</a>
    </div>
  </div>
  {% endfor %}
</div>
{% endblock content %}
<!-- pricing/templates/pricing/plan_detail.html -->
{% extends "base.html" %} {% block title %} Buy Plan {% endblock title%} {% block content %}
<div class="card-deck my-5 p-3">
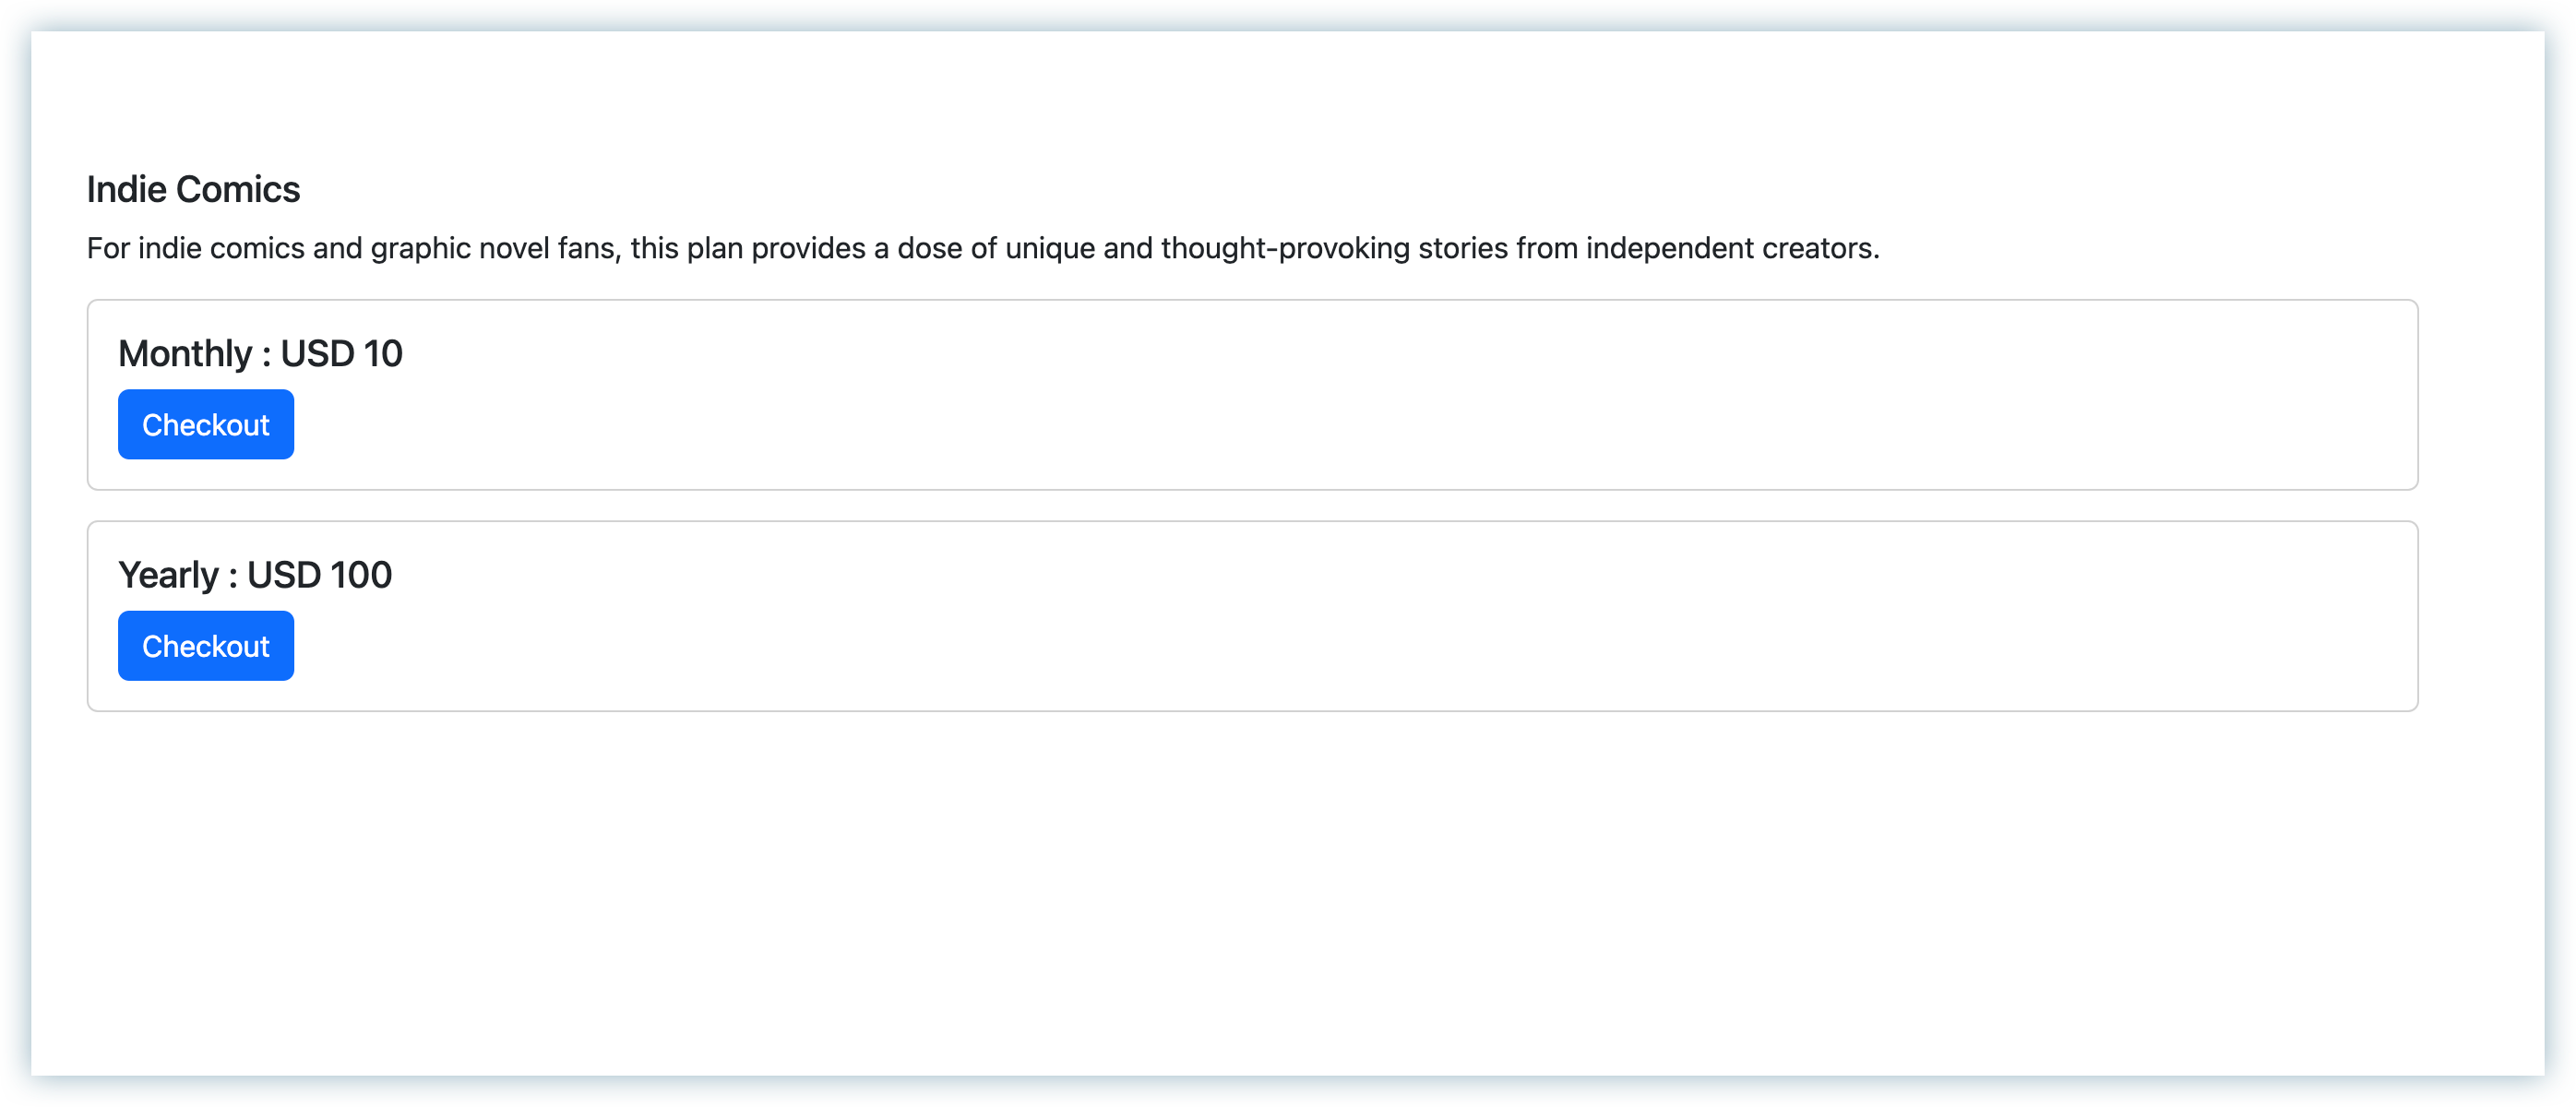
<h5>{{plan.name}}</h5>
<p>{{plan.description}}</p>
{% for price in plan_prices %}
<div class="card my-3">
<div class="card-body">
<h5>{{price.period}} : {{price.currency}} {{ price.price }}</h5>
<button class="checkout-button btn btn-primary" data-price="{{ price.price_id }}">
Checkout
</button>
</div>
</div>
{% endfor %}
</div>
{% endblock content %}
User Authentication
Login
Django provides us with a default view for a login page. We have to add a URL pattern for the auth system, a login template, and a minor update to the settings file.
In honecomics/urls.py, add the following code
# honeycomics/urls.py


from django.contrib import admin
from django.urls import path, include

urlpatterns = [
    path("accounts/", include("django.contrib.auth.urls")),  # new
]
So, Django will look for a login.html within the templates directory under registration." So create a new directory, registration under templates, and a new HTML file login.html. So, the file structure will be ../templates/registration/login.html
<!-- templates/registration/login.html -->

{% extends "base.html" %} {% block content %}
<div class="mt-5">
  <form method="post">
    {% csrf_token %} {{ form.as_p }}
    <button class="btn btn-primary" type="submit">Log In</button>
  </form>
</div>
{% endblock content %}
Finally, we have to add the redirect URL in the settings file to redirect the user after login successfully.
# settings.py

LOGIN_REDIRECT_URL = "pricing:plans"
Sign up
We need to write our own views for Sign up.
Django provides a UserCreationForm. But, that only provides username, password1, and confirm password. We need to include email,first_name, and last_name, so we will create a new form extending UserCreationForm.
First, we will create a dedicated app for this, which will help to keep our code organized. To create a new app, run
python3 manage.py startapp accounts
Then add this to "INSTALLED_APPS" of your settings file
# settings.py


INSTALLED_APPS = [

    # Local apps
    'pricing.apps.PricingConfig',
    'accounts.apps.AccountsConfig'  # new
]
Next, add a new URL path in your project, urls.py file
# honeycomics/urls.py

urlpatterns = [
    path("accounts/", include("accounts.urls")),  # new
]
Create a new file, forms.py, under the accounts app. Add the following code.
# accounts/forms.py

from django import forms
from django.contrib.auth.forms import UserCreationForm
from django.contrib.auth.models import User


class UserForm(UserCreationForm):
    first_name = forms.CharField(max_length=30, required=True, help_text='Required. 30 characters or fewer.')
    last_name = forms.CharField(max_length=30, required=True, help_text='Required. 30 characters or fewer.')
    email = forms.EmailField(required=True, help_text='Required. Enter a valid email address.')

    class Meta:
        model = User
        fields = UserCreationForm.Meta.fields + ('first_name', 'last_name', 'email')
You can see we are including first_name, last_name, and email fields on top of the default fields.
Now, We will use this form in our View to Signup. Create a new file, views.py, under the accounts app.
# accounts/views.py

from django.urls import reverse_lazy
from django.views.generic.edit import CreateView
from .forms import UserForm


class SignUpView(CreateView):
    form_class = UserForm
    success_url = reverse_lazy("login")
    template_name = "registration/signup.html"
URL configuration for the Sign up
# accounts/urls.py

from django.urls import path
from .views import SignUpView

name = "accounts"
urlpatterns = [
    path("signup/", SignUpView.as_view(), name="signup"),
]
Similar to login.html, it will search for signup.html in the registration directory. So, create the signup.html inside the registration directory.
<!-- templates/registration/signup.html -->

{% extends "base.html" %} {% block content %}
<div class="mt-5">
  <form method="post">
    {% csrf_token %} {{ form.as_p }}
    <button class="btn btn-primary" type="submit">Sign Up</button>
  </form>
</div>
{% endblock content %}
Logout
We don't need any views for logout, only the redirect URL to which the user will be redirected after clicking the logout button
# settings.py

LOGOUT_REDIRECT_URL = "login"
Add buttons
Now, we will add the Login, Logout, and Signup buttons. Based on the Login Status, the buttons will be shown.
User model provides an attribute is_authenticated, by which we can know whether the user is logged in.
<!-- templates/base.html-->

<body>
  <div class="container my-5">
    <div class="d-flex justify-content-between flex-row">
      <h1>
        <a style="text-decoration:none; " class="text-dark" href="{% url 'pricing:plans' %}"
          >Honey Comics</a
        >
      </h1>
      <div>
        {% if user.is_authenticated %}
        <div class="d-flex column-gap-4 flex-row">
          <h4>Hi {{ user.username }}</h4>
          <a class="btn btn-dark" href="{% url 'logout' %}">Log out</a>
        </div>
        {% else %}
        <a class="btn btn-dark" href="{% url 'login' %}">Log In</a>
        <a class="btn btn-dark" href="{% url 'signup' %}">Sign Up</a>
        {% endif %}
      </div>
    </div>
    {% block content %}{% endblock %}
  </div>
</body>
Authorization
We would restrict access to our Views so that any random logged-out user who knows the correct URL can not access any part of the site. Only the Login Users are allowed to access. If logged-out users try to access, they will be redirected to the login page. To achieve this, we will use LoginRequiredMixin.
In your ../pricing/views.py
# pricing/views.py

from django.contrib.auth.mixins import LoginRequiredMixin

class PlanView(LoginRequiredMixin, ListView):
    ...

class PlanDetailView(LoginRequiredMixin, DetailView):
    ...
Integration with Chargebee
Configure Chargebee
Chargebee provides a Python client library with a corresponding class representation of the resource. All operations specific to that resource are exposed as class methods in the corresponding resource class.
- Install the Chargebee library
pip3 install 'chargebee>=2,<3'
- Grab the Chargebee API key of your Chargebee TEST site.
Now add the following code to pricing/views.py
# pricing/views.py

import json
import chargebee
from django.http import JsonResponse
from django.views.generic import View, DetailView, ListView

class CreateCBSubscriptionView(View):
    def post(self, request, *args, **kwargs):
        try:
            price_id = request.POST.get("price_id")
            # Configure Chargebee
            chargebee.configure('CHARGEBEE_API_KEY', 'CHARGEBEE_SITE')

            # Use the received price_id in the checkout request
            result = chargebee.HostedPage.checkout_new_for_items(
                {
                    "subscription_items": [
                        {"item_price_id": price_id},
                    ],
                    "customer": {
                        "first_name": request.user.first_name,
                        "last_name": request.user.last_name,
                        "email": request.user.email,
                    }
                }
            )

            # Extract hosted_page from the result
            hosted_page = result._response["hosted_page"]
            # Return the hosted_page data as JSON response
            return JsonResponse(hosted_page)
        except json.JSONDecodeError:
            return JsonResponse(
                {"error": "Invalid JSON data in the request."}, status=400
            )
Replace CHARGEBEE_API_KEY with your API key (From step 2 ) and CHARGEBEE_SITE with your site name.
Example:
CHARGEBEE_API_KEY = 'test_H7blF0MmaKqnicjdknRKTGu91gBBIPf0m'
CHARGEBEE_SITE = 'honeycomics-test'
In the above code,
- First, we are configuring the client library with your Chargebee API key and Site name.
- The view is called with "price_id" as the parameter,
- Chargebee's Checkout to a new subscription API is called passing the "price_id" in "subscription_items" and customer details in "customer", which returns a hosted page.
The "customer" object is optional. After the successful Checkout, Chargebee will create a Customer in your Chargebee Account with given details.
Update the pricing/urls.py to add the URL for the above created view
# pricing/urls.py

from django.urls import path
from .views import CreateCBSubscriptionView

urlpatterns = [
    path(
        "api/generate_checkout_new_url",
        CreateCBSubscriptionView.as_view(),
    )
]
Bind Checkout Opening with the Click Event
Clicking the Checkout button on the plan detail page should open Chargebee's in-app checkout. Then, Customers will fill in their name, email, billing address, and payment details. After Clicking on submit, the customer will be redirected to a success page. We will receive the subscription confirmation/details from Chargebee webhooks.
We already added the Checkout button in the plan_detail.html file. Now, we will add the JS code to handle opening In-app Checkout.
First, Add the following script in your base.html
<script src="https://js.chargebee.com/v2/chargebee.js"></script>
Then, On the client side, a function like openCheckout that returns a Promise object is created. This promise object will result from an Ajax call, which is done to the endpoint we created in the previous step, and this will resolve to a hosted page object.
We will be adding JS files to write the client-side function. Similar to the template directory structure, make a directory static under the pricing app, make pricing under that, and create a "checkout.js" file inside.
Final folder structure will be as follows
.../pricing/static/pricing/checkout.js
Then, Add the following code to "checkout.js"
// pricing/static/pricing/checkout.js

$(document).ready(function () {
  let cbInstance = Chargebee.init({
    site: 'honeycomics-test', // replace with your site name
  })
  let cbInstance = Chargebee.getInstance()
  $('.checkout-button').click(function () {
    let selectedPriceId = $(this).data('price')
    console.log(selectedPriceId)
    const csrftoken = getCookie('csrftoken')
    console.log(csrftoken)

    openChargebeeCheckout(selectedPriceId, csrftoken)
  })
  function openChargebeeCheckout(priceId, csrftoken) {
    cbInstance.openCheckout({
      hostedPage: function () {
        return $.ajax({
          headers: { 'X-CSRFToken': csrftoken },
          method: 'post',
          url: 'http://localhost:8000/api/generate_checkout_new_url', // url point to "CreateCBSubscriptionView"
          data: { price_id: priceId },
        })
      },
      loaded: function () {
        console.log('checkout opened')
      },
      error: function () {
        $('#loader').hide()
        $('#errorContainer').show()
      },
      close: function () {
        $('#loader').hide()
        $('#errorContainer').hide()
        console.log('checkout closed')
      },
      success: function (hostedPageId) {
        console.log(hostedPageId)
        // redirect to Any thank you page you want
      },
      step: function (value) {
        console.log(value)
      },
    })
  }

  function getCookie(name) {
    let cookieValue = null
    if (document.cookie && document.cookie !== '') {
      const cookies = document.cookie.split(';')
      for (let i = 0; i < cookies.length; i++) {
        const cookie = cookies[i].trim()
        if (cookie.substring(0, name.length + 1) === name + '=') {
          cookieValue = decodeURIComponent(cookie.substring(name.length + 1))
          break
        }
      }
    }
    return cookieValue
  }
})
Here, first, we are initializing a Chargebee instance, and then on clicking the Checkout button, the function openChargebeeCheckout is called, passing the "price_id" and the "CSRF" token as parameters.
If you noticed, in plan_detail.html, we are passing the "price_id" of the Plan to subscribe.
Finally, in base.html, Add the following script.
<script src="{% static 'pricing/checkout.js' %}"></script>
You must have your Payment gateway setup otherwise the API will throw error. To setup follow https://www.chargebee.com/docs/2.0/gateway_settings.html
Test your Application/Checkout
Step 1. Login to your account.
Step 2. Go to the Plan detail page and click on the Checkout button.
Step 3. A Subscription Plan is shown, which is based on the "price_id" we passed in the checkout request and then Passed to Hosted Page API.
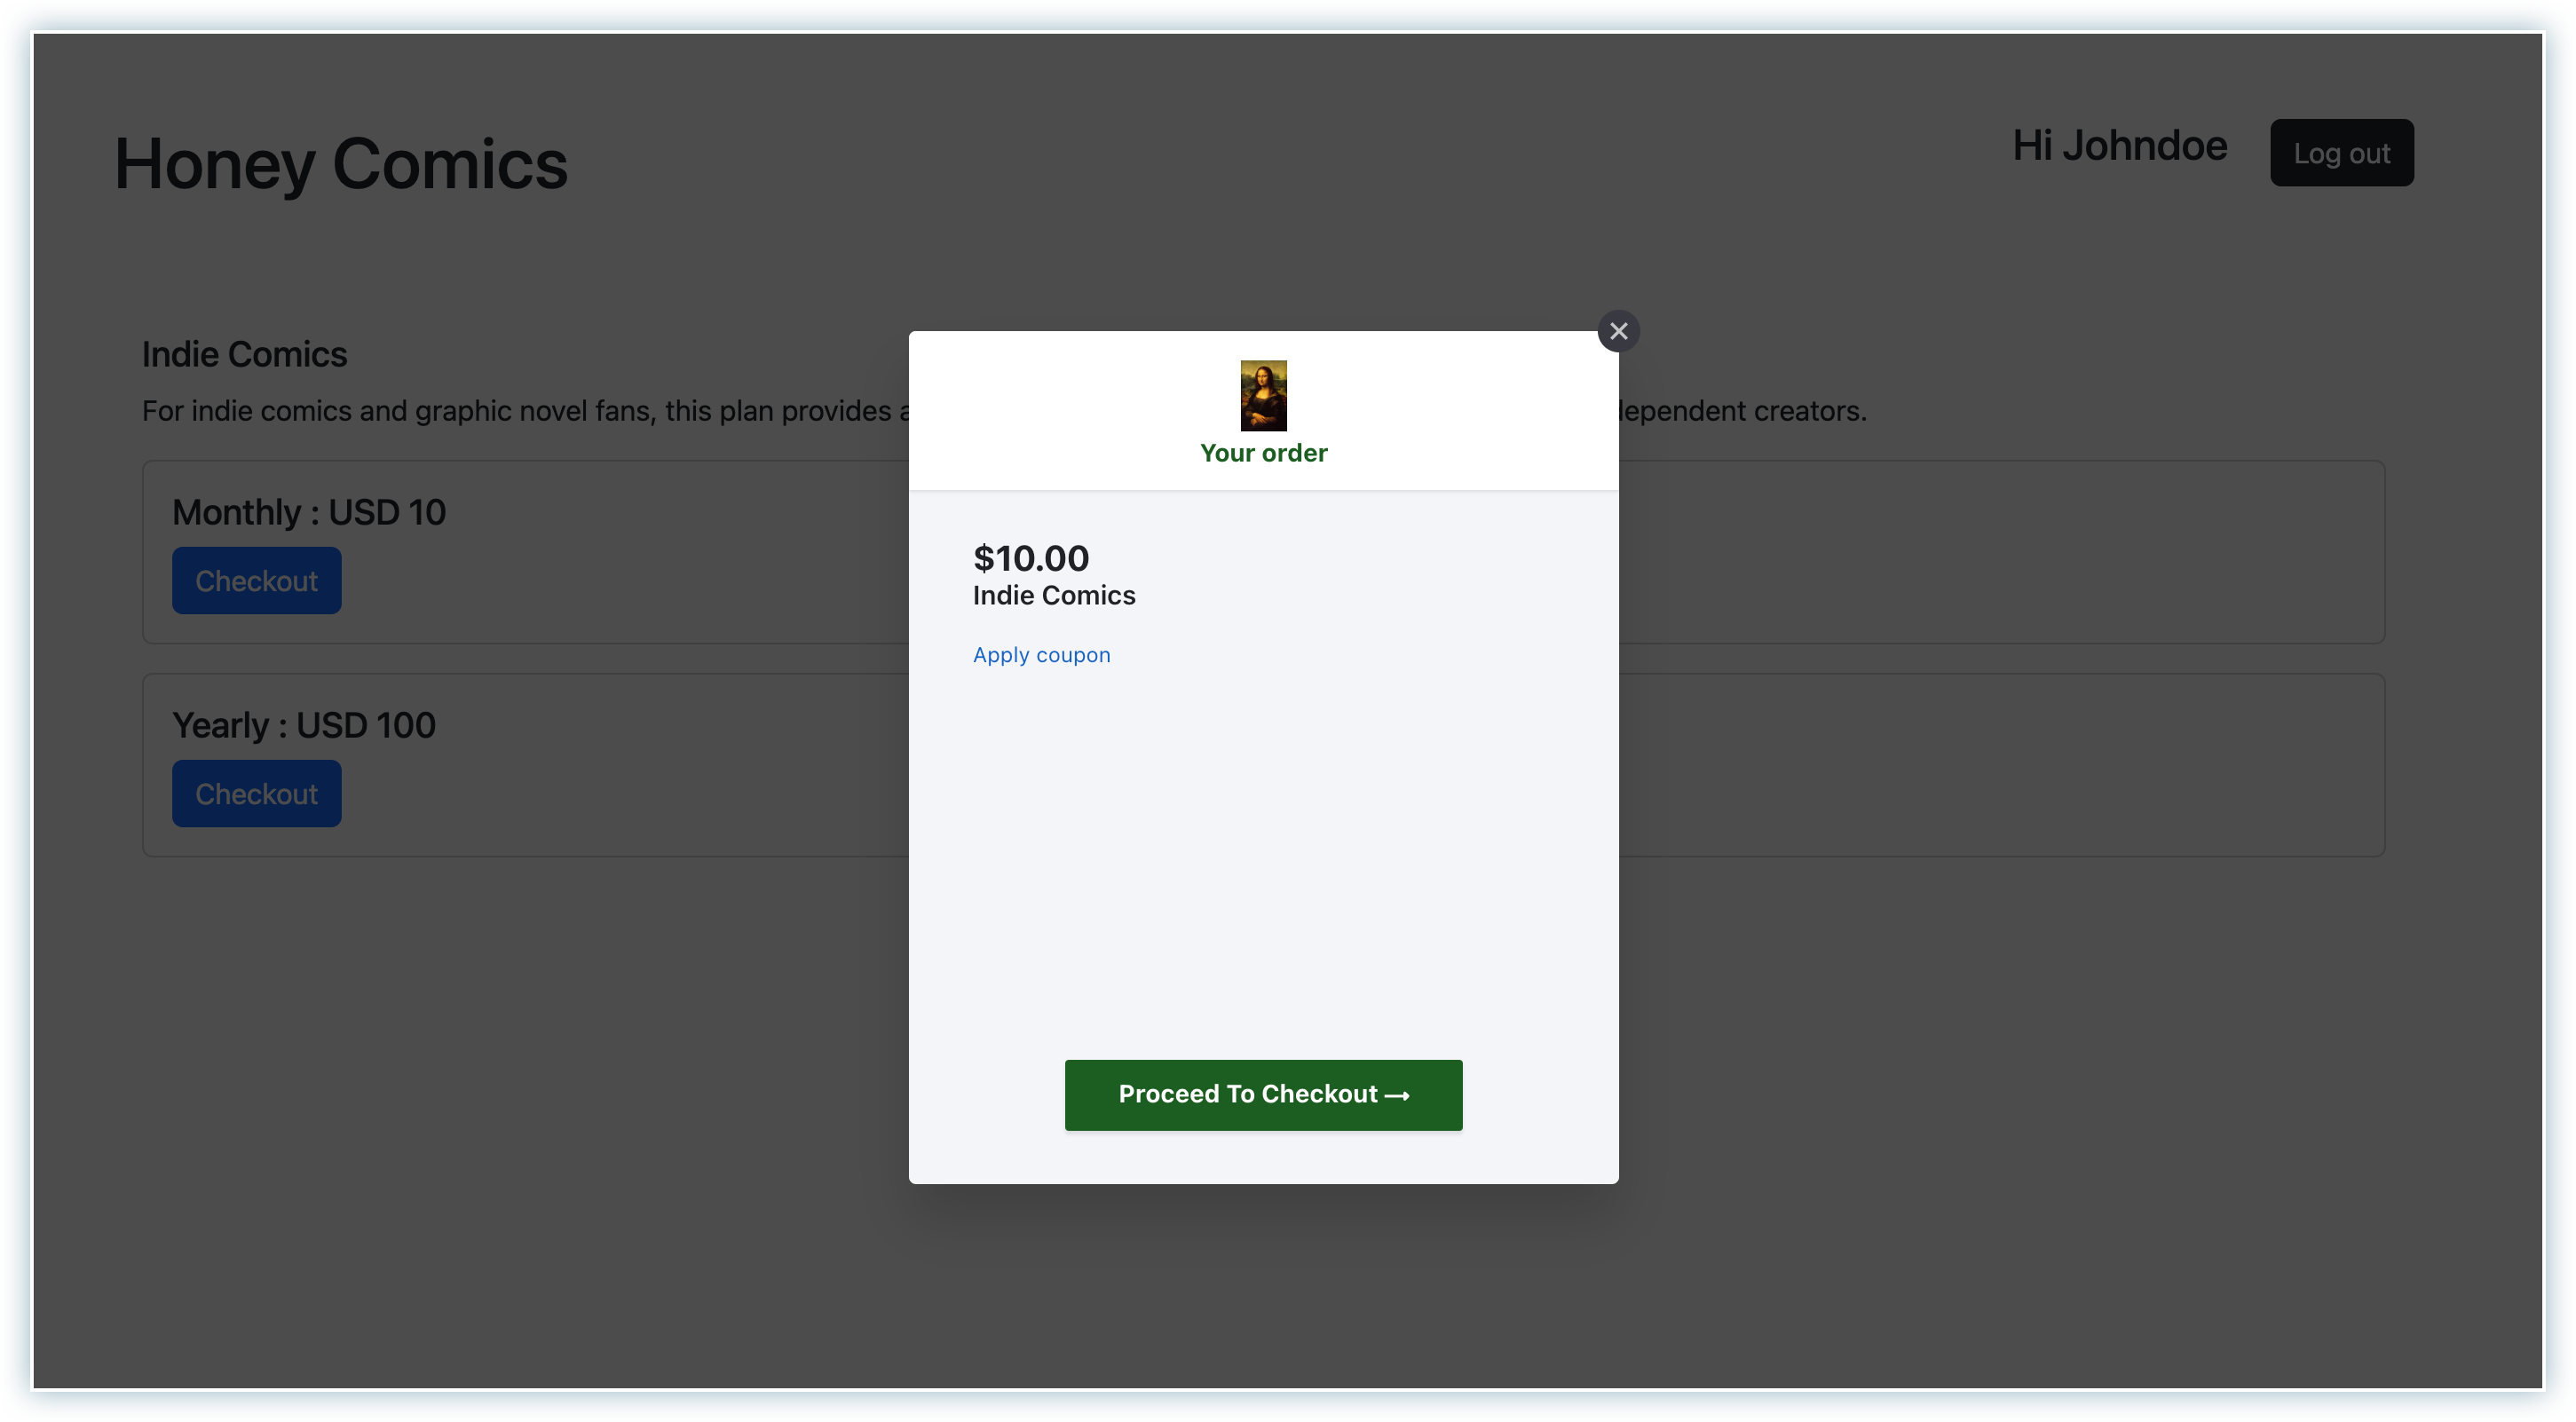
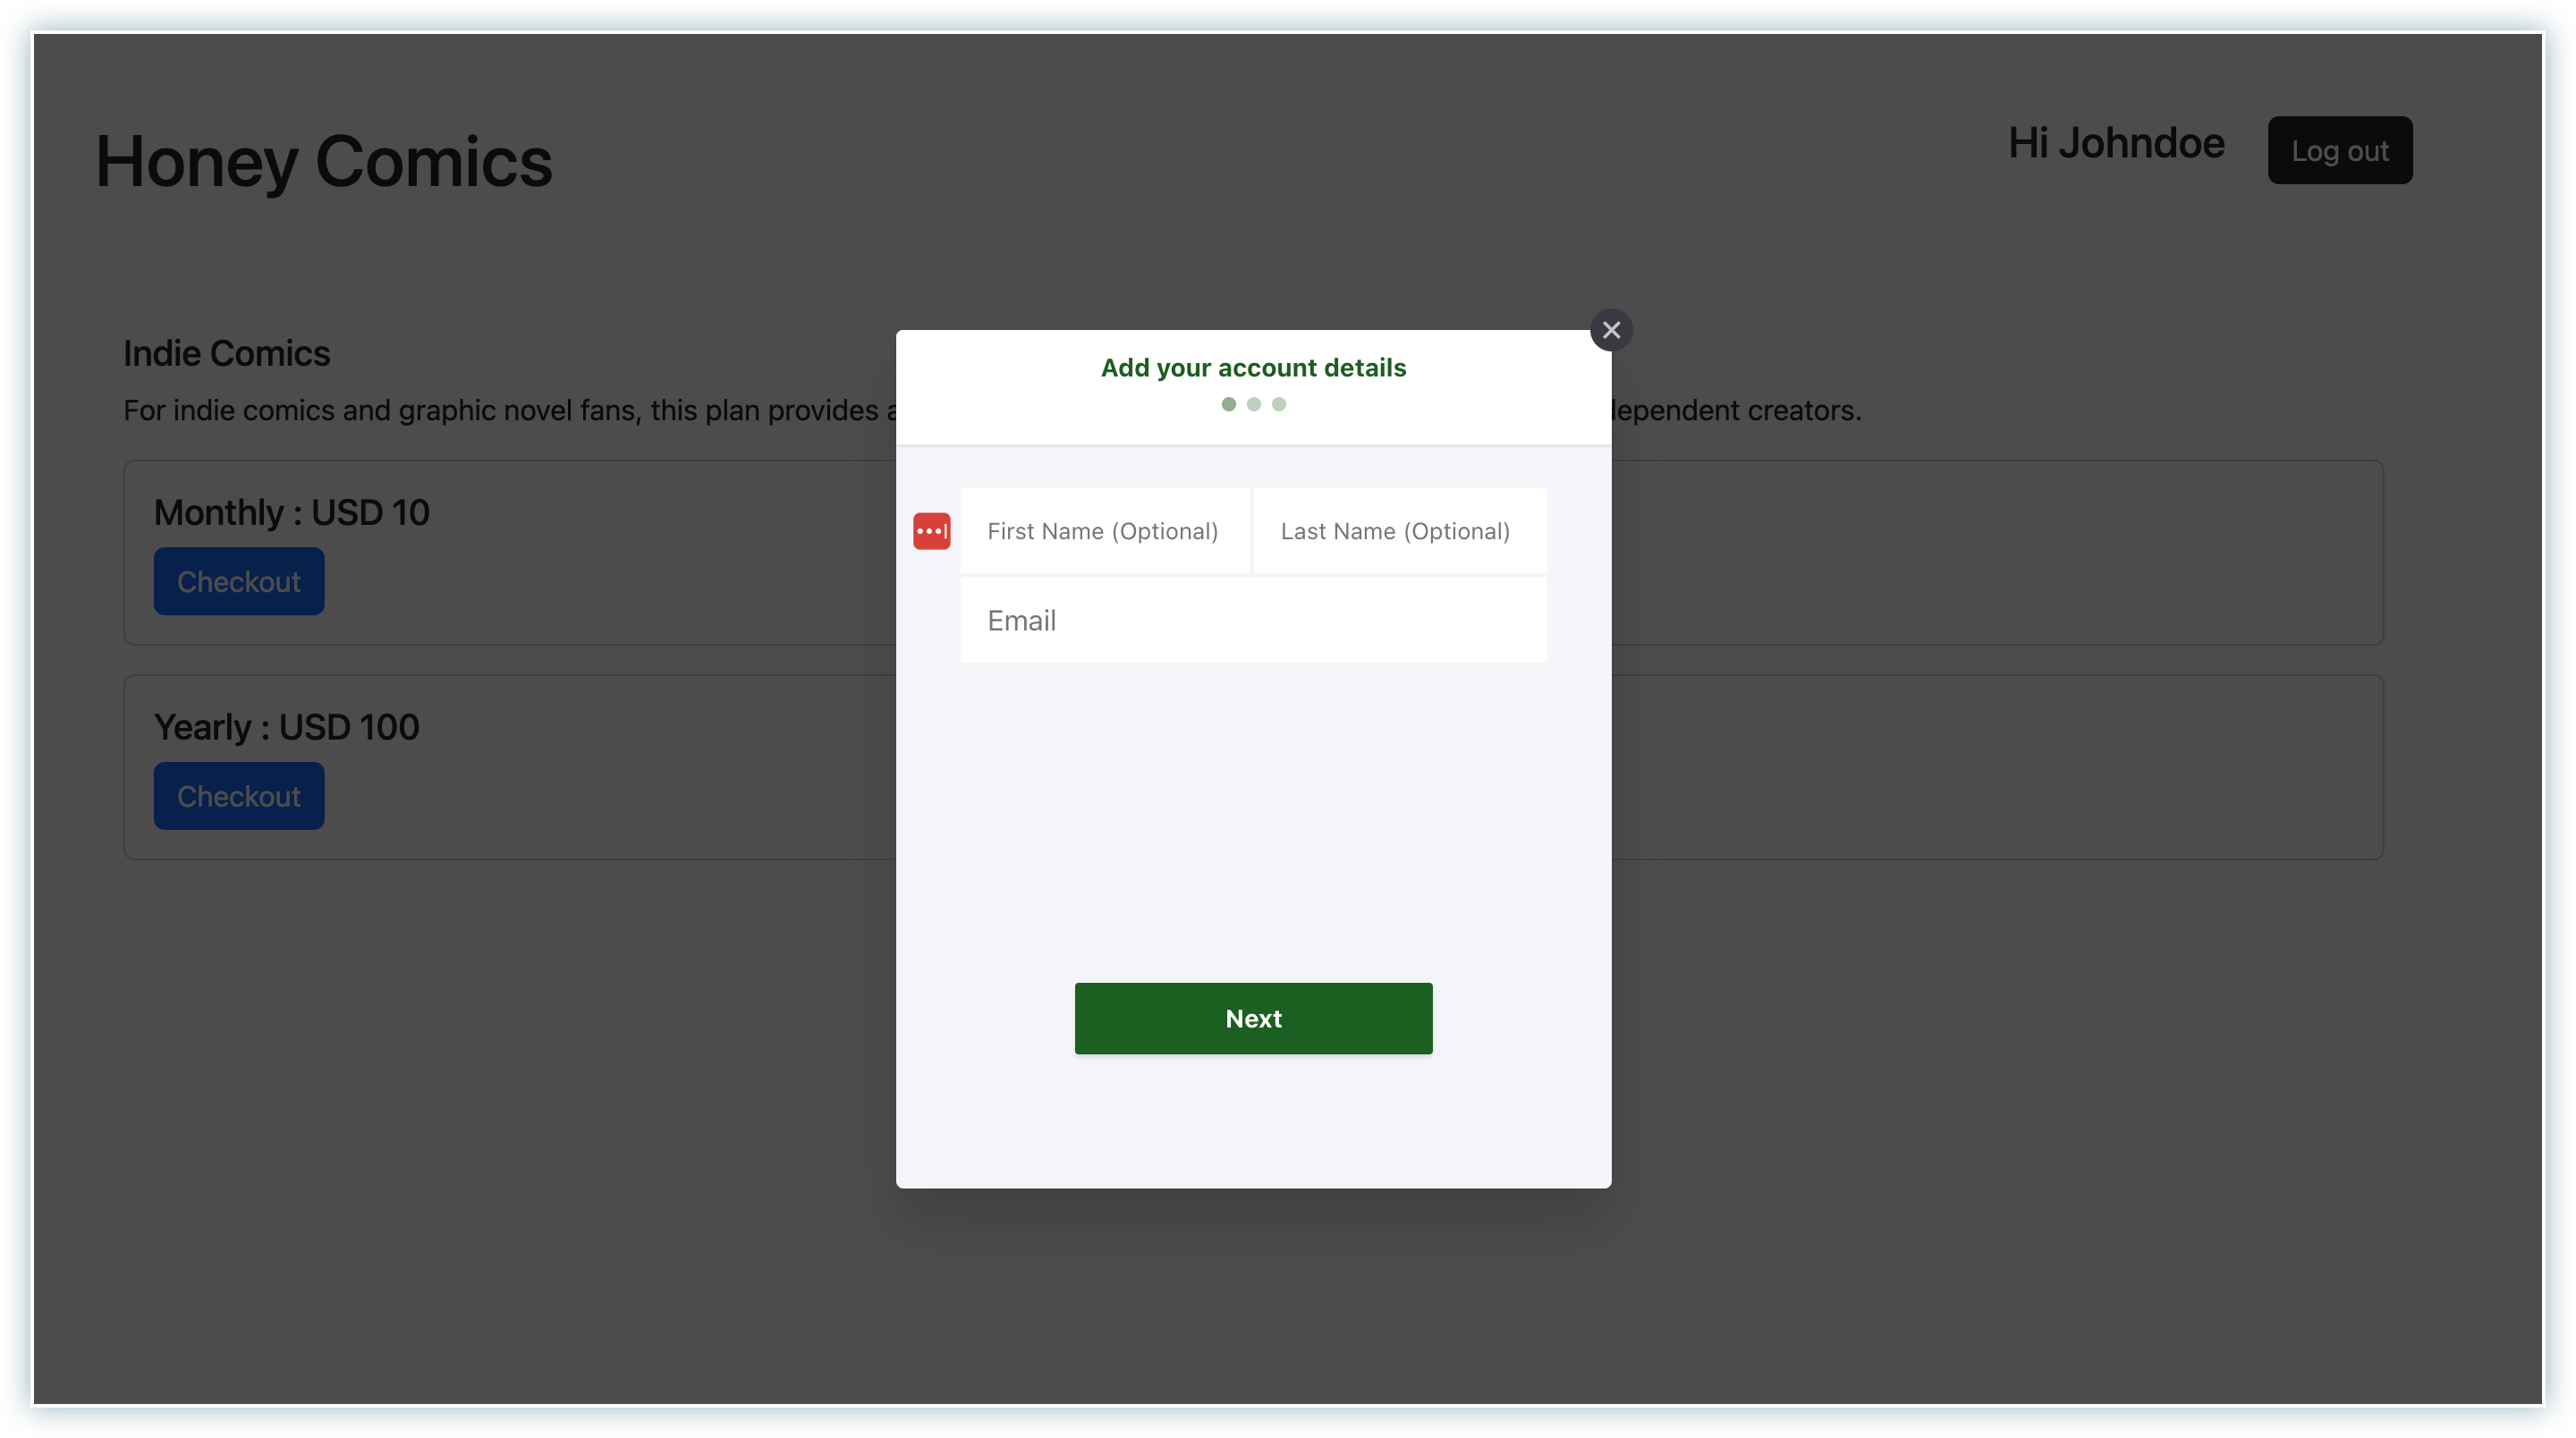
Step 4. Fill in the customer details. This Step only shows up if we don't pass the "customer" object in the Hosted Page API.
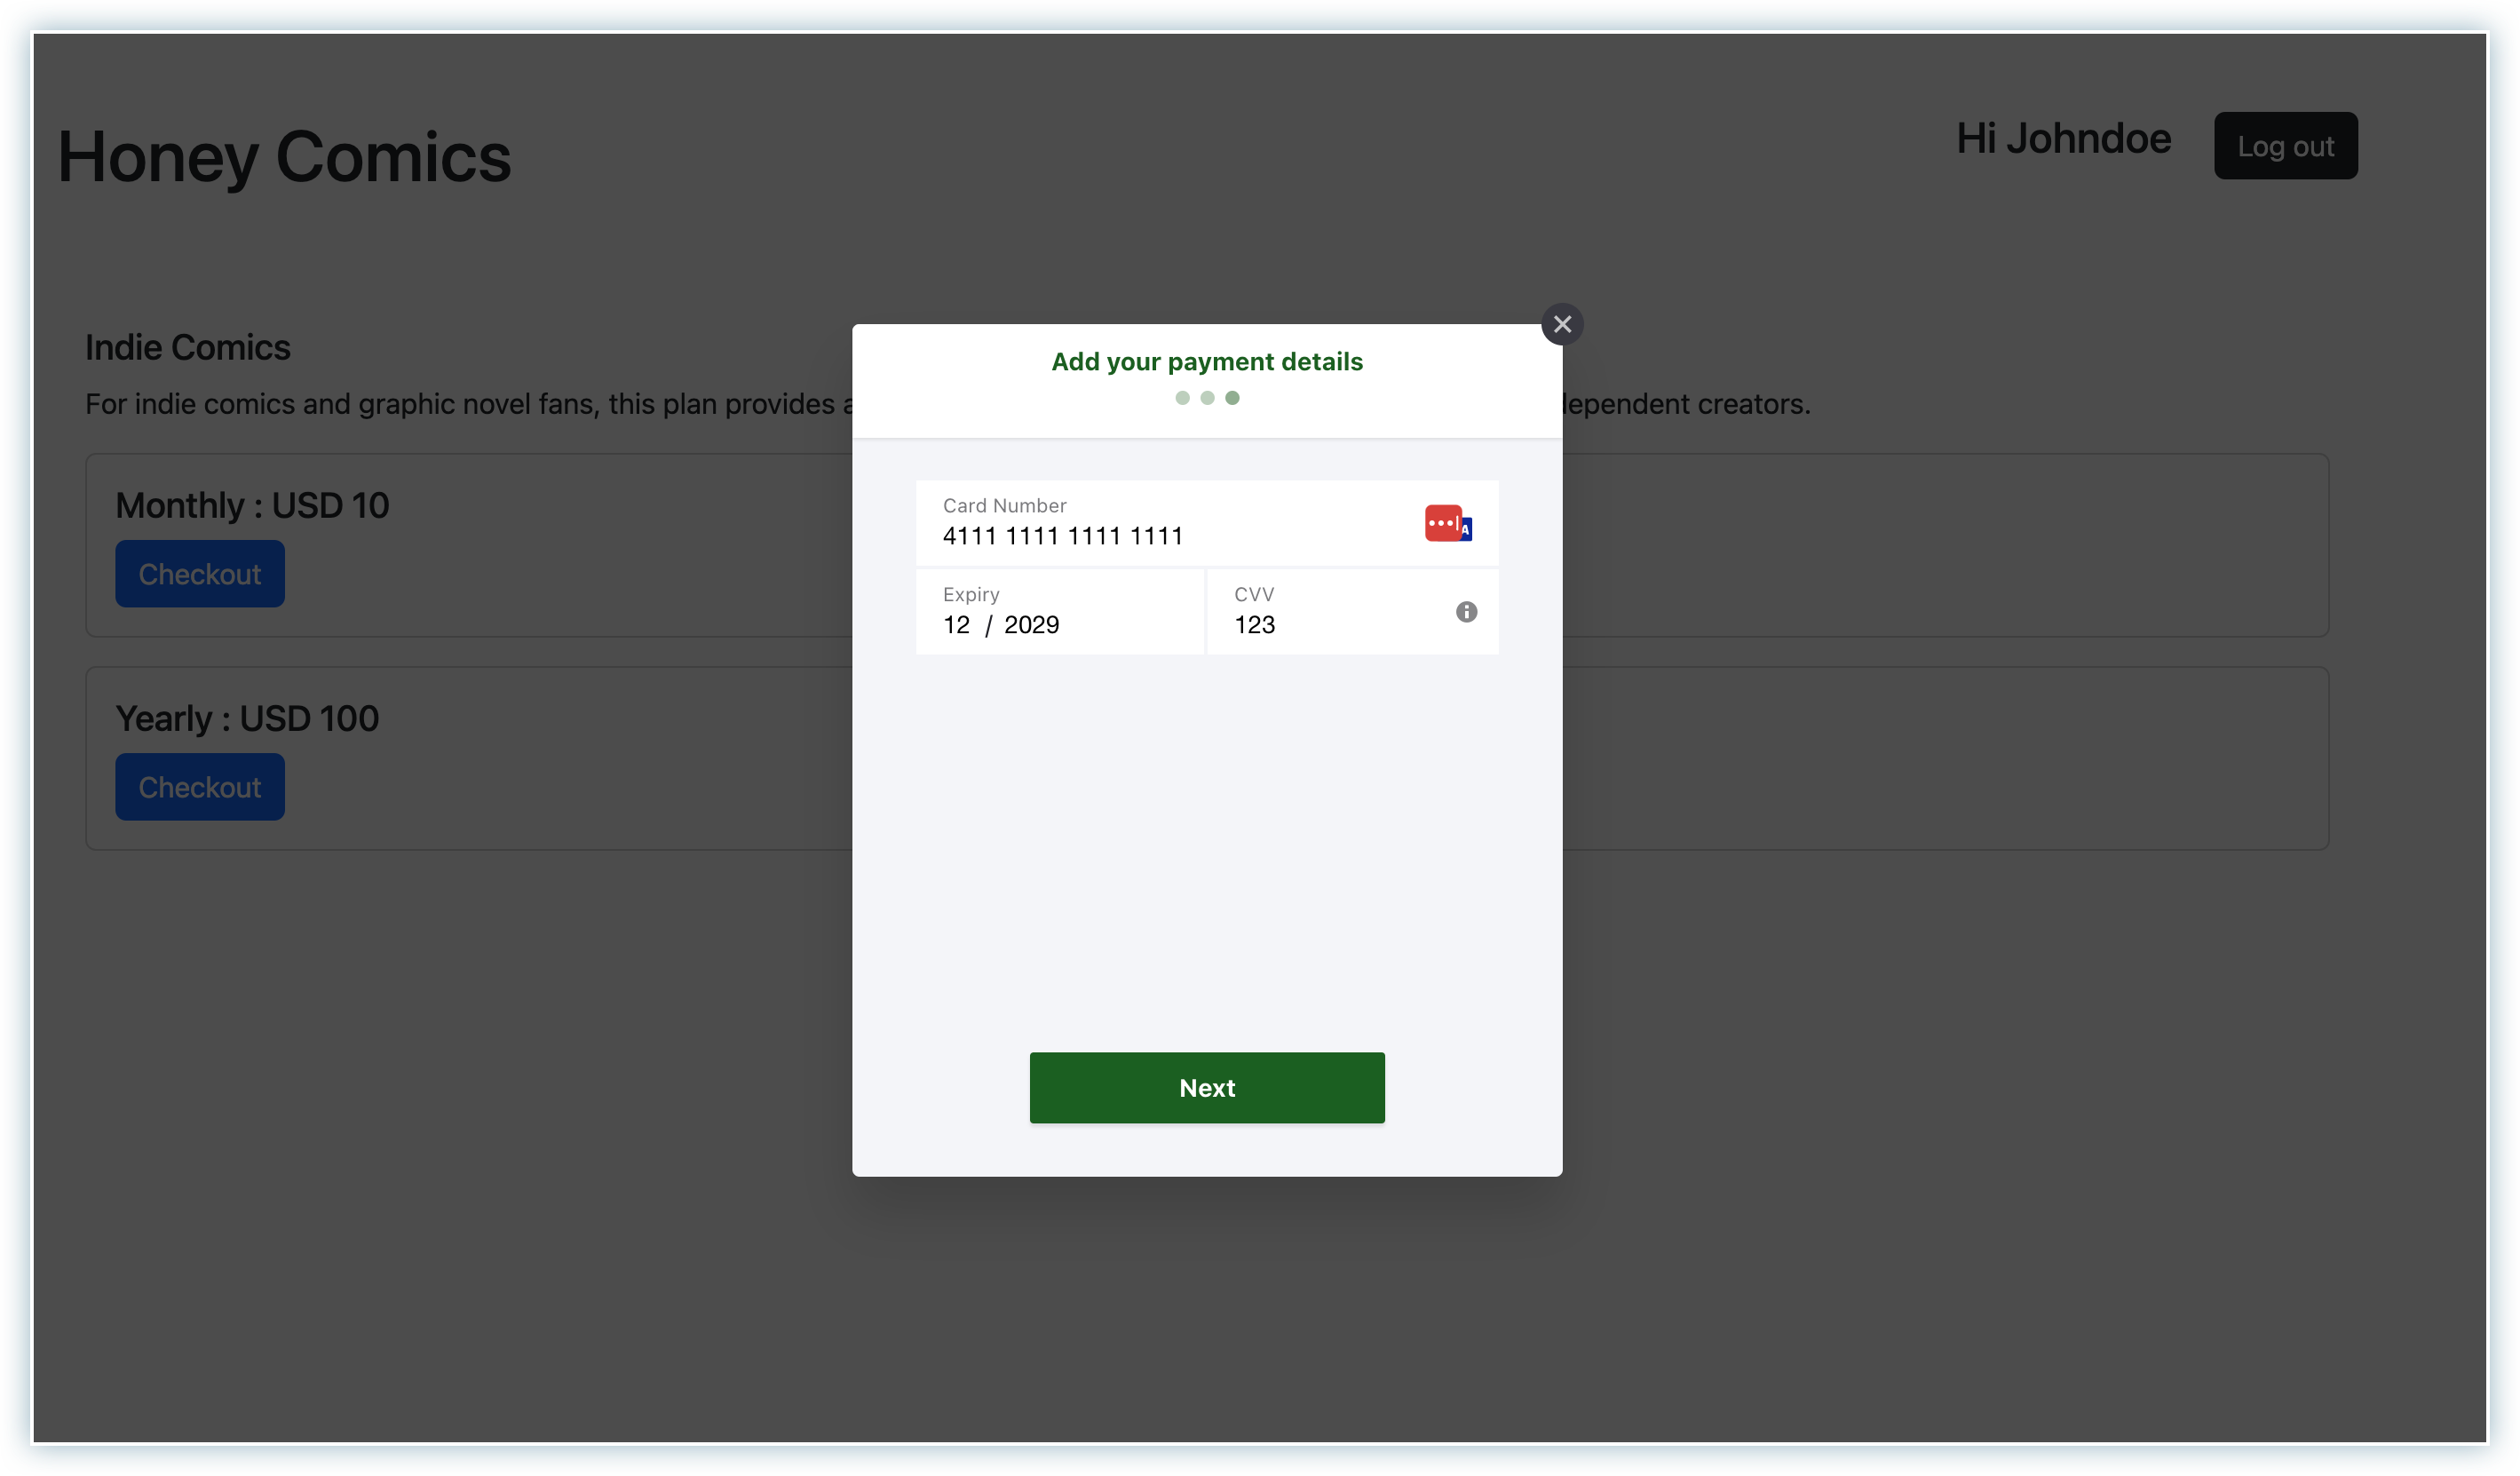
Step 5. Fill in the payment details and click on the Next button.
Step 6. Click on subscribe. We have not implemented any redirection; we will do so later.
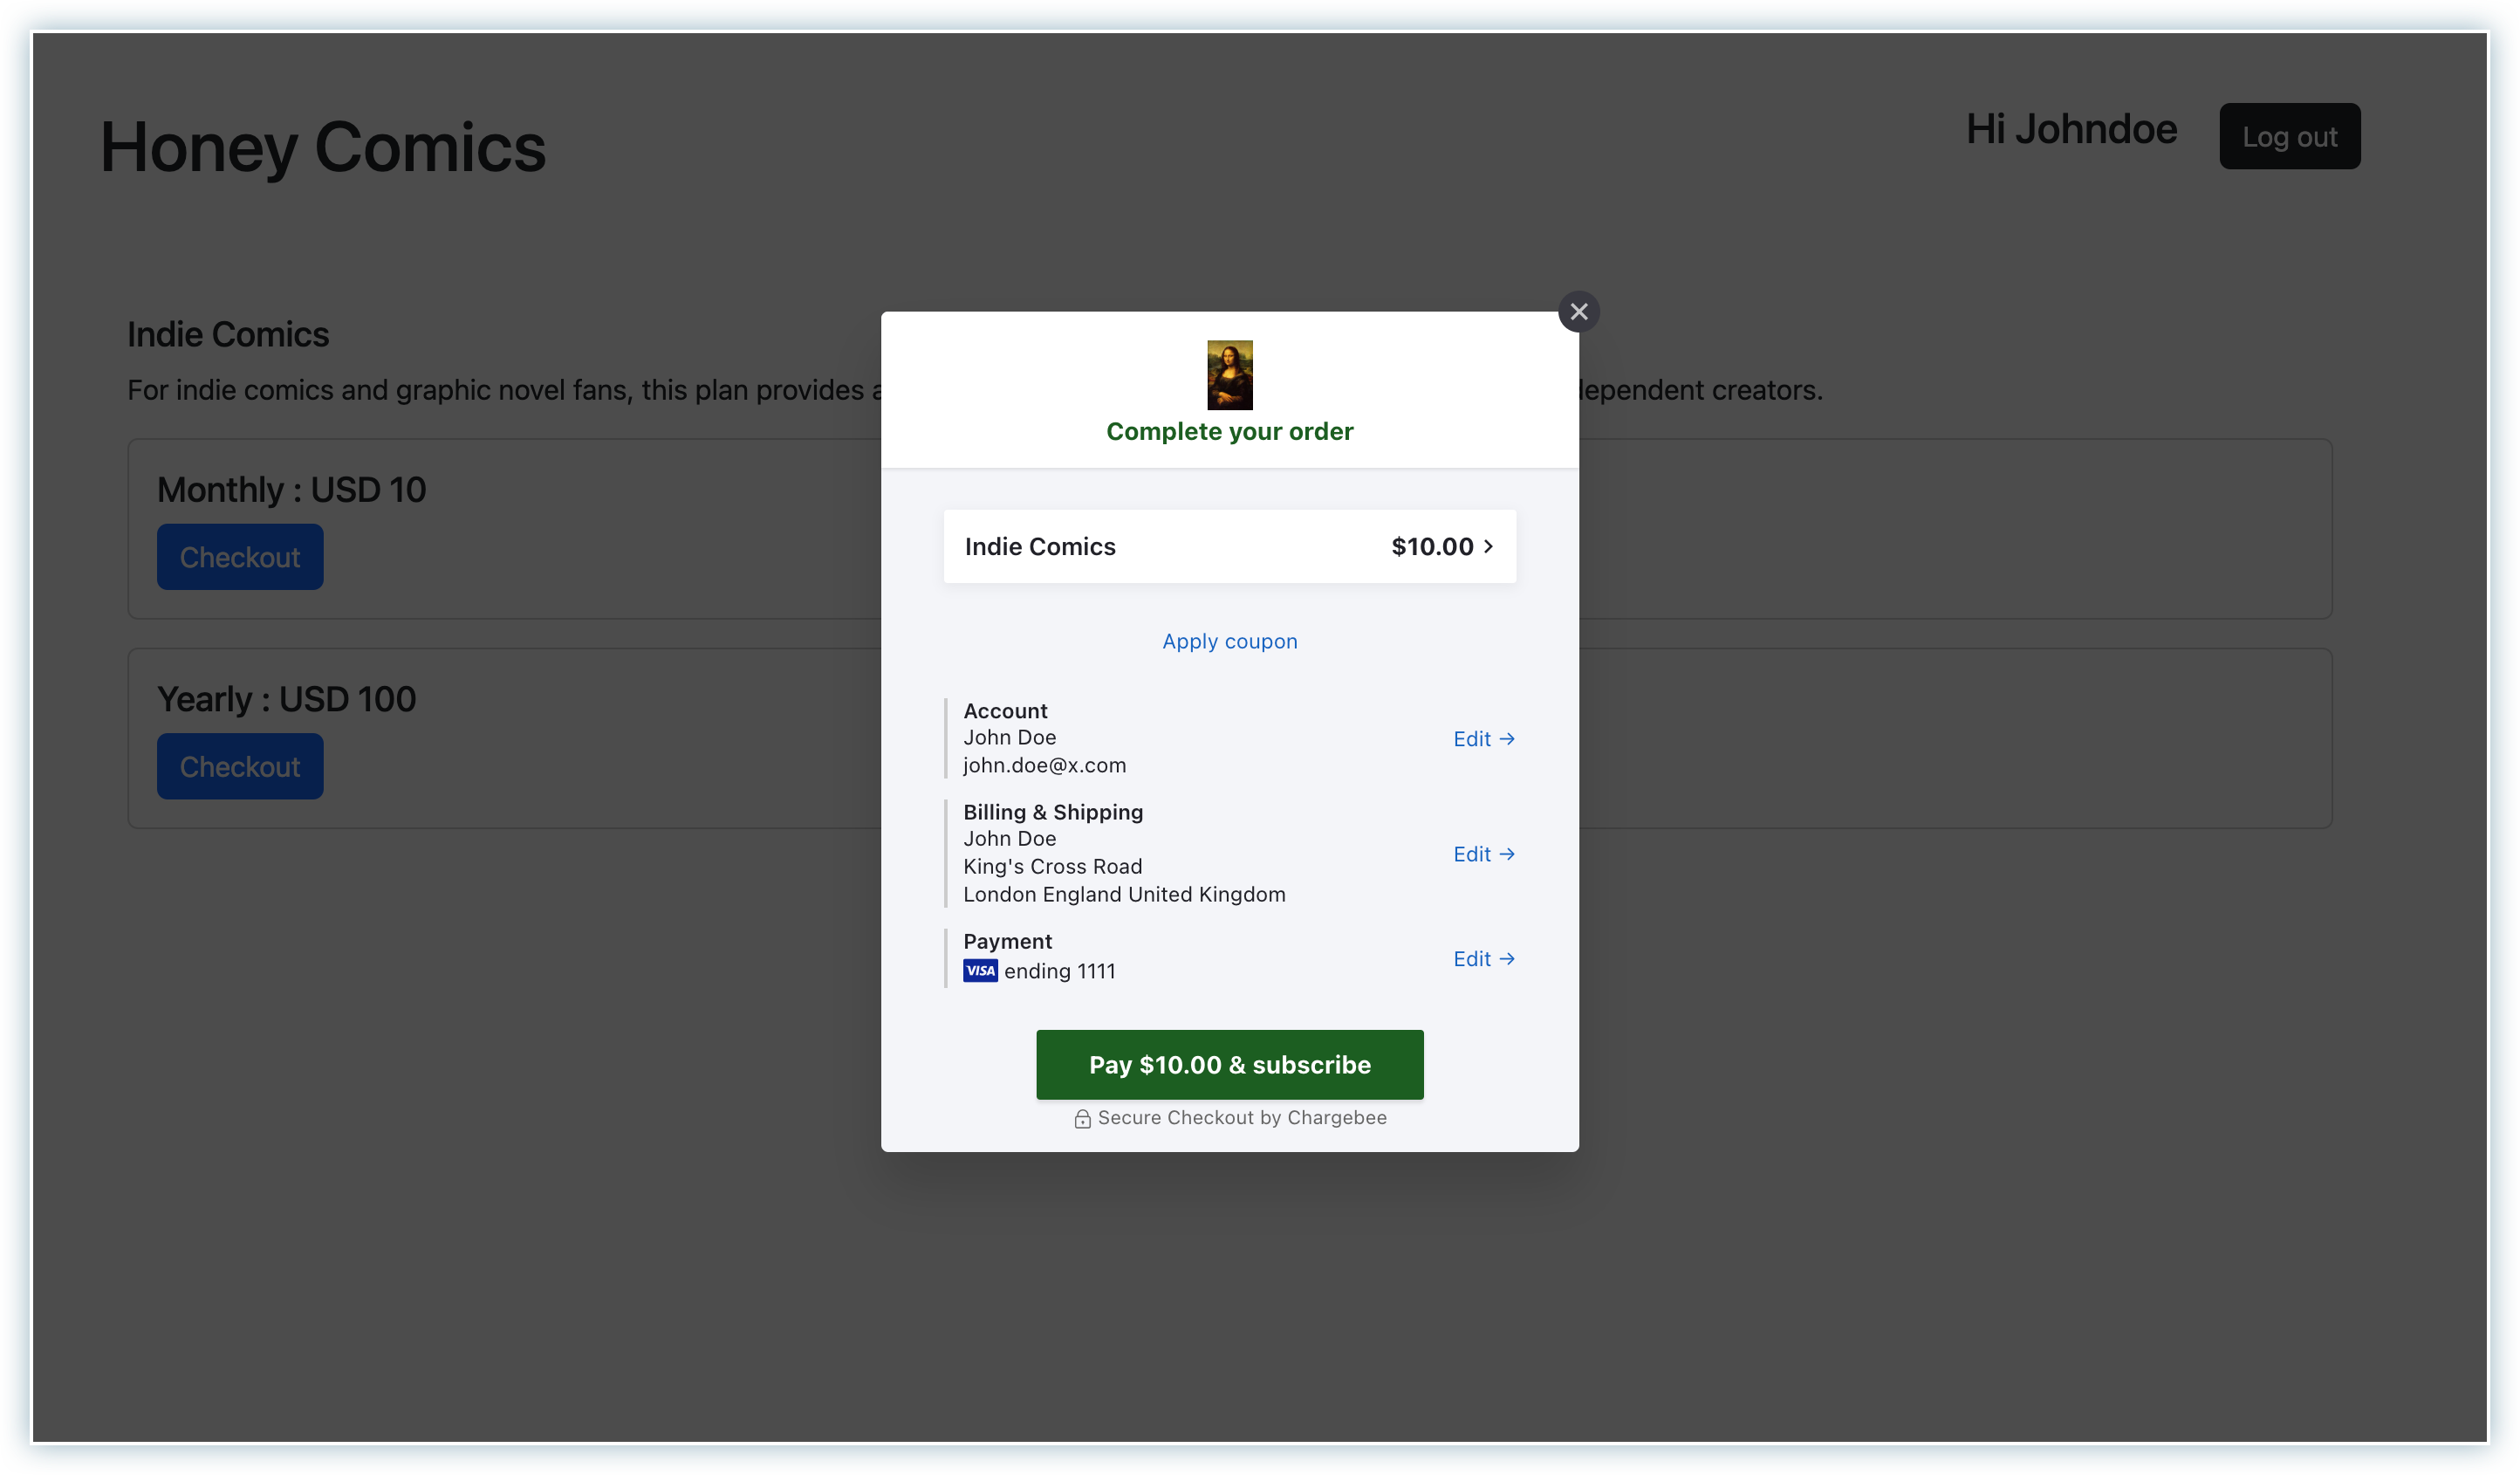
Finally, Go to your Chargebee Account and check the Subscription, and a Customer is created.
Setting up webhooks
When configured, a webhook is used to send out an event notification to your service.
Once configuring the URL, Chargebee will post the event as a JSON to your webhook URL.
Like in our use case, when a "subscription_created" event occurs, then a notification is sent to the specified URL. You can configure webhook alerts to keep track of any events relating to your subscriptions, plans, addons, and coupons.
Follow the steps here to setup Webhook in your Chargebee Account.
We are setting up the webhooks only for Subscription Created events and also not using any authentication for the webhook.
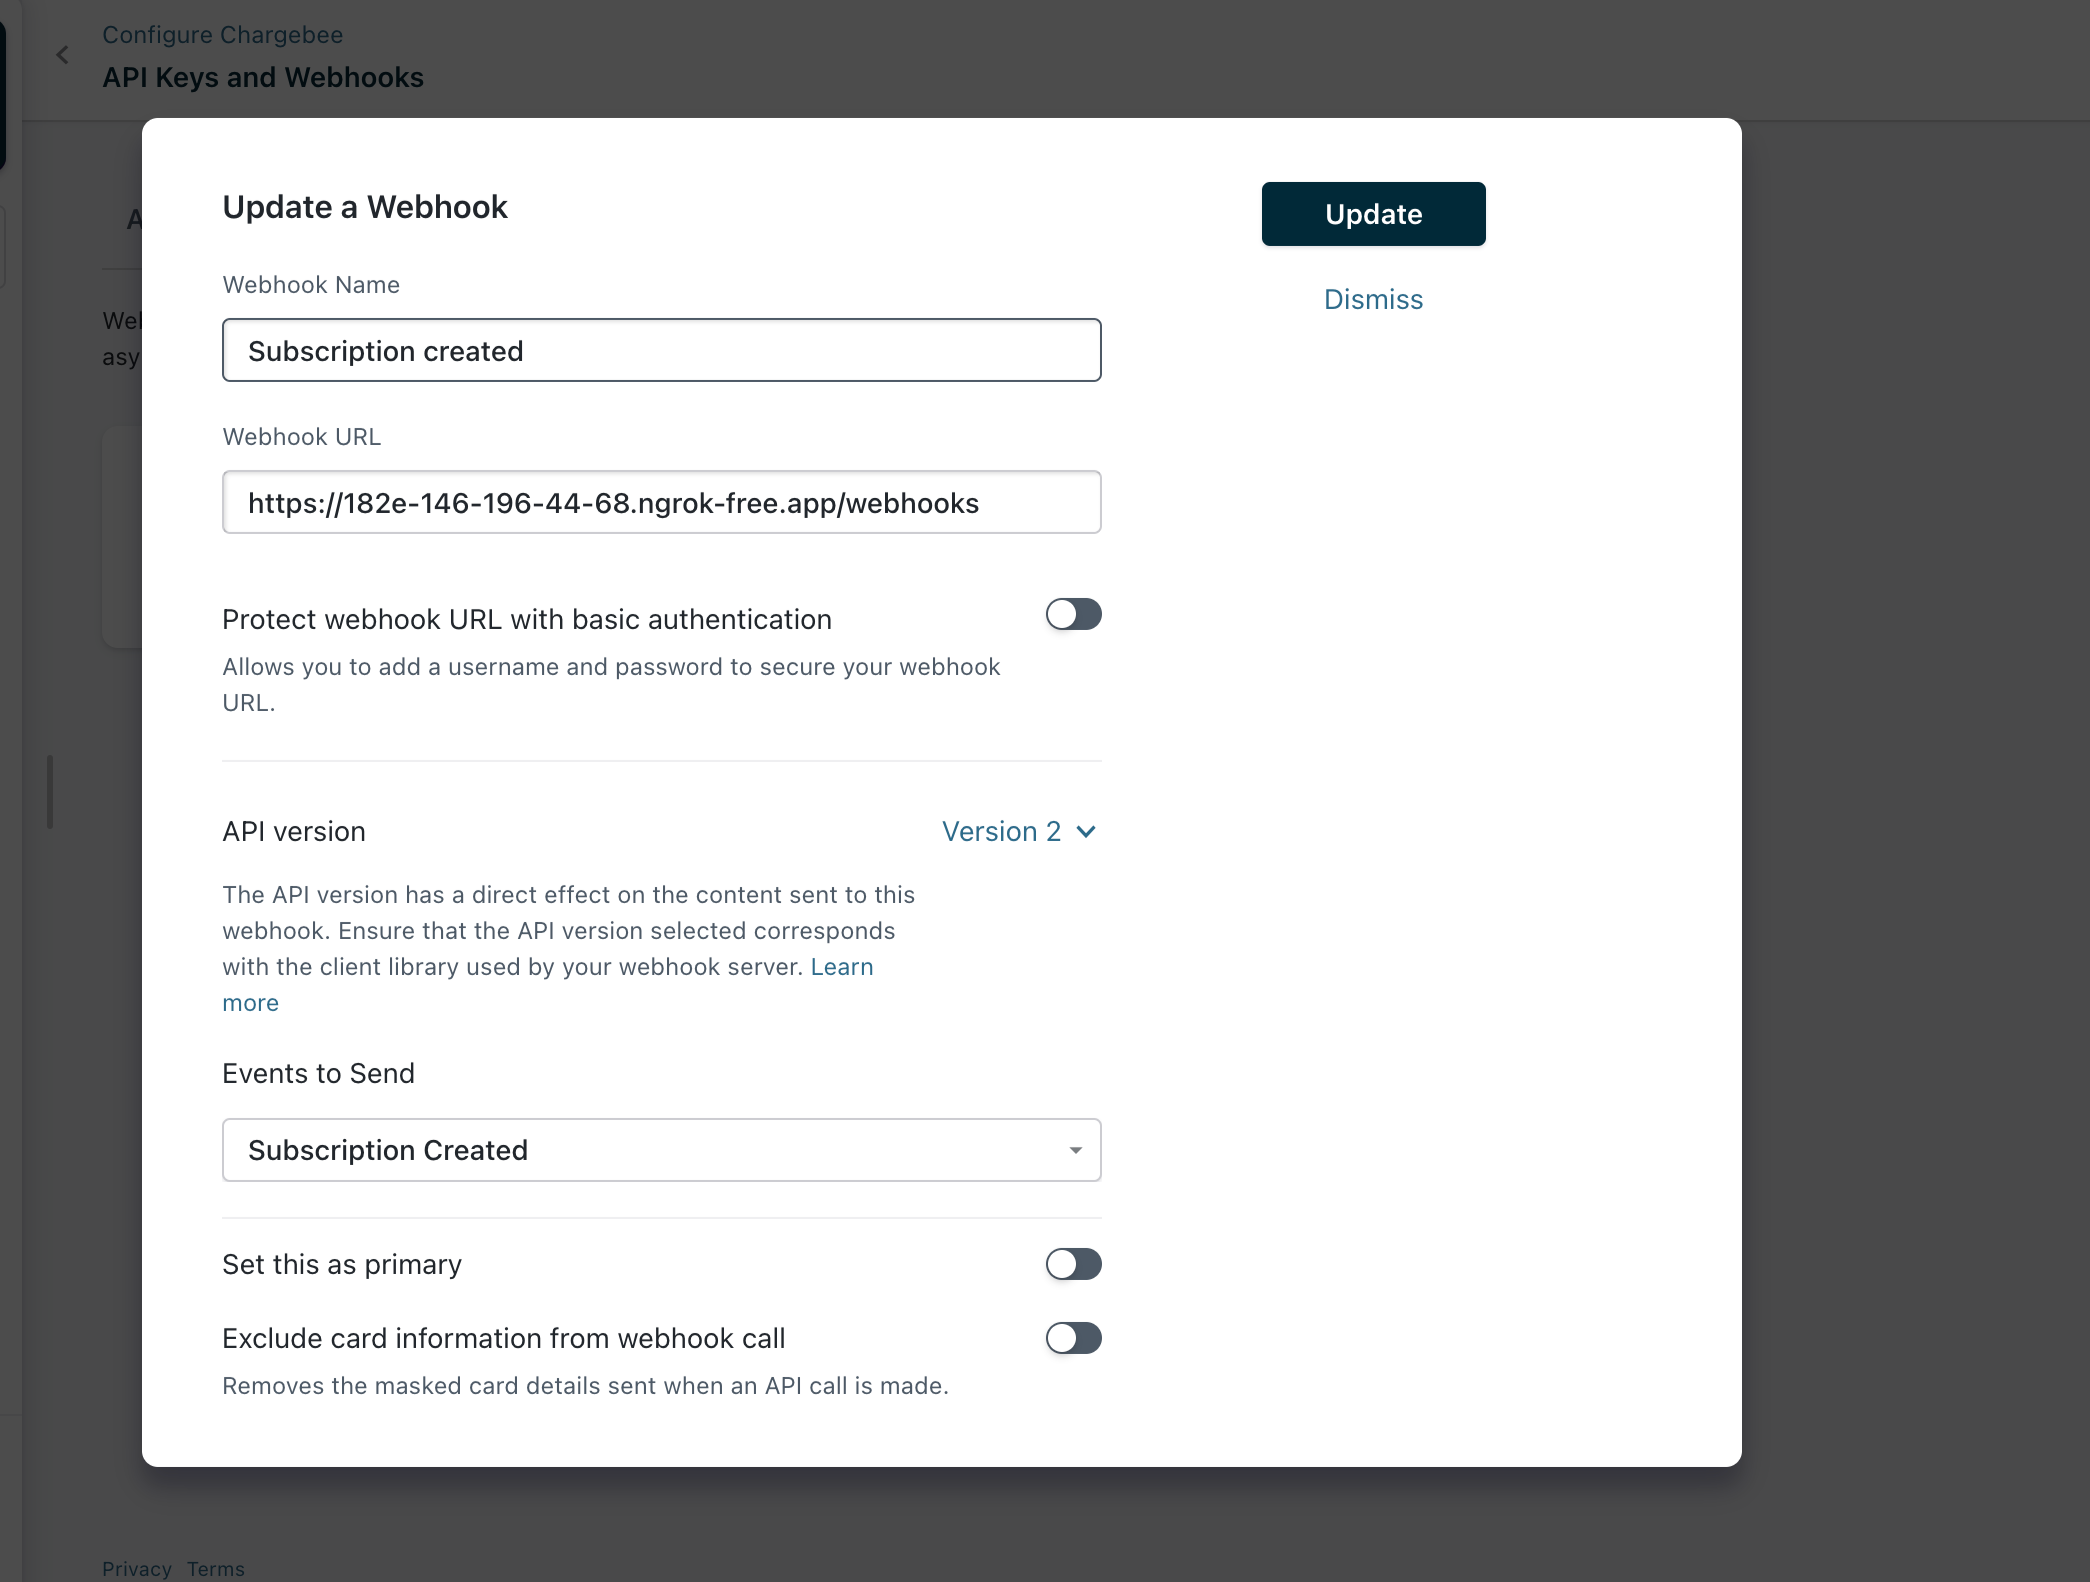
If you run your server locally, you must expose your local server to the internet so Chargebee can send webhook events to your server. To do this, you can use a freemium service like ngrok. Chargebee won't allow the local server.
Also, Chargebee sends webhook events from specific IP addresses. So, we must ensure we only receive such notifications from those IP addresses only.
But, Before Creating View to handle post requests from Chargebee Webhooks, We will create a model Subscription to store the User and their respective subscription based on the received data from the webhook. Update your ../pricing/models.py file
# pricing/models.py

from django.conf import settings
User = settings.AUTH_USER_MODEL


class Subscription(models.Model):
    user = models.ForeignKey(User, on_delete=models.CASCADE)
    subscribed_to = models.ForeignKey(PlanPrice, on_delete=models.CASCADE)

    created_at = models.DateTimeField(auto_now_add=True)
    updated_at = models.DateTimeField(auto_now=True)

    def __str__(self) -> str:
        return f"{self.user.username} {self.subscribed_to.plan.name}"
Run migrations to add the new model to the database
python3 manage.py makemigrations
python3 manage.py migrate
Now, Create View to handle the post request from webhooks.
# pricing/views.py


import json
import chargebee
from .models import Plan, PlanPrice, Subscription
from django.views.generic import View, DetailView, ListView
from django.contrib.auth.mixins import LoginRequiredMixin
from django.http import JsonResponse, HttpResponseForbidden
from django.utils.decorators import method_decorator
from django.views.decorators.csrf import csrf_exempt
from django.contrib.auth.models import User

# US region IP addresses
ALLOWED_IPS = [
    '3.209.65.25',
    '3.215.11.205',
    '3.228.118.137',
    '3.229.12.56',
    '3.230.149.90',
    '3.231.198.174',
    '3.231.48.173',
    '3.233.249.52',
    '18.210.240.138',
    '18.232.249.243',
    '34.195.242.184',
    '34.206.183.55',
    '35.168.199.245',
    '52.203.173.152',
    '52.205.125.34',
    '52.45.227.101',
    '54.158.181.196',
    '54.163.233.122',
    '54.166.107.32',
    '54.84.202.184',
]

@method_decorator(csrf_exempt, name="dispatch")
class WebhookView(View):
    def post(self, request, *args, **kwargs):
        try:
            remote_ip = request.META.get('REMOTE_ADDR', None)
            if remote_ip in ALLOWED_IPS:
                event = json.loads(request.body)
                if event["event_type"] == "subscription_created":
                    content = event["content"]
                    email = content["customer"]["email"]
                    user = User.objects.get(email=email)
                    item_price_id = content["subscription"]["subscription_items"][0]["item_price_id"]
                    item_price = PlanPrice.objects.get(price_id=item_price_id)
                    Subscription.objects.create(user=user, subscribed_to=item_price)
                    return JsonResponse({"status": "success"}, status=200)
                else:
                    print("Unhandled event type")
                    return JsonResponse({"status": "success"}, status=200)
            else:
                return HttpResponseForbidden("Access denied: Request from unauthorized IP.")
        except Exception as e:
            return JsonResponse({"error": str(e)}, status=500)
In the above code, we are only checking for the "subscription_created" event. If the event is "subscription_created", we are extracting the "email" and the "item_price_id" from the received data and creating a new Subscription object and returning a success response.
We use the "csrf_exempt" decorator to exempt the View from the CSRF protection. It will allow us to receive data from Chargebee even if it has no CSRF token.
Also note, we are only allowing the request from the Chargebee IP addresses.
Add the URL configuration for the webhook view in your ../pricing/urls.py file
# pricing/urls.py

from django.urls import path
from .views import WebhookView

app_name = "pricing"

urlpatterns = [
    path("webhooks", WebhookView.as_view()),
]
Note: You will use this URL in the Chargebee Webhook configuration.
Show Subscription View
We will create the SubscriptionView where we will show the User the current Plan he is subscribed to, and if not, then we will deliver a message to subscribe to any plan. We will also use this to redirect to user after the checkout is completed successfully. Update your ../pricing/views.py file
class SubscriptionView(LoginRequiredMixin, ListView):
    model = Subscription
    template_name = 'pricing/subscription.html'
    context_object_name = 'subscription'

    def get_context_data(self, **kwargs):
        context = super().get_context_data(**kwargs)
        context['subscription'] = Subscription.objects.filter(user=self.request.user).order_by('-created_at').first()
        return context
In your ../pricing/urls.py file
# pricing/urls.py

from .views import SubscriptionView

app_name = "pricing"

urlpatterns = [
    path("subscription", SubscriptionView.as_view(), name="subscription"),
]
Update your ../pricing/static/pricing/checkout.js file to redirect the User to the Subscription page after the checkout is completed successfully.
success: function (hostedPageId) {
window.location.replace("http://localhost:8000/subscription"); // new
}
Finally, create the subscription.html file under the pricing/templates/pricing/templates directory,
<!-- ../pricing/templates/pricing/subscription.html -->

{% extends "base.html" %} {% block title %} Success {% endblock title%} {% block content %}
<div class="alert alert-success my-5" role="alert">
  {% if subscription %} Thanks for subscribing! You are subscribed to
  <strong>{{ subscription.subscribed_to }}</strong> {% else %} Please subscribe to any
  <a href="{% url 'pricing:plans' %}"> plans</a>
  {% endif %}
</div>
{% endblock content %}
Conclusion
Congratulations! You have successfully navigated the integration of Chargebee's Hosted Page Checkout into your Django web application. Thank you for joining us on this journey. We hope you've learned something and are excited to see what you build next.
Happy Coding and subscription management!
Refer the Github repo for complete code.
We're always happy to help you with any questions you might have!
support@chargebee.com