Managing Plays
Overview
The Plays module in Chargebee Growth allows you to view and create plays based on the play objective, such as Acquisition, Expansion, and Retention. You can navigate to each of these pages to review existing plays and set up new ones to engage specific audience segments based on your business goals. Each play includes key details such as its name, type, and performance metrics, helping you track effectiveness and optimise for better results.
Prerequisites
Before creating and managing Plays in Chargebee Growth, ensure the following prerequisites are met:
- You have completed Growth installation with the appropriate integration method.
- If you are an existing Retention customer, you need to be migrated to Chargebee Growth to experience Plays.
Creating a Play
To create a new Play on your Growth site, follow these steps:
- Navigate to the Plays module and select Acquisition, Expansion, or Retention based on the objective of the Play that you are creating.

- The Plays page allows you to view all your existing plays and create new ones. Click + Create New Play.
- On the Choose Play Type pop-up, select your preferred play type based on your requirements. The play types displayed for selection differ based on the objective of the play. Once you select your preferred Play Type, click Proceed. You will be taken to the play builder screen to set up the play further.

- Under Choose your Audience, define the target audience for whom you want to deploy the play. Click the dropdown to select any existing audience segment, or create a new segment for this play.

You can simply enable the toggle icon to Target all subscribers for the play.

Once you’re done, move to the trigger step. Targeting all subscribers will bypass any audience rules and let any subscriber who sees the play enter the play targeting logic.
Note
Trigger configurations are applicable only if you select the Play type to be In-app Offer. Or click Targeting & Experimentation and refer to Step 6.
- Under Select Trigger, choose when you want to display the offer. You can select from the following options:
- Any Page Load: Select this option to trigger the play when a customer visits any page of your application/site.
- Custom Page Load: Select this option to trigger the play when a customer visits a specific page. You can further specify the page URL on which the play should get triggered. Once you select your preferred trigger, click Targeting & Experimentation.

Note
Contact Support if you’d like to see any specific triggers based on your business requirements.
- Under Targeting & Experimentation, review your audience and trigger conditions (if applicable).

a. Under Control, you can optionally select a subset percentage of your audience as control, and select a different offer to be displayed to the control group. You can even add a control group to exclude a portion of the eligible audience from entering the play targeting. b. Under Actions, you can define your offer targeting strategy for the play. You can select from the following options:
- Simple actions: Select this option to present a simple offer or pricing table, or a cancel page to all subscribers in your target audience for the play.

- Test actions: Select this option to run a test to evaluate different offers, pricing tables, cancel page variants and understand which one works best for your subscribers. By default, Growth displays two variants, but you could add additional variants to test. For example, you can run the A/B testing by distributing your play traffic to each variant equally. This way, Variant 1 is displayed to 50% of your target audience, and Variant 2 is displayed to the other 50% of your target audience. You can customise this split % and the number of variants based on your business requirements.

- Add Sub-Audience: Select this option to personalise what you show for each subscriber cohort within your play's target audience.
- Under Sub-audiences, select the target sub-audience using the dropdown, or you can even create a new sub-audience and select the desired offer, pricing table, or cancel page to be displayed for each sub-audience as required.
- Click Add Sub-audience to add more subscriber cohorts within your play's target audience and choose corresponding offers, pricing tables, or cancel pages for them.
- You need to specify a fallback option when configuring a sub audience to handle subscribers who do not match any of the sub audience criteria.
Once you’re done, click Review & Publish.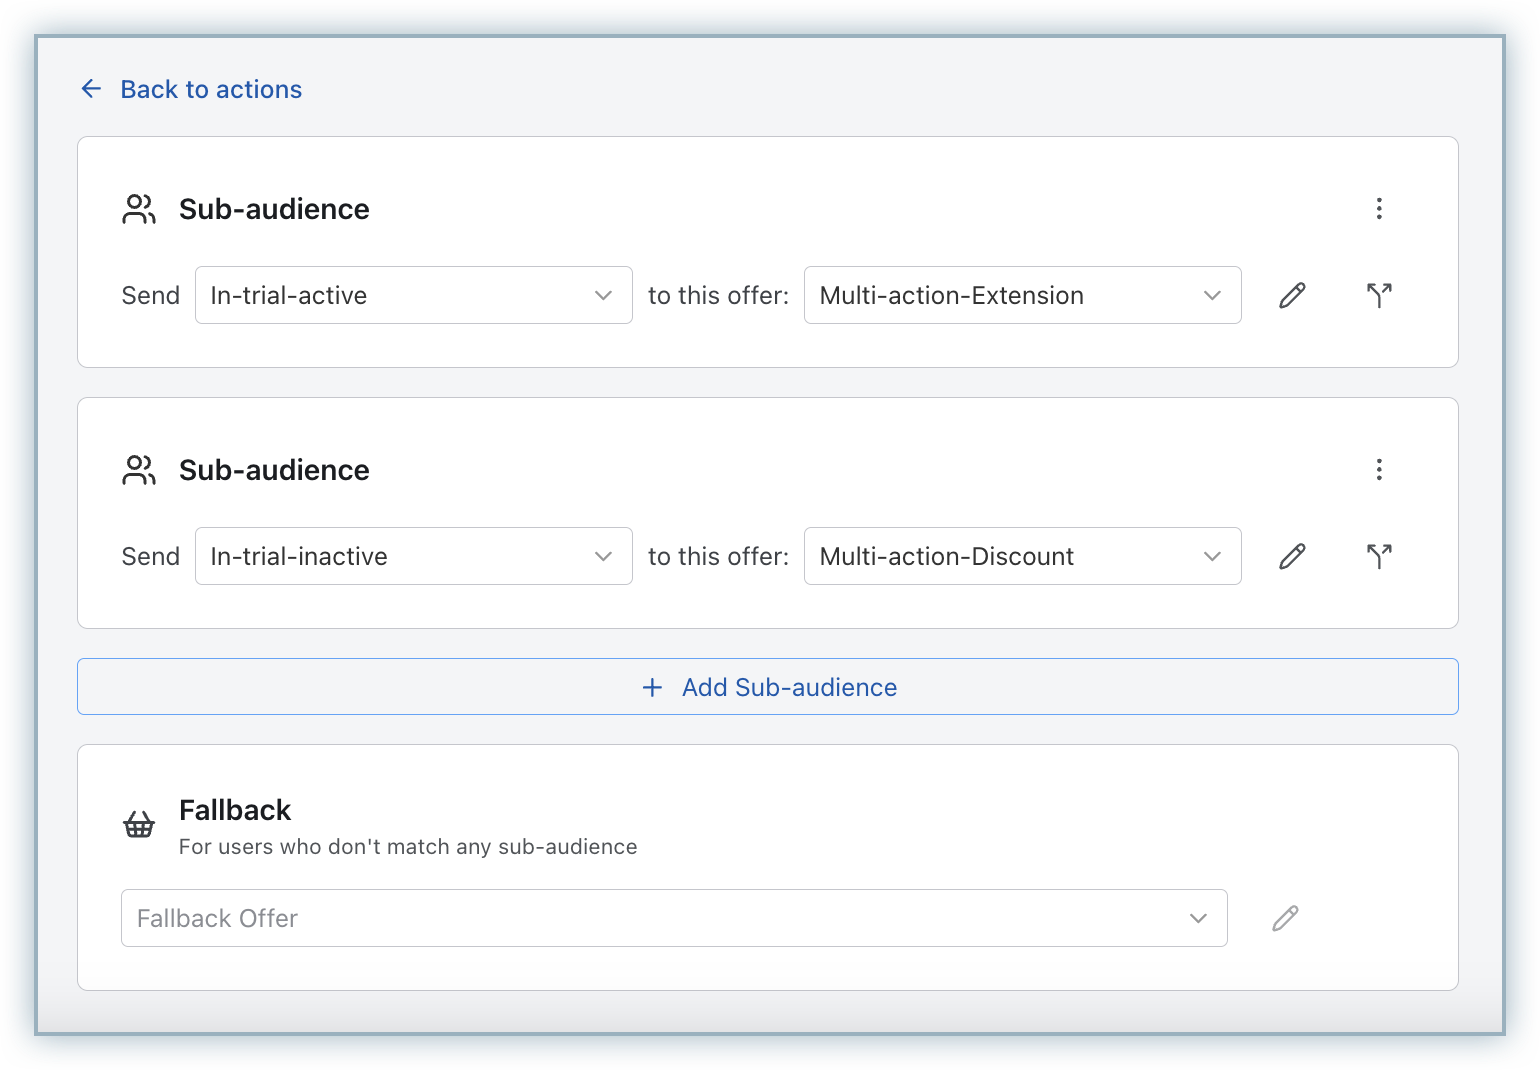
- Under Review & Publish, review the key details of the play and make changes if required.
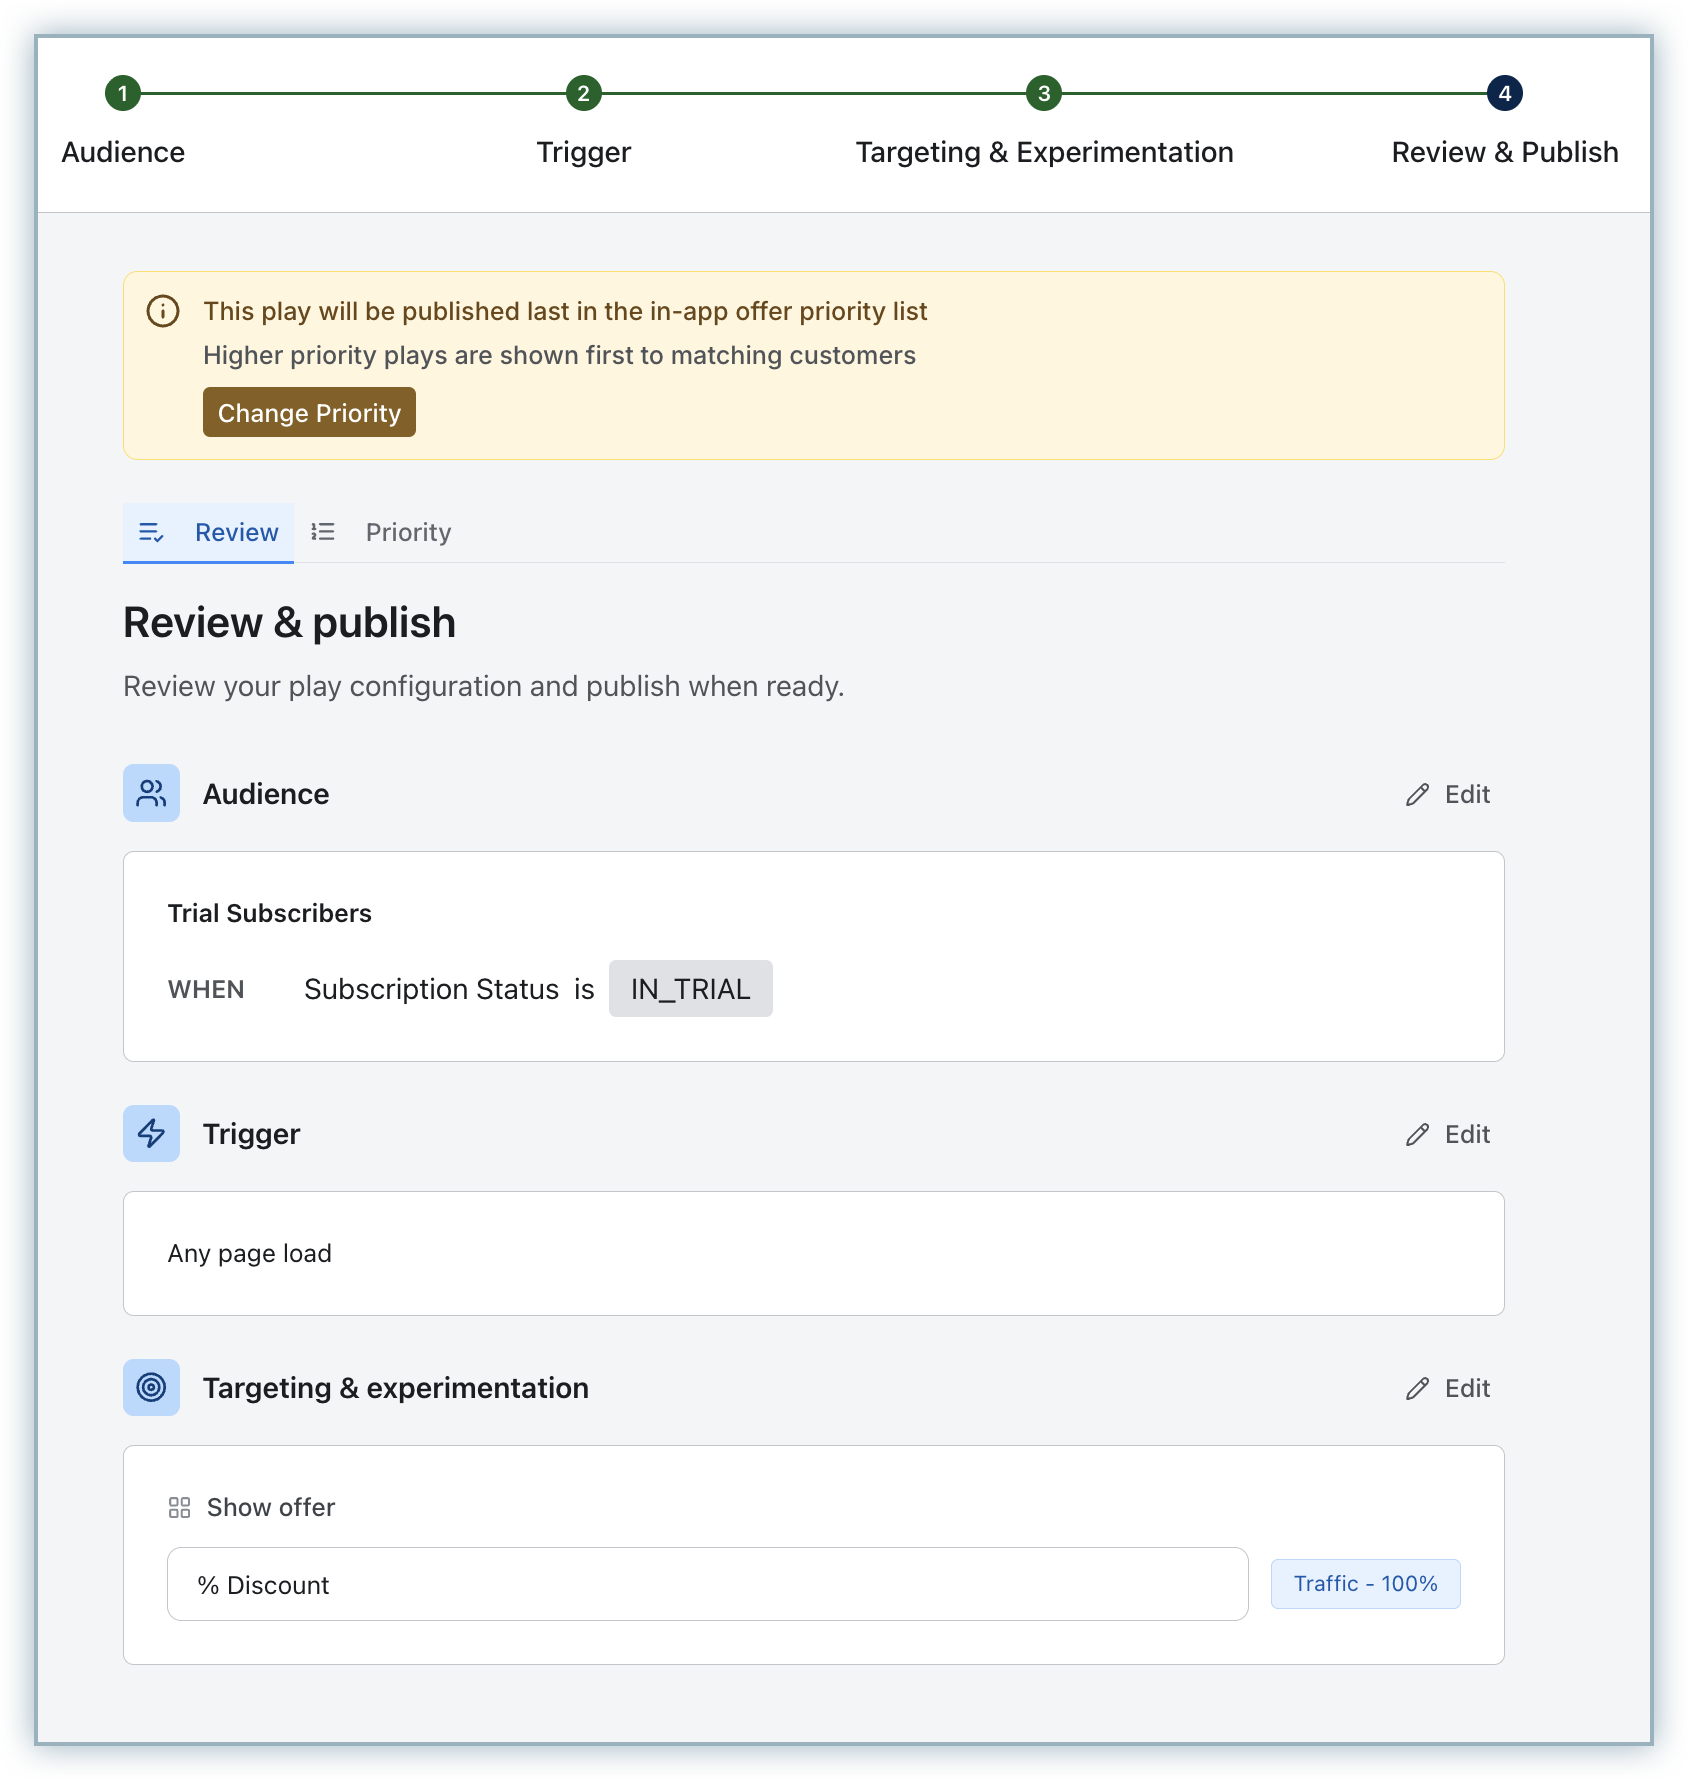
- Play Priority: The current play that you are creating will be published within the respective category, as the last item under the priority list by default. Click Change Priority to update the priority for the play, based on which it is displayed to the relevant audience.
- Click Publish Play to go live with the play, or click Save Draft to save your play updates thus far and revisit later. You have successfully created a play.

Editing a Play
You can edit your plays at any point in time, regardless of their status, to make changes as and when required. Editing a play overrides the existing live version of the play. What you can edit in a Play depends on whether the play is in draft or live version.
- You can edit any configuration for plays that are in draft mode and have not yet been launched. You can make any number of changes and save it as a draft which will overwrite the existing draft. Once you're ready to go live, can choose the Publish the play option which will move the draft play to live.
- You can only edit the targeting section for a live play. When you edit a live play, Growth sets up both live and draft versions allowing you to switch between the two and compare the versions. The unpublished changes can be saved as draft without affecting the live version. Once the changes are published, the draft version is merged with live which gets updated/published. If there are any pages / offers / pricing tables in draft mode, they are automatically published along with the play.
To edit an existing play in your Growth site, follow these steps:
- Navigate to the Plays module and select Acquisition/Expansion/Retention, where all your existing plays are listed.
- Click to open the play that you want to edit. You can also click the Ellipsis icon next to the Play Status and click Edit.

- You will be redirected to the play builder screen, where you can make necessary changes to the play targeting, swap out/replace low-performing offers, or simply change the play's name.
- Once you're done, click Save Changes to go live with your updates. You can optionally save the changes as a draft and choose to publish your changes later without affecting your live version.
Duplicating a Play
Without having to create a new play from scratch each time, you can simply duplicate an existing play to create a clone of it and make necessary changes. To duplicate an existing play in your Growth site, follow these steps:
- Navigate to the Plays module and select Acquisition/Expansion/Retention, where all your existing plays are listed.
- Navigate to an existing play that you want to clone and click the Ellipsis icon next to the Play Status, and click Duplicate.

- You will be redirected to the play builder screen, where the play properties are cloned from the previous play. Edit the Play Name and make necessary changes to the play properties as required.
- Once you're done, click Publish Play to go live with your new play.
Activating/Deactivating a Play
To activate/deactivate a play in your Growth site, follow these steps:
- Navigate to the Plays module and select Acquisition/Expansion/Retention, where all your existing plays are listed.
- Click the Active drop-down under the Status column and select Active/Inactive for each play record.

Marking a play Inactive will make it ineligible for the target audience segment. At any point in time, you may choose to reactivate the play using the same toggle if you want to make the play eligible again for the target audience segment.
Changing Play Priority
You might have multiple offers targeting the same audience segments at any given time. To resolve any conflicts, you can choose the prioritization for Plays based on which they are displayed to the relevant audience.

Play priority is specific to each play type. You can prioritize plays within each play type, but not across different types. For example, you can prioritize an in-app offer play over another in-app offer play, but you cannot prioritize an in-app offer play over a pricing table play.
To update the priority for plays in your Growth site, follow these steps:
- Navigate to the Plays module and select Acquisition/Expansion/Retention, where all your existing plays are listed.
- Use the Cancel Page, In-app Offer, and Pricing Table tabs to switch between the play types.
- The listing within each tab depicts the order of priority for all active and inactive plays within the selected type.
- Simply drag and drop the plays using the handles available at the start of each row. Moving a play higher up in the priority will ensure that it gets displayed earlier than other lower-priority plays.
- Click Save Priority to save your play prioritization.
Archiving a Play
You can archive plays in your Chargebee Growth site at any point in time to declutter your play management pages. To archive a play, follow these steps:
- Navigate to the Plays module and select Acquisition/Expansion/Retention, where all your existing plays are listed.
- Click the ellipsis icon next to the play and select the Archive option in the menu
When a play is archived, it is automatically deactivated and moved to the Archive section within the respective play management module. To unarchive the play, go to the desired play within the Archive section and choose Unarchive. The selected play will be unarchived in a deactivated state.
Was this article helpful?